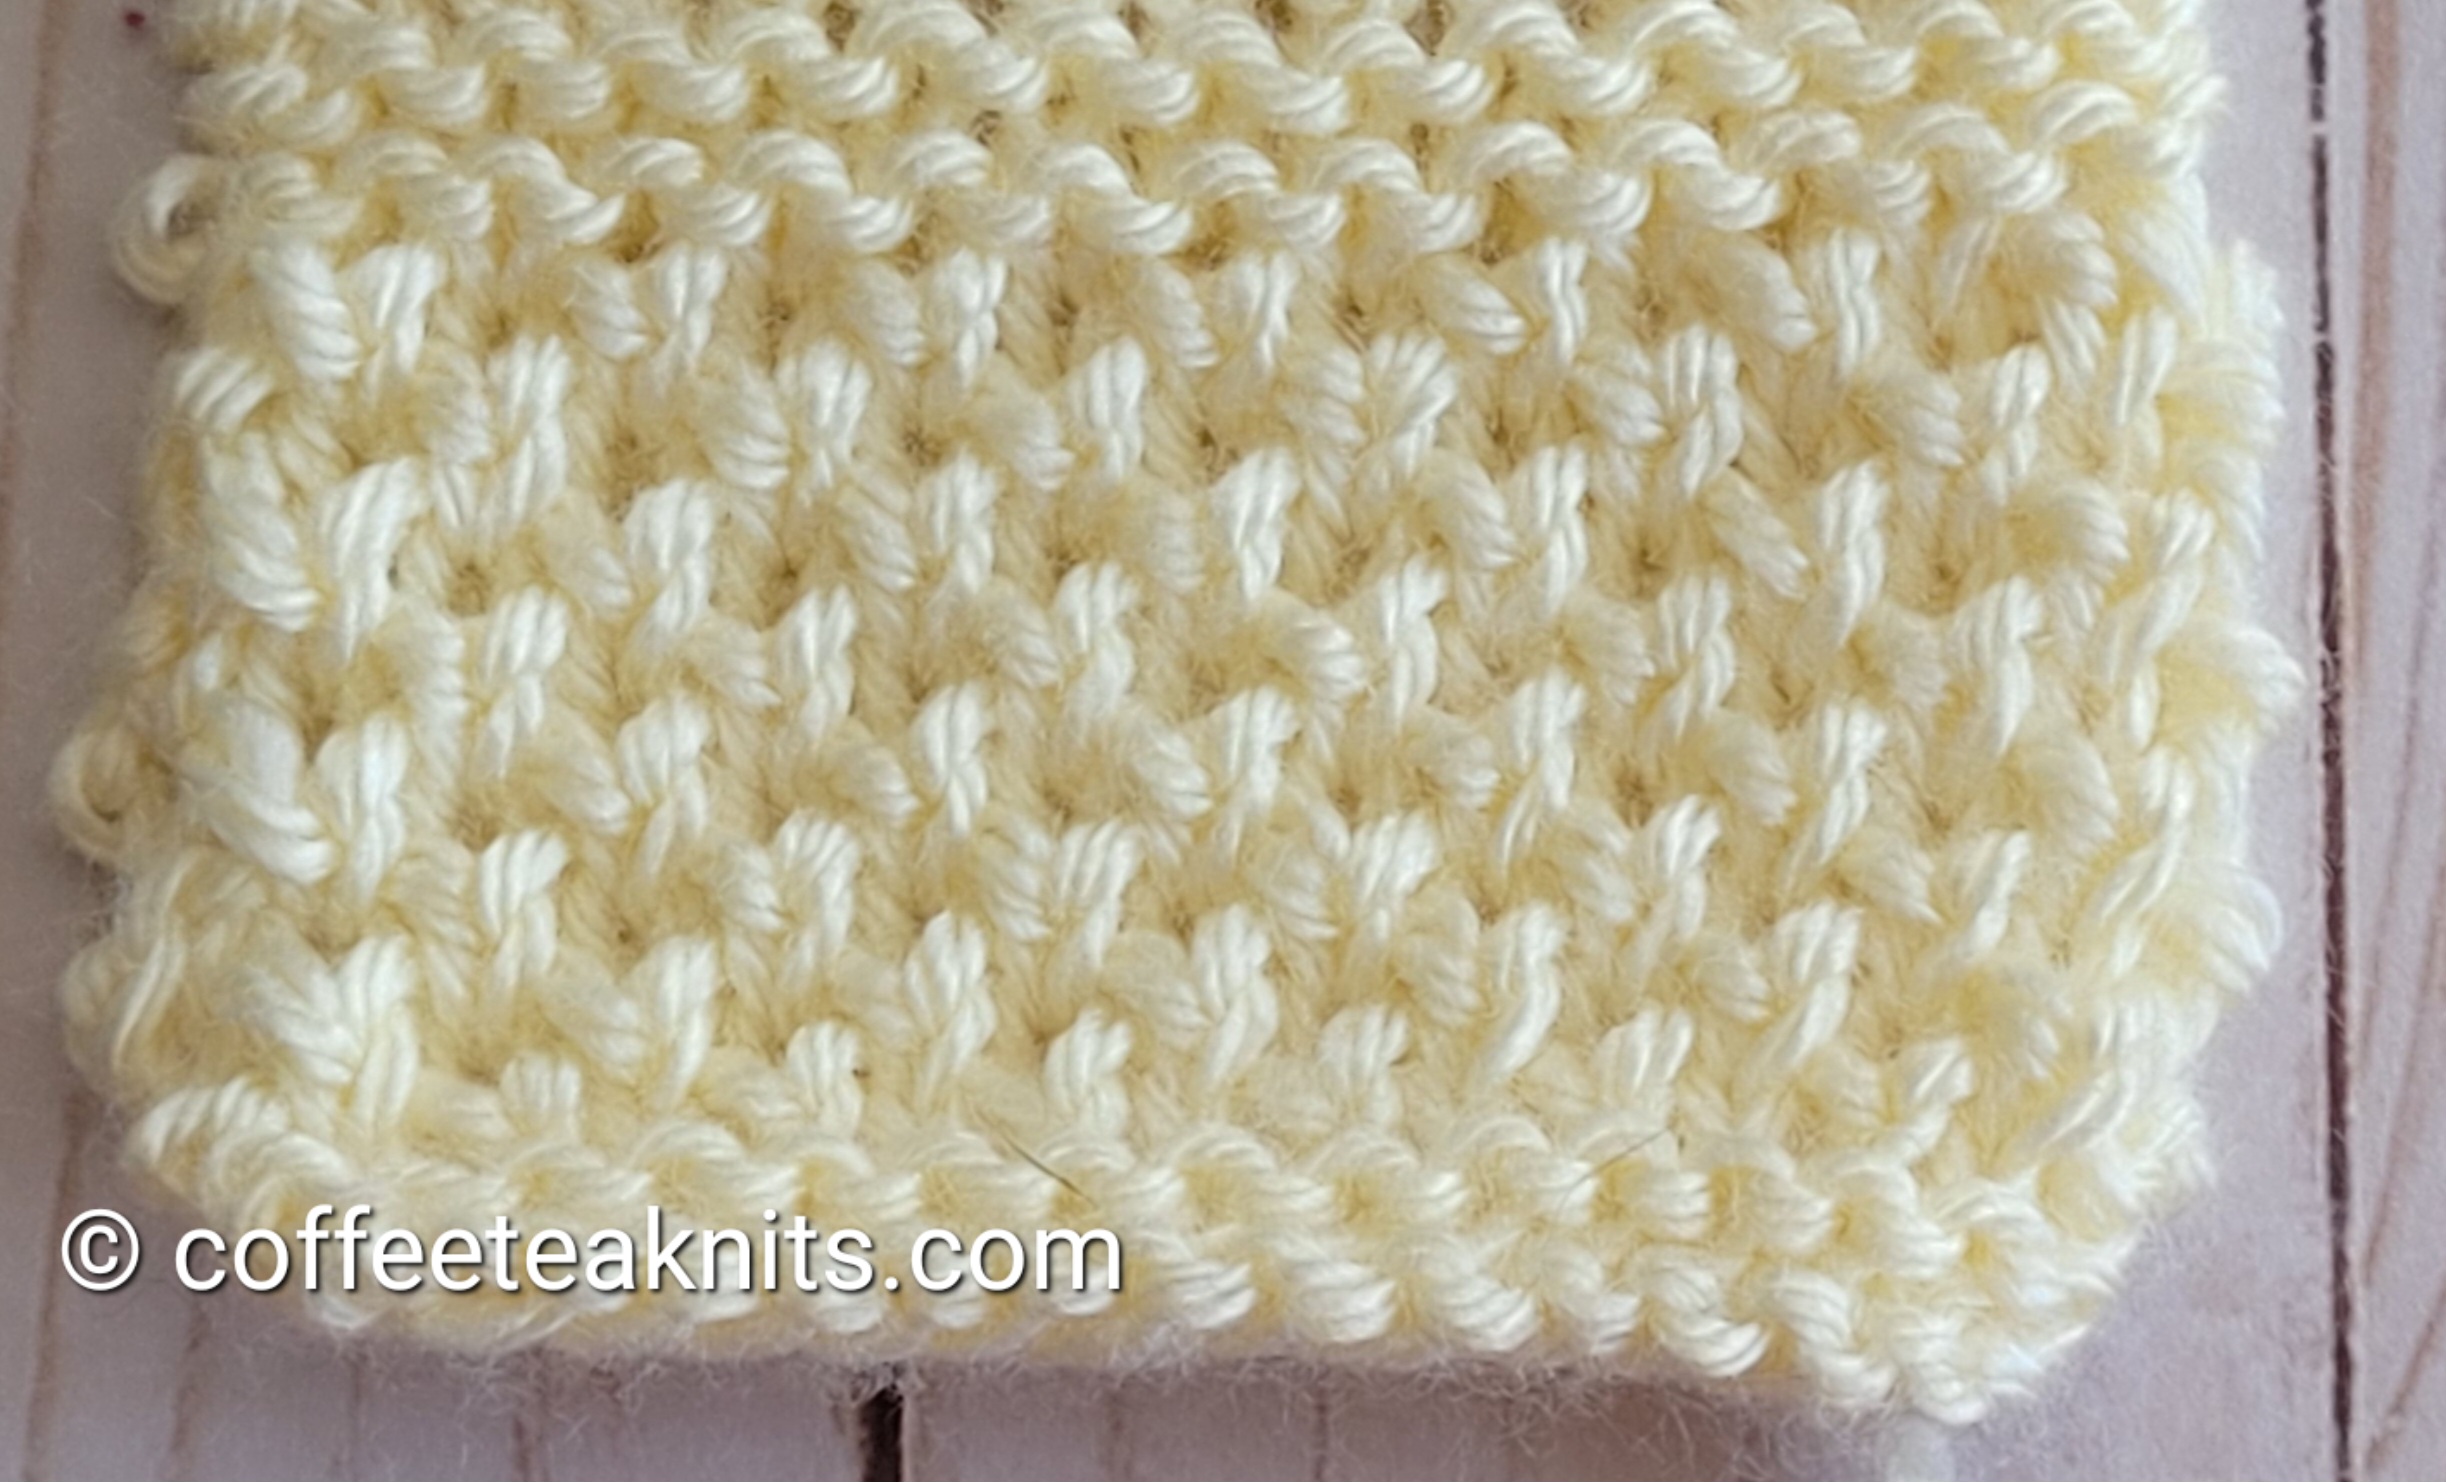
Knit one below (K1b) is a technique where the stitch on the knitting needle is not worked or knit. Instead the knit stitch right below is worked or knit. Examples of stitch patterns where K1b is used include the twisted seed stitch pattern, fisherman’s rib stitch pattern, some half brioche stitch patterns, honeycomb and textured rib patterns. Knit one below forms a fluffy and textured fabric. I have used K1b technique in the twisted seed stitch pattern for the Summertime Dishcloths and The Comfy Hat 1 patterns.
The twisted seed stitch pattern looks similar to the half brioche stitch pattern but differs in the techniques used to create the textured fabric (see image below)
The video and written instructions below show how to use the K1b technique for right-hand knitting
Knit One Below (K1b):
Written instructions for Knit one Below (K1b):
Insert the right knitting needle from front to back into the center of the stitch below the first stitch on the left knitting needle
Knitting or crocheting dishcloths are useful for exploring various stitch patterns, for personal use, and for gifting. Dishcloths are quick projects that can be knit or crocheted in a few days. This makes them perfect for both beginners and seasoned crafters looking to learn new techniques. Dishcloths can enhance a kitchen décor or add a pop of color to it. Gifting dishcloths for those domestic muses in our lives that give us delicious and soul-satisfying meals is my way of thanking them for their effort and care. Also, knitting or crocheting dishcloths has been meditative and calming for me this winter season.
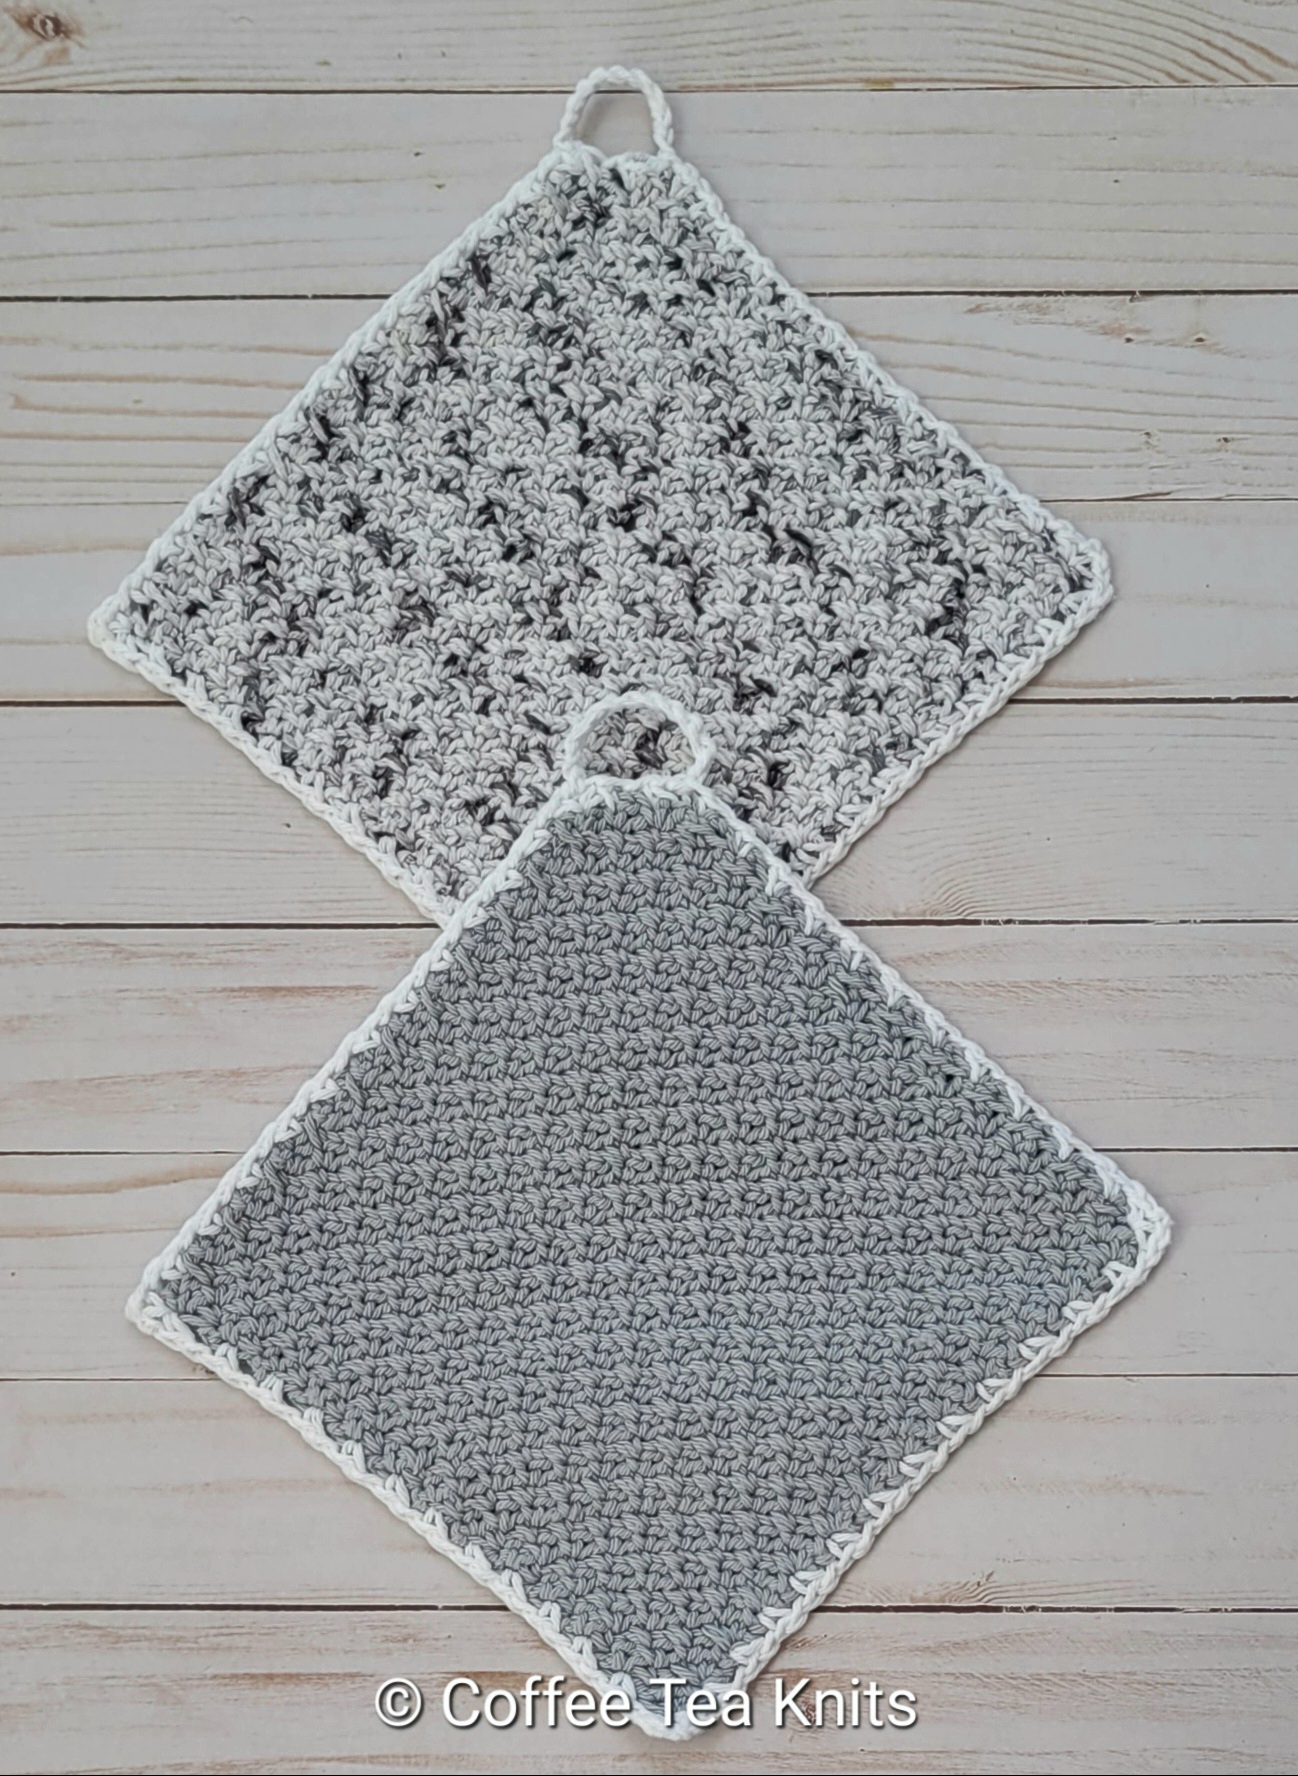
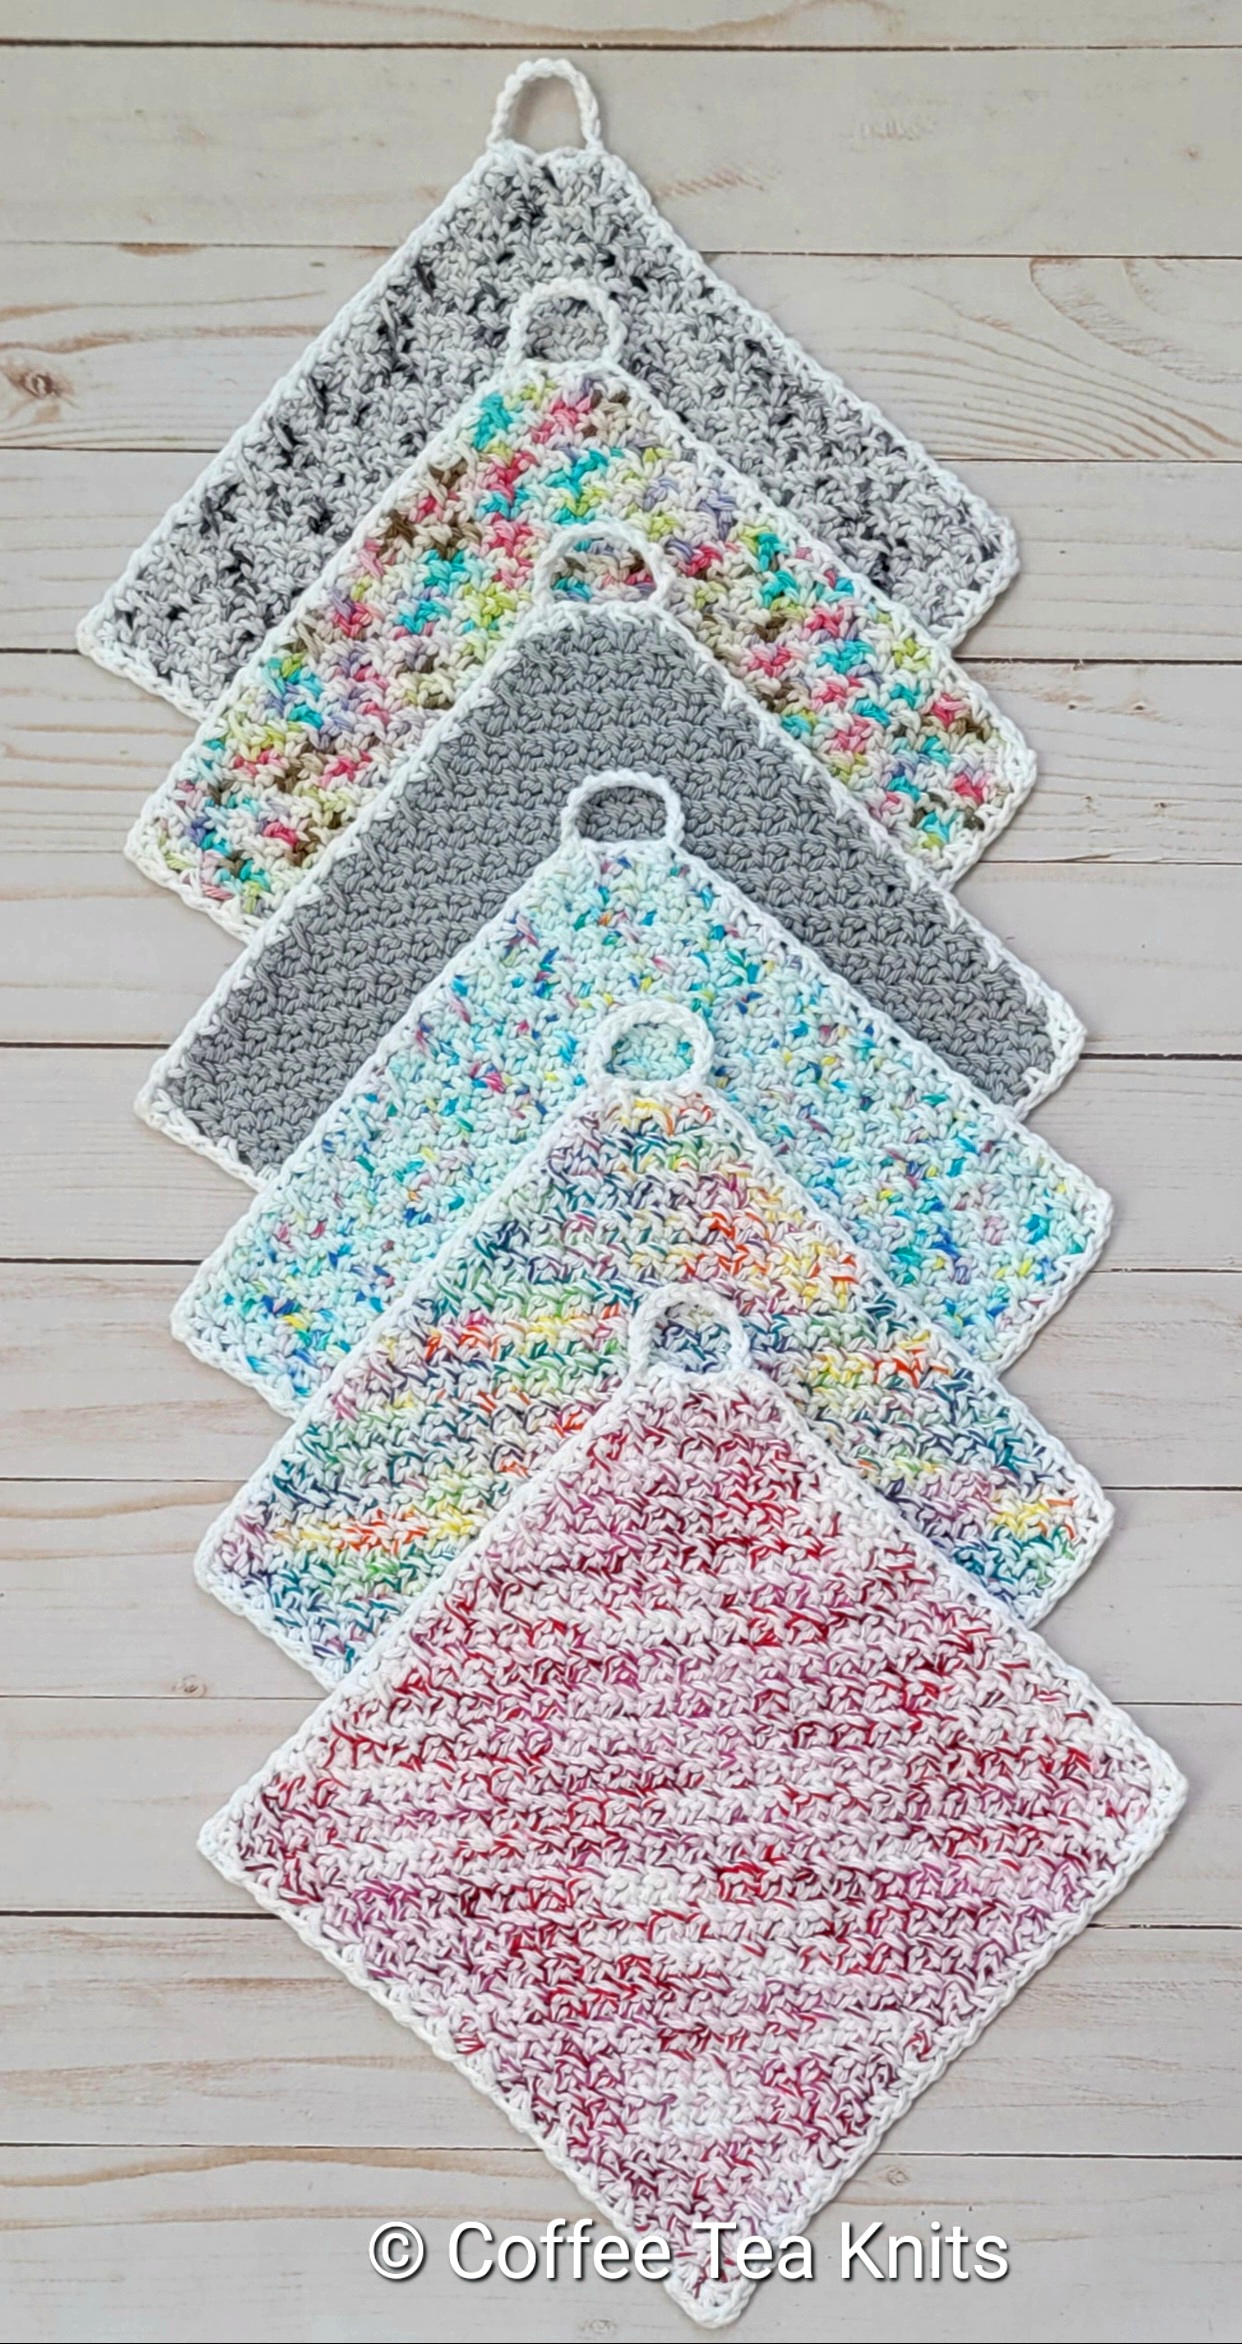
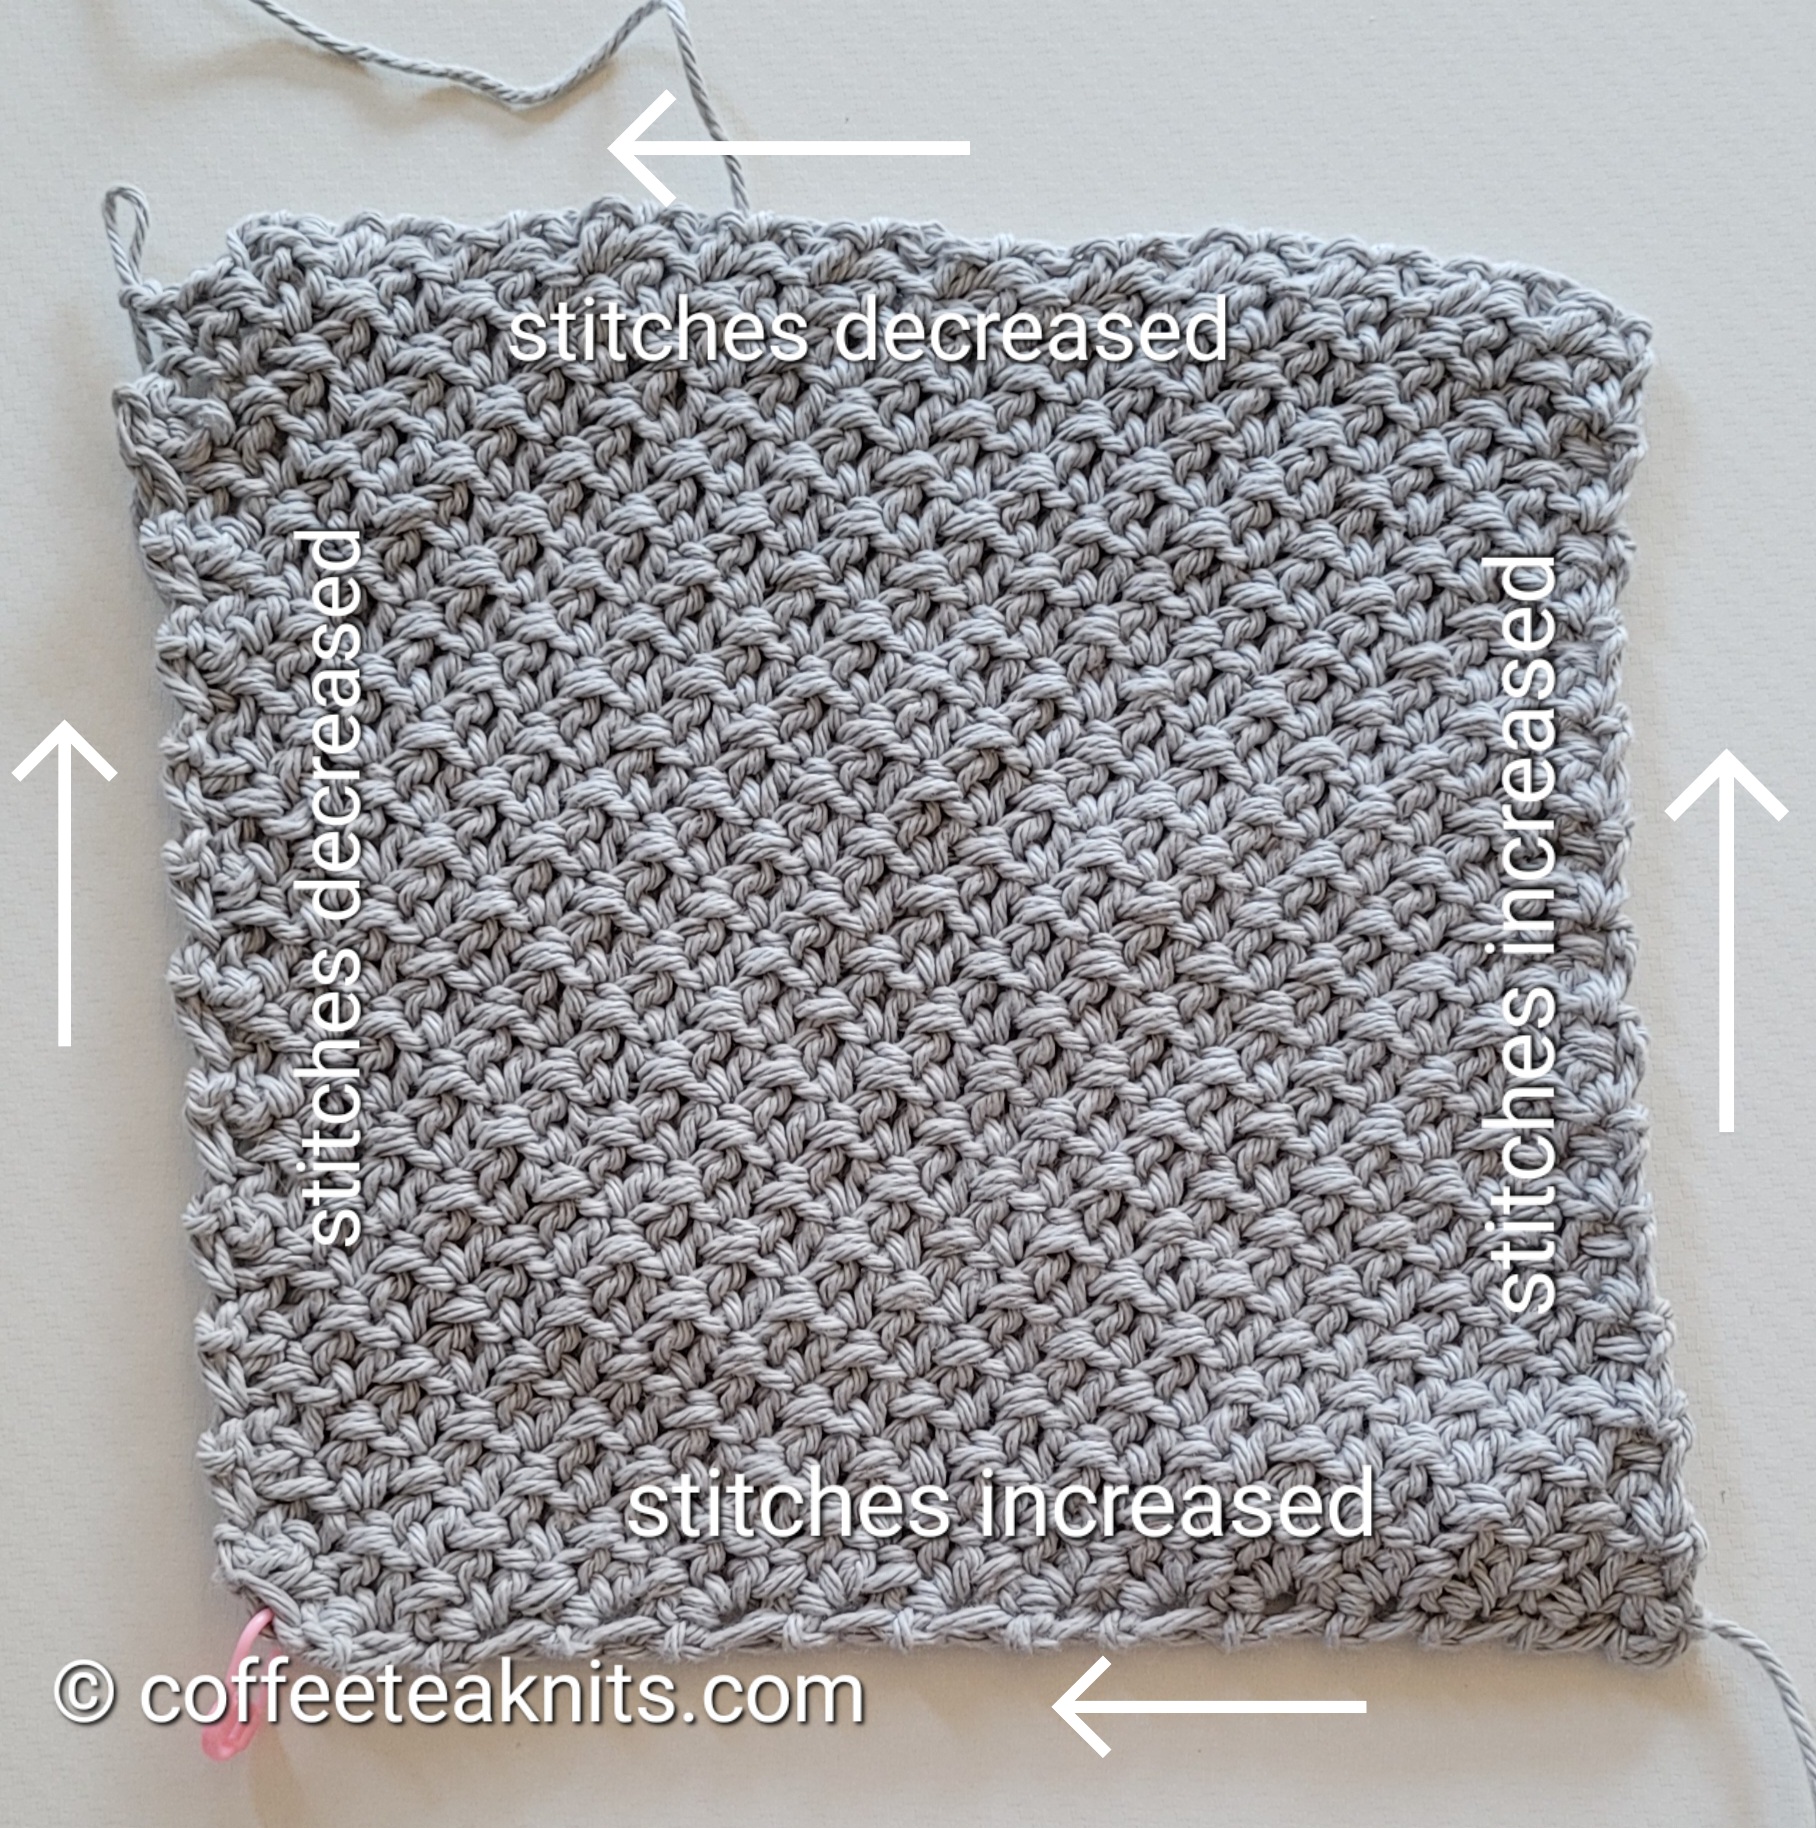
The Textured Dishcloth is crocheted flat from one corner to another in the granite crochet stitch pattern which is a variation of the crochet moss stitch pattern. It begins with a chain of 2 stitches with an increase of 4 stitches every other row, and then a decrease of 4 stitches every other row till a square shape is formed. The dishcloth is finished with a crochet moss stitch border along with a hanging loop of crochet chain stitches. This dishcloth is a two-row repeat pattern that can be customized to any size. It is beginner friendly and can be used with any worsted weight cotton yarn suitable for dishcloths.
The Textured Dishcloth Pattern (text and images for personal use only)
Materials Needed:
Yarn:Hobby Lobby Crafter’s Secret Cotton Yarn in several different colorways: Main Colorways – Gray, City Stripe, Shaded Crimson, At The Fairgrounds, Extra Sprinkles, Potpourii Print Contrast Colorway (for border edge) – White
Gauge: 5 stitches per inch x 5 rows per inch in the crochet granite stitch pattern Crochet hook: US size 7 (4.50 mm) Tapestry needle to weave in ends
The Parts of the Textured Dishcloth Pattern include the following:
Crochet Foundation Chain
Increase Section
Decrease Section
Crochet Moss Stitch Border Edge
Crochet Foundation Chain:
With one Main Colorway yarn of choice, chain 2 using US size 7 (4.50 mm) crochet hook
Increase Section:
Row 1 (RS): Single crochet, chain 1 in the second foundation chain stitch from the crochet hook, sc, chain 1 again in the same second stitch and turn
Row 2 (WS): Single crochet in the second stitch from the crochet hook, chain 1, skip a stitch and sc in the last stitch, chain 1 and turn (4 stitches)
Row 3 (RS): Single crochet in the second stitch from the crochet hook, chain 1, sc in the same stitch again, chain 1, skip a stitch, and sc in the last stitch, chain 1, sc in the same last stitch again, chain 1 and turn
Row 4 (WS): Single crochet in the second stitch from the crochet hook, chain 1, [skip a stitch, sc in the next stitch, chain 1], repeat […] till the last stitch, sc in the last stitch, chain 1 and turn (8 stitches)
Row 5 (RS): Single crochet in the second stitch from the crochet hook, chain 1, sc in the same stitch again, chain 1, [skip a stitch, sc in the next stitch, chain 1], repeat […] till the last stitch of the row, sc in the last stitch, chain 1, sc again in the same last stitch, chain 1 and turn
Row 6 (WS): Single crochet in the second stitch from the crochet hook, chain 1, [skip a stitch, sc in the next stitch, chain 1], repeat […] till the last stitch, sc in the last stitch, chain 1 and turn (12 stitches)
Repeat Rows 5 and 6 till 52 stitches in the row. Customize the dishcloth by increasing or decreasing the number of repeats of Rows 5 and 6.
Decrease Section:
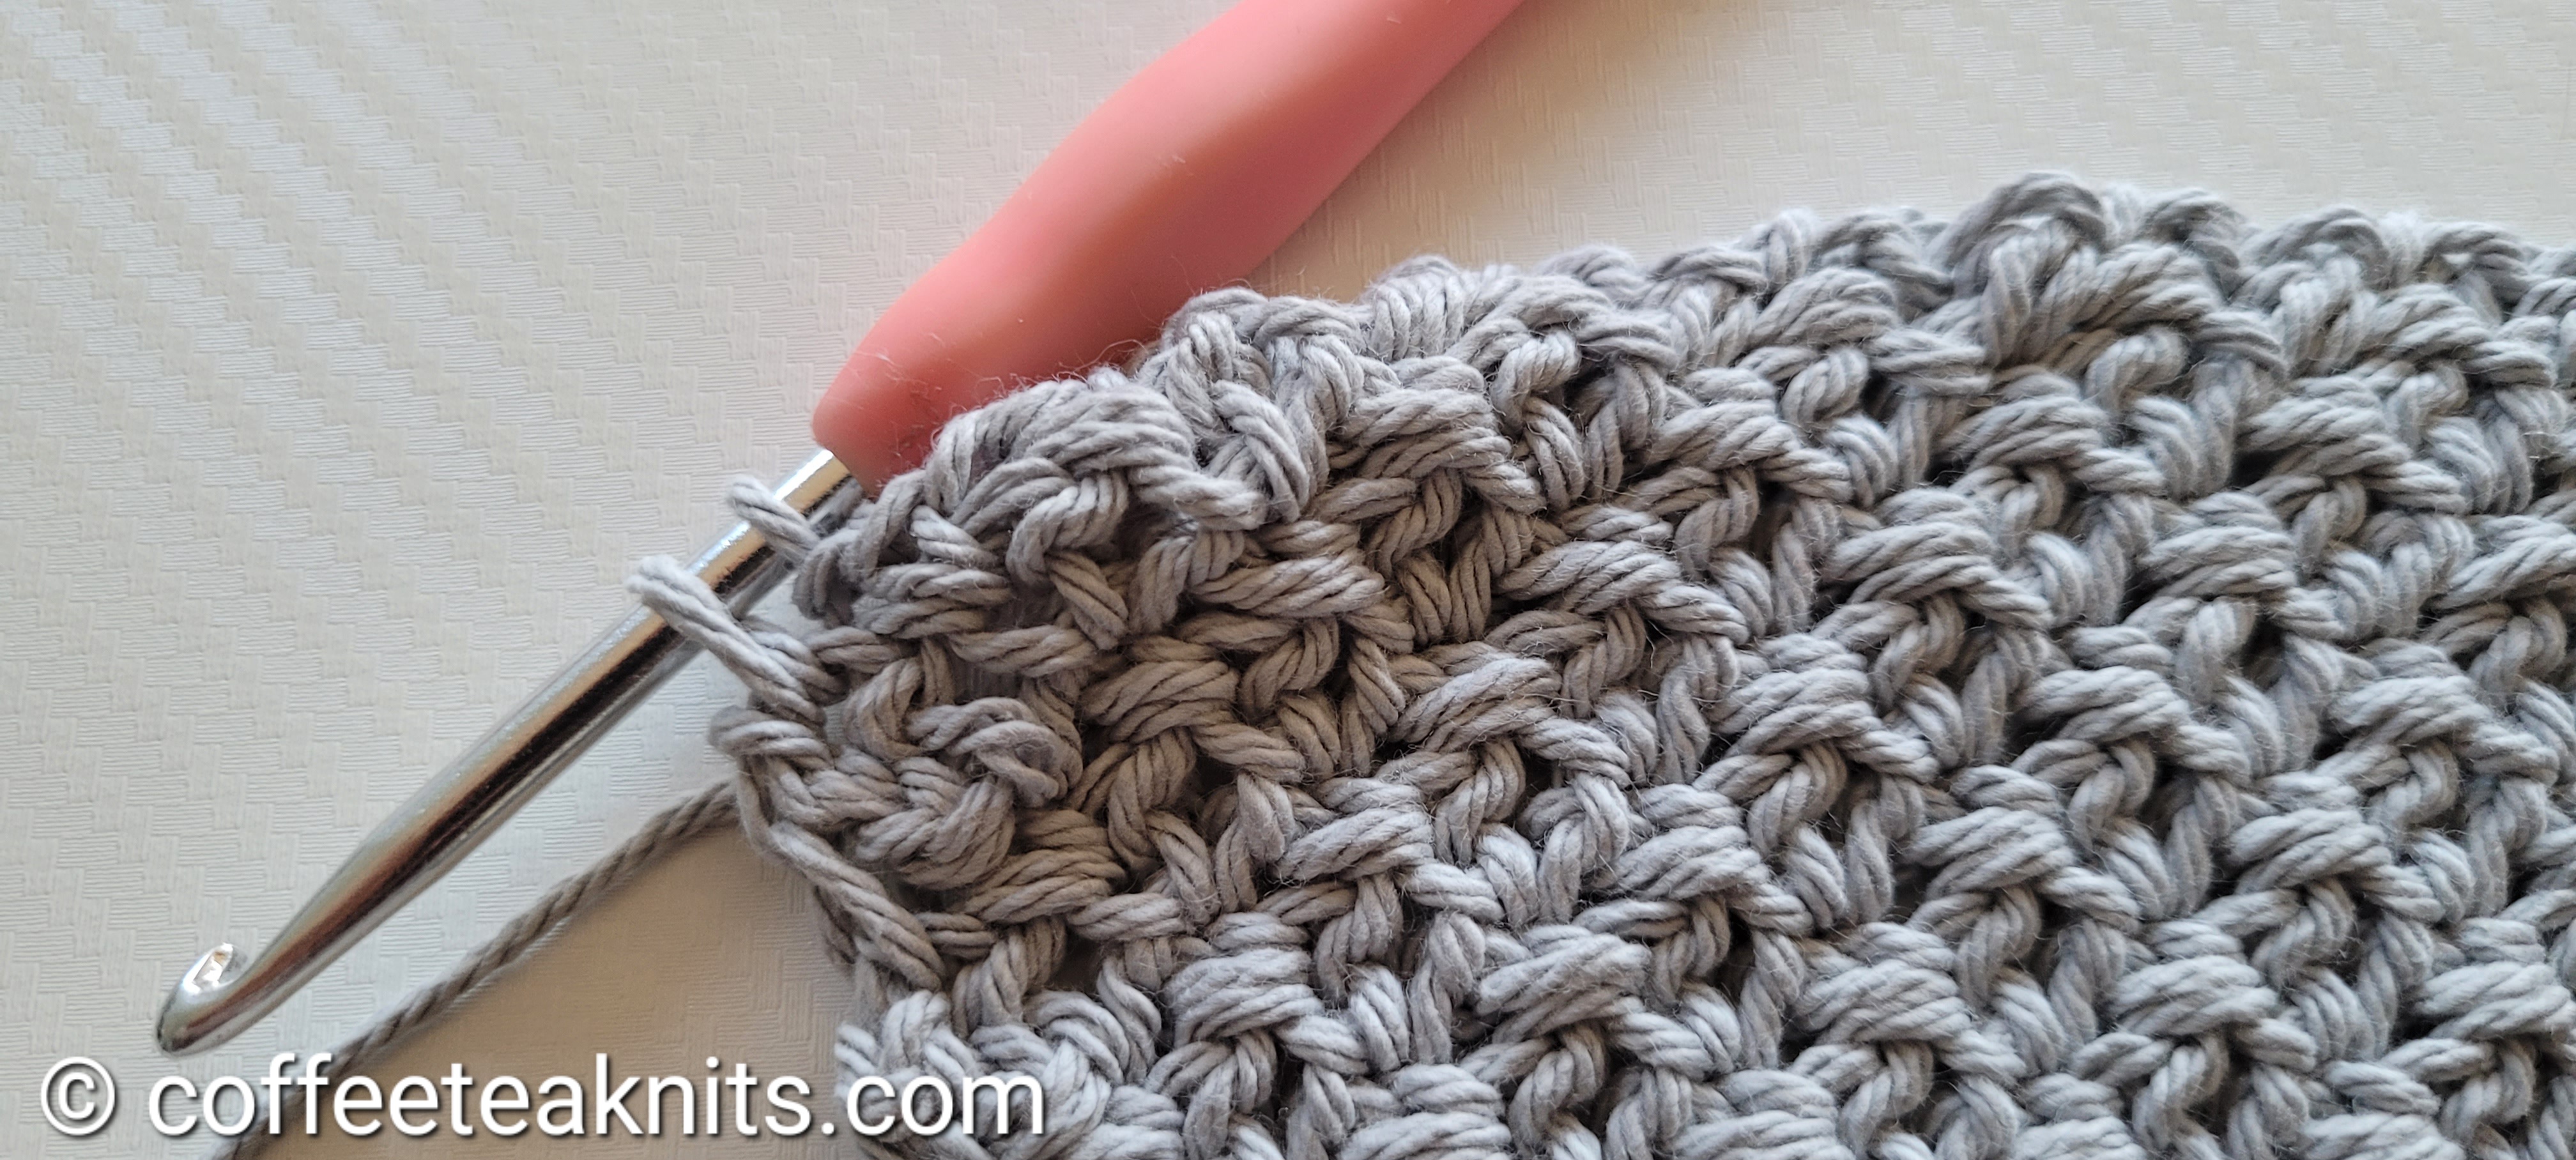
Row 1 (RS): Skip the first stitch, insert crochet hook into the next stitch, wrap yarn around the crochet hook and pull the loop through that stitch (there are 2 loops on the crochet hook). Skip a stitch and insert hook in the next stitch (4th stitch from the beginning), wrap yarn around the crochet hook and pull the loop through that stitch (three loops on the hook now), yarn over and pull loop through the three loops on the hook, chain 1. [Skip a stitch, sc in the next stitch, chain 1], repeat […] till 4 stitches left. Insert crochet hook into the next stitch, yarn over and pull the loop through that stitch (there are 2 loops on the crochet hook). Skip a stitch and insert hook in the last stitch, yarn over and pull the loop through that stitch (three loops on the hook), yarn over and pull loop through the three loops on the hook, chain 1 and turn
Row 2 (WS): [Skip the first stitch and sc in the next stitch, chain 1], repeat […] till 2 stitches left, sc in the last stitch, chain 1, and turn
Repeat Rows 1 and 2 till 12 stitches left in the row.
Row (RS): Skip the first stitch, insert crochet hook into the next stitch, wrap yarn around the crochet hook and pull the loop through that stitch (there are 2 loops on the crochet hook). Skip a stitch and insert hook in the next stitch (4th stitch from the beginning), wrap yarn around the crochet hook and pull the loop through that stitch (three loops on the hook now), yarn over and pull loop through the three loops on the hook, chain 1. Skip a stitch, insert crochet hook into the next stitch, yarn over and pull the loop through that stitch (there are 2 loops on the crochet hook). Skip a stitch and insert hook in the last stitch, yarn over and pull the loop through that stitch (three loops on the hook), yarn over and pull loop through the three loops on the hook, chain 1 and turn (8 stitches remaining)
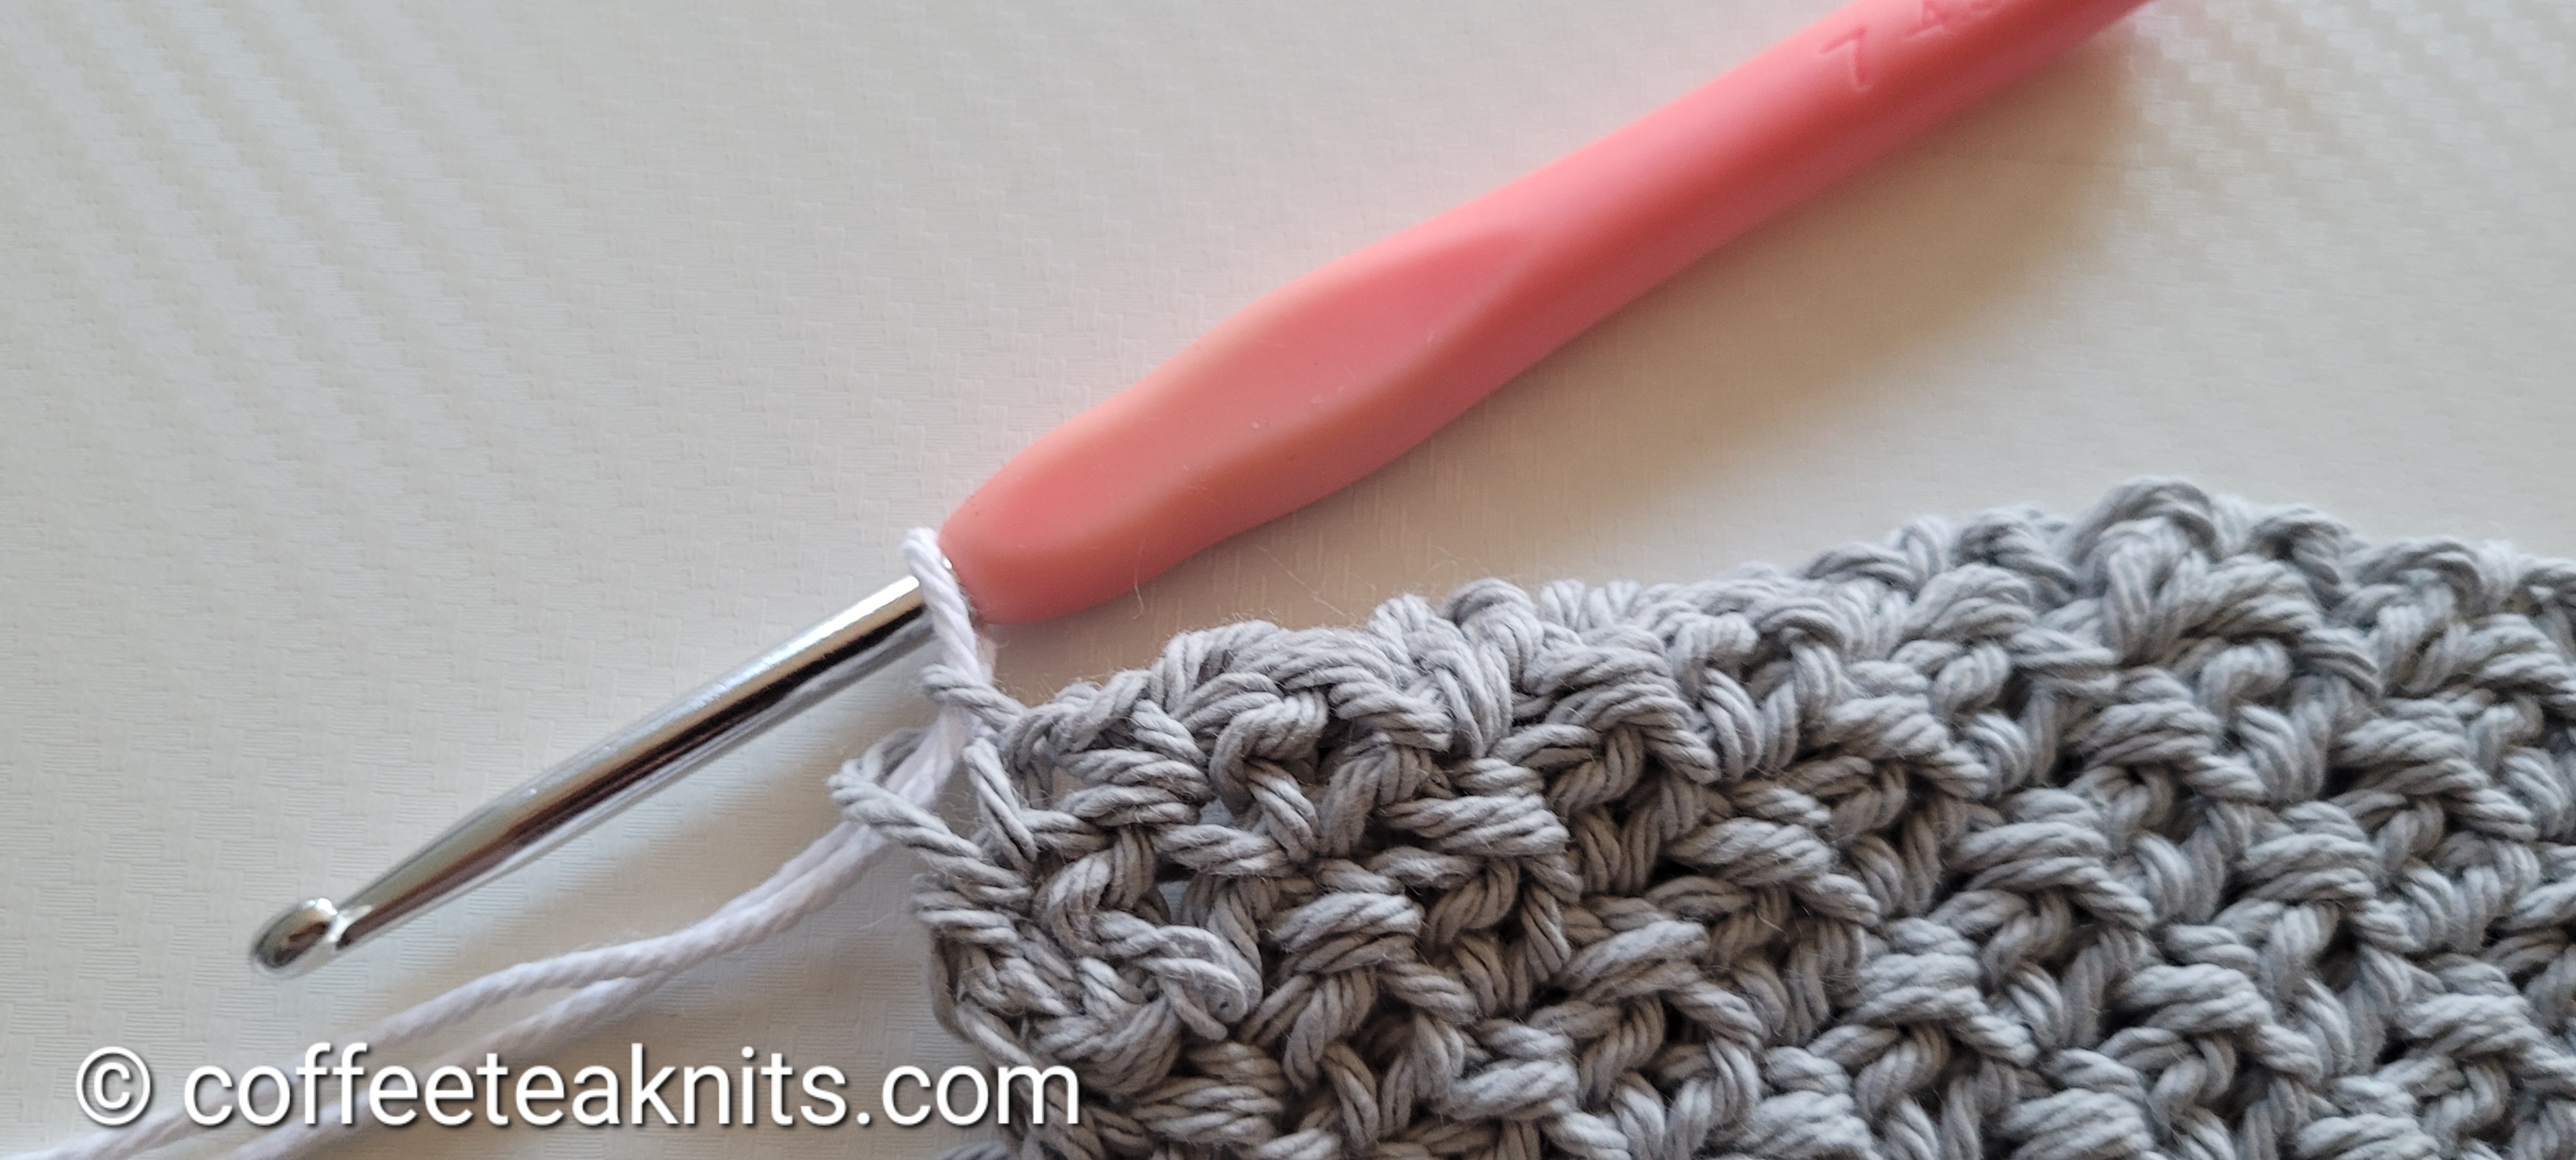
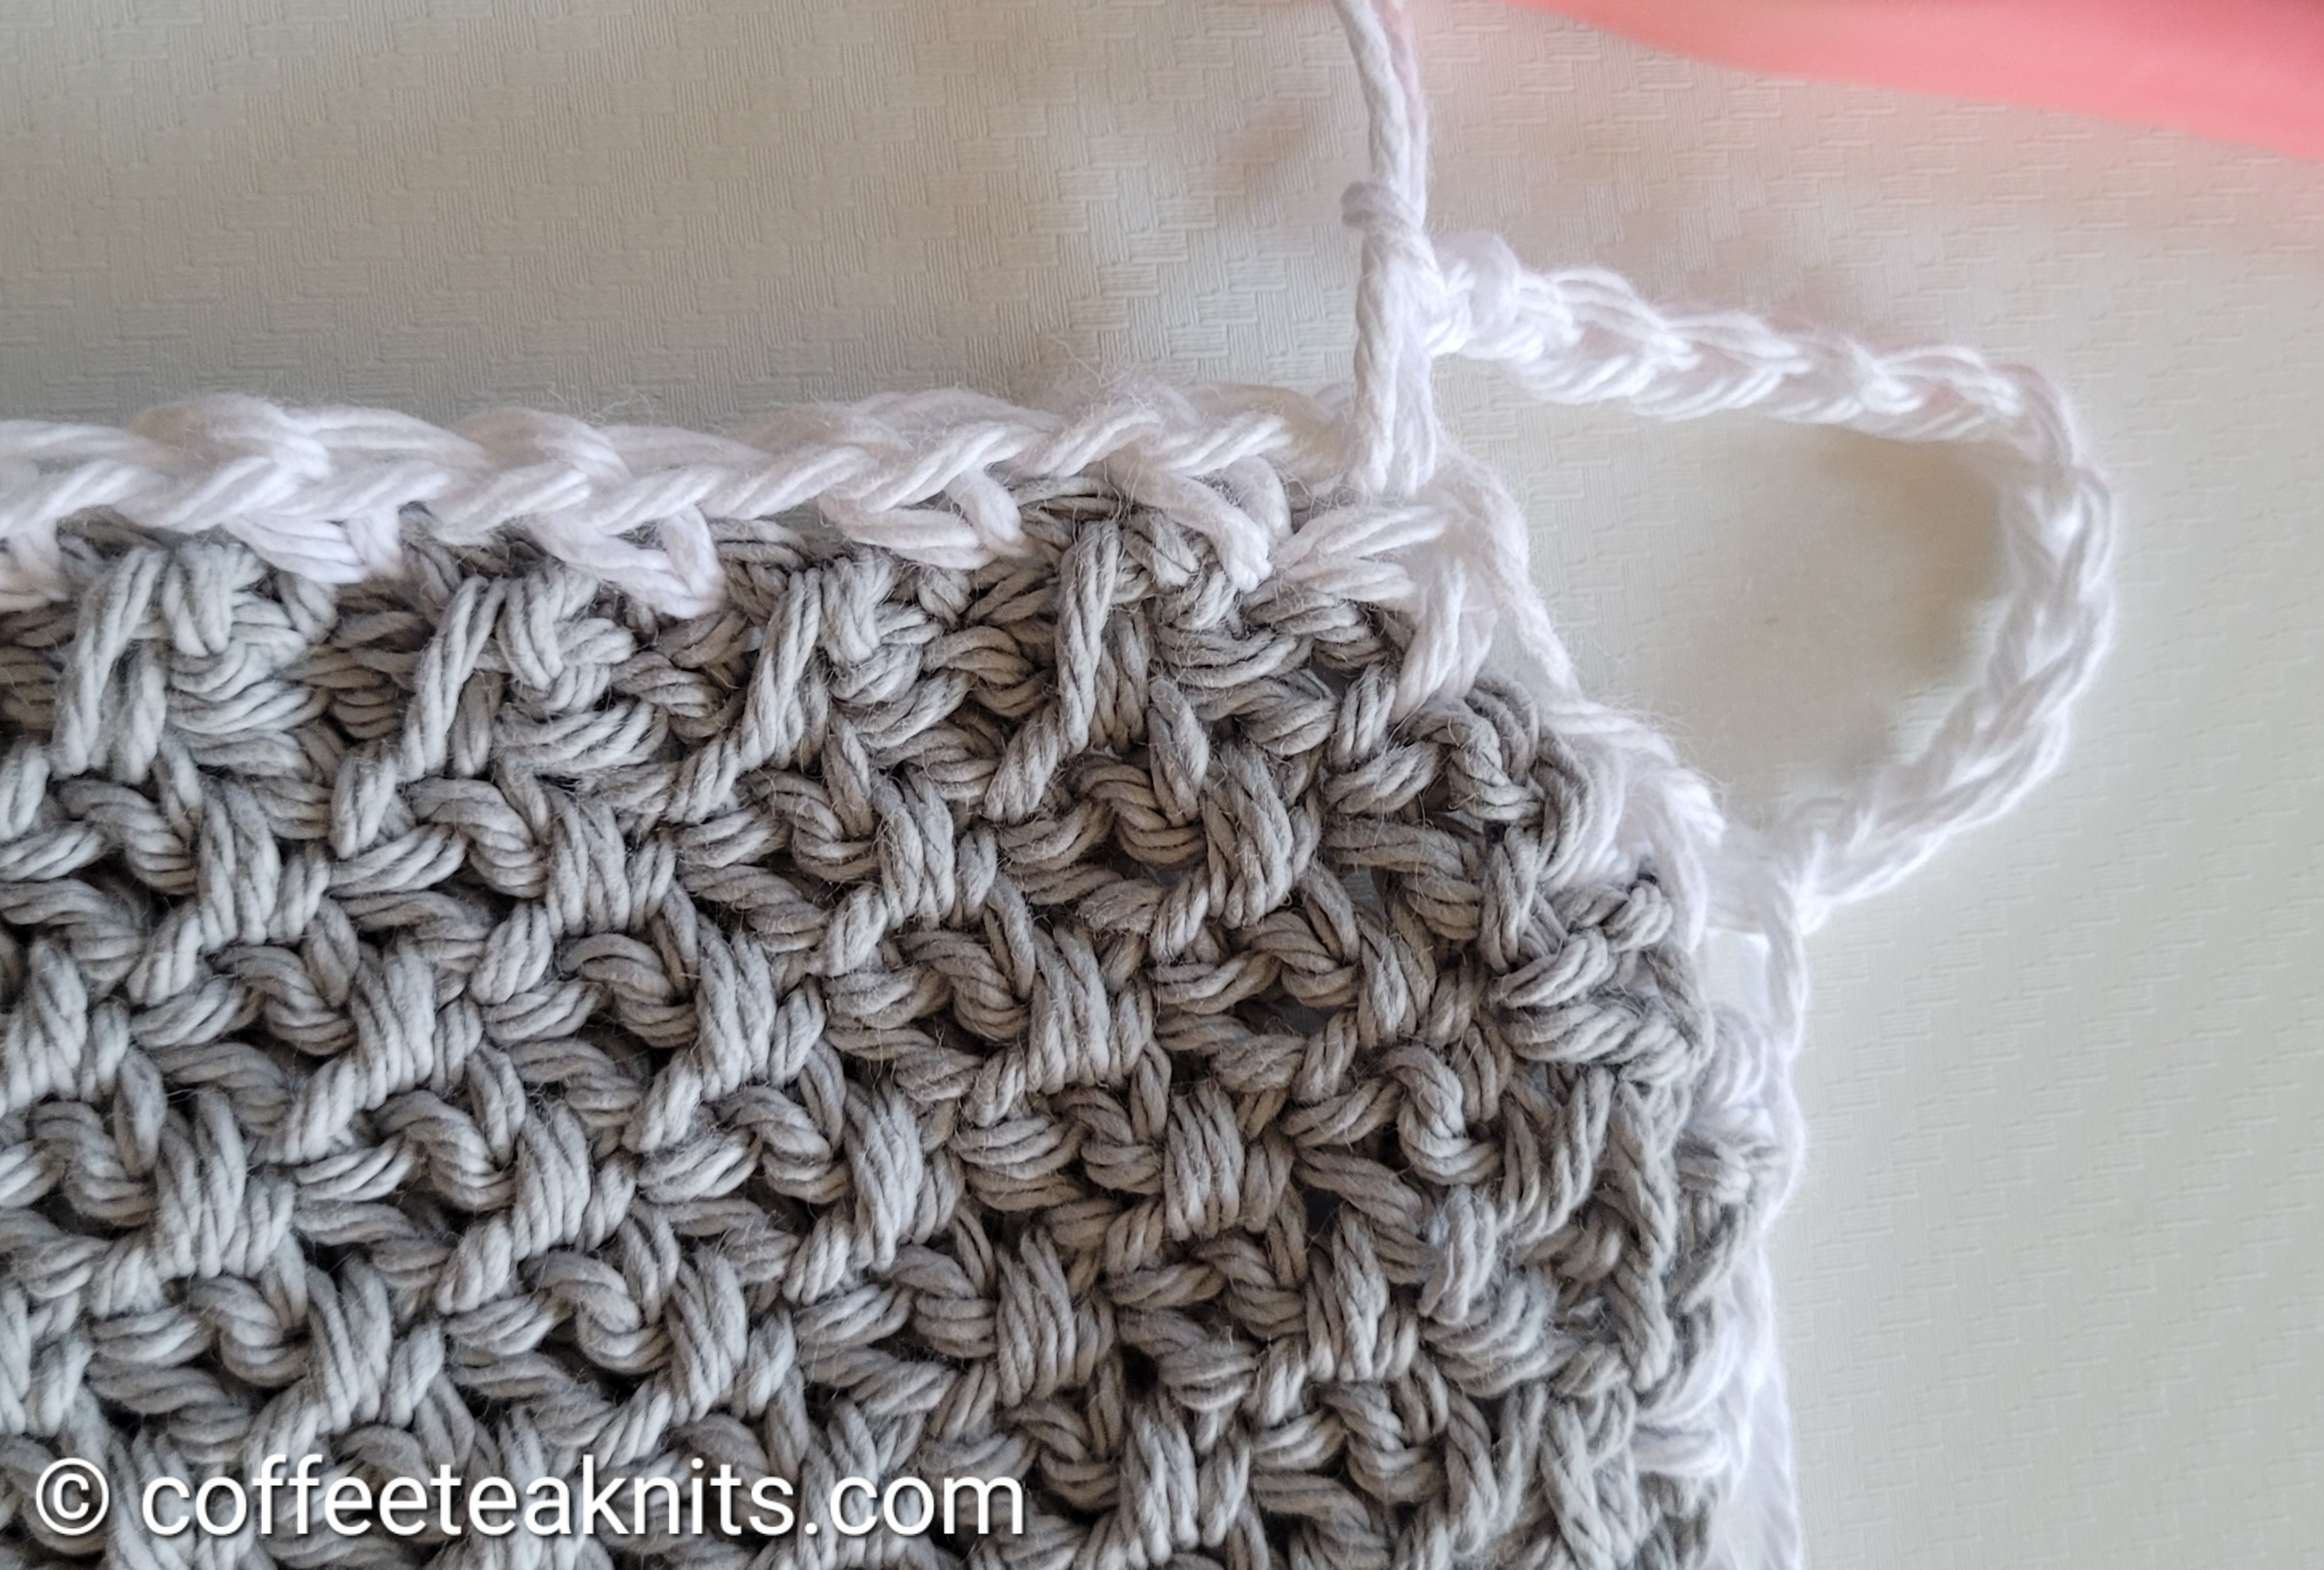
Row (WS): [Skip the first stitch and sc in the next stitch, chain 1], repeat […] till 2 stitches left. Insert hook into the last stitch and pull the Main Colorway yarn loop on the crochet hook. Drop the Main Colorway yarn and pickup the Contrast Colorway yarn. Yarn over with the Contrast Colorway yarn and pull it through both the loops on the hook (see image below). Chain 1 with the Contrast Colorway yarn and turn. Break and secure the Main Colorway yarn tail.
Last Row of Decrease Section (RS): Continuing with the Contrast Colorway yarn –
Skip the first stitch, insert crochet hook into the next stitch, wrap yarn around the crochet hook and pull the loop through that stitch (there are 2 loops on the crochet hook), skip a stitch and insert hook in the next stitch (4th stitch from the beginning), wrap yarn around the crochet hook and pull the loop through that stitch (three loops on the hook now)
Yarn over and pull loop through the three loops on the hook, chain 1
Skip a stitch, insert crochet hook into the next stitch, yarn over and pull the loop through that stitch (there are 2 loops on the crochet hook)
Skip a stitch and insert hook in the last stitch, yarn over and pull the loop through that stitch (three loops on the hook), yarn over and pull loop through the three loops on the hook
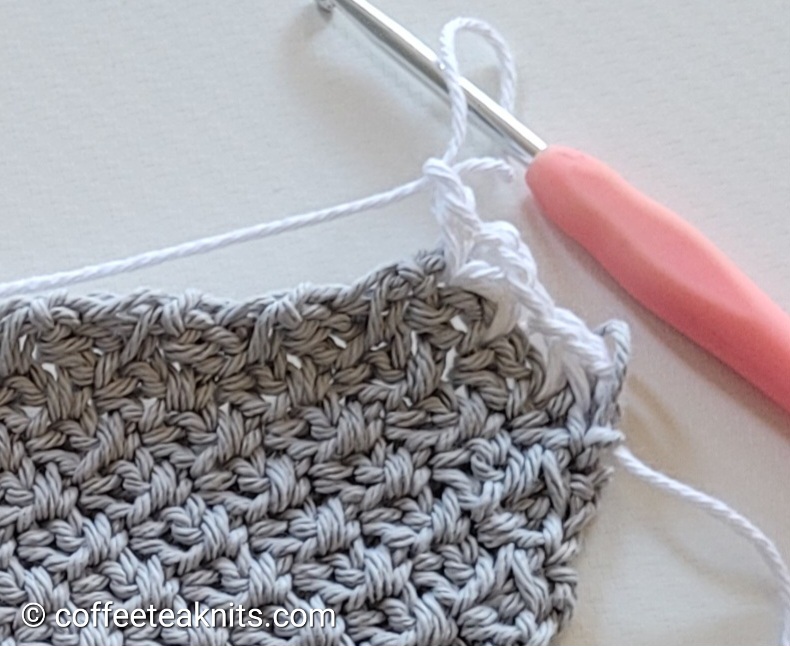
Chain 2 in the same stitch, chain 1 and sc into the last stitch again, chain 1 and turn counter clockwise for the crochet moss stitch border edge
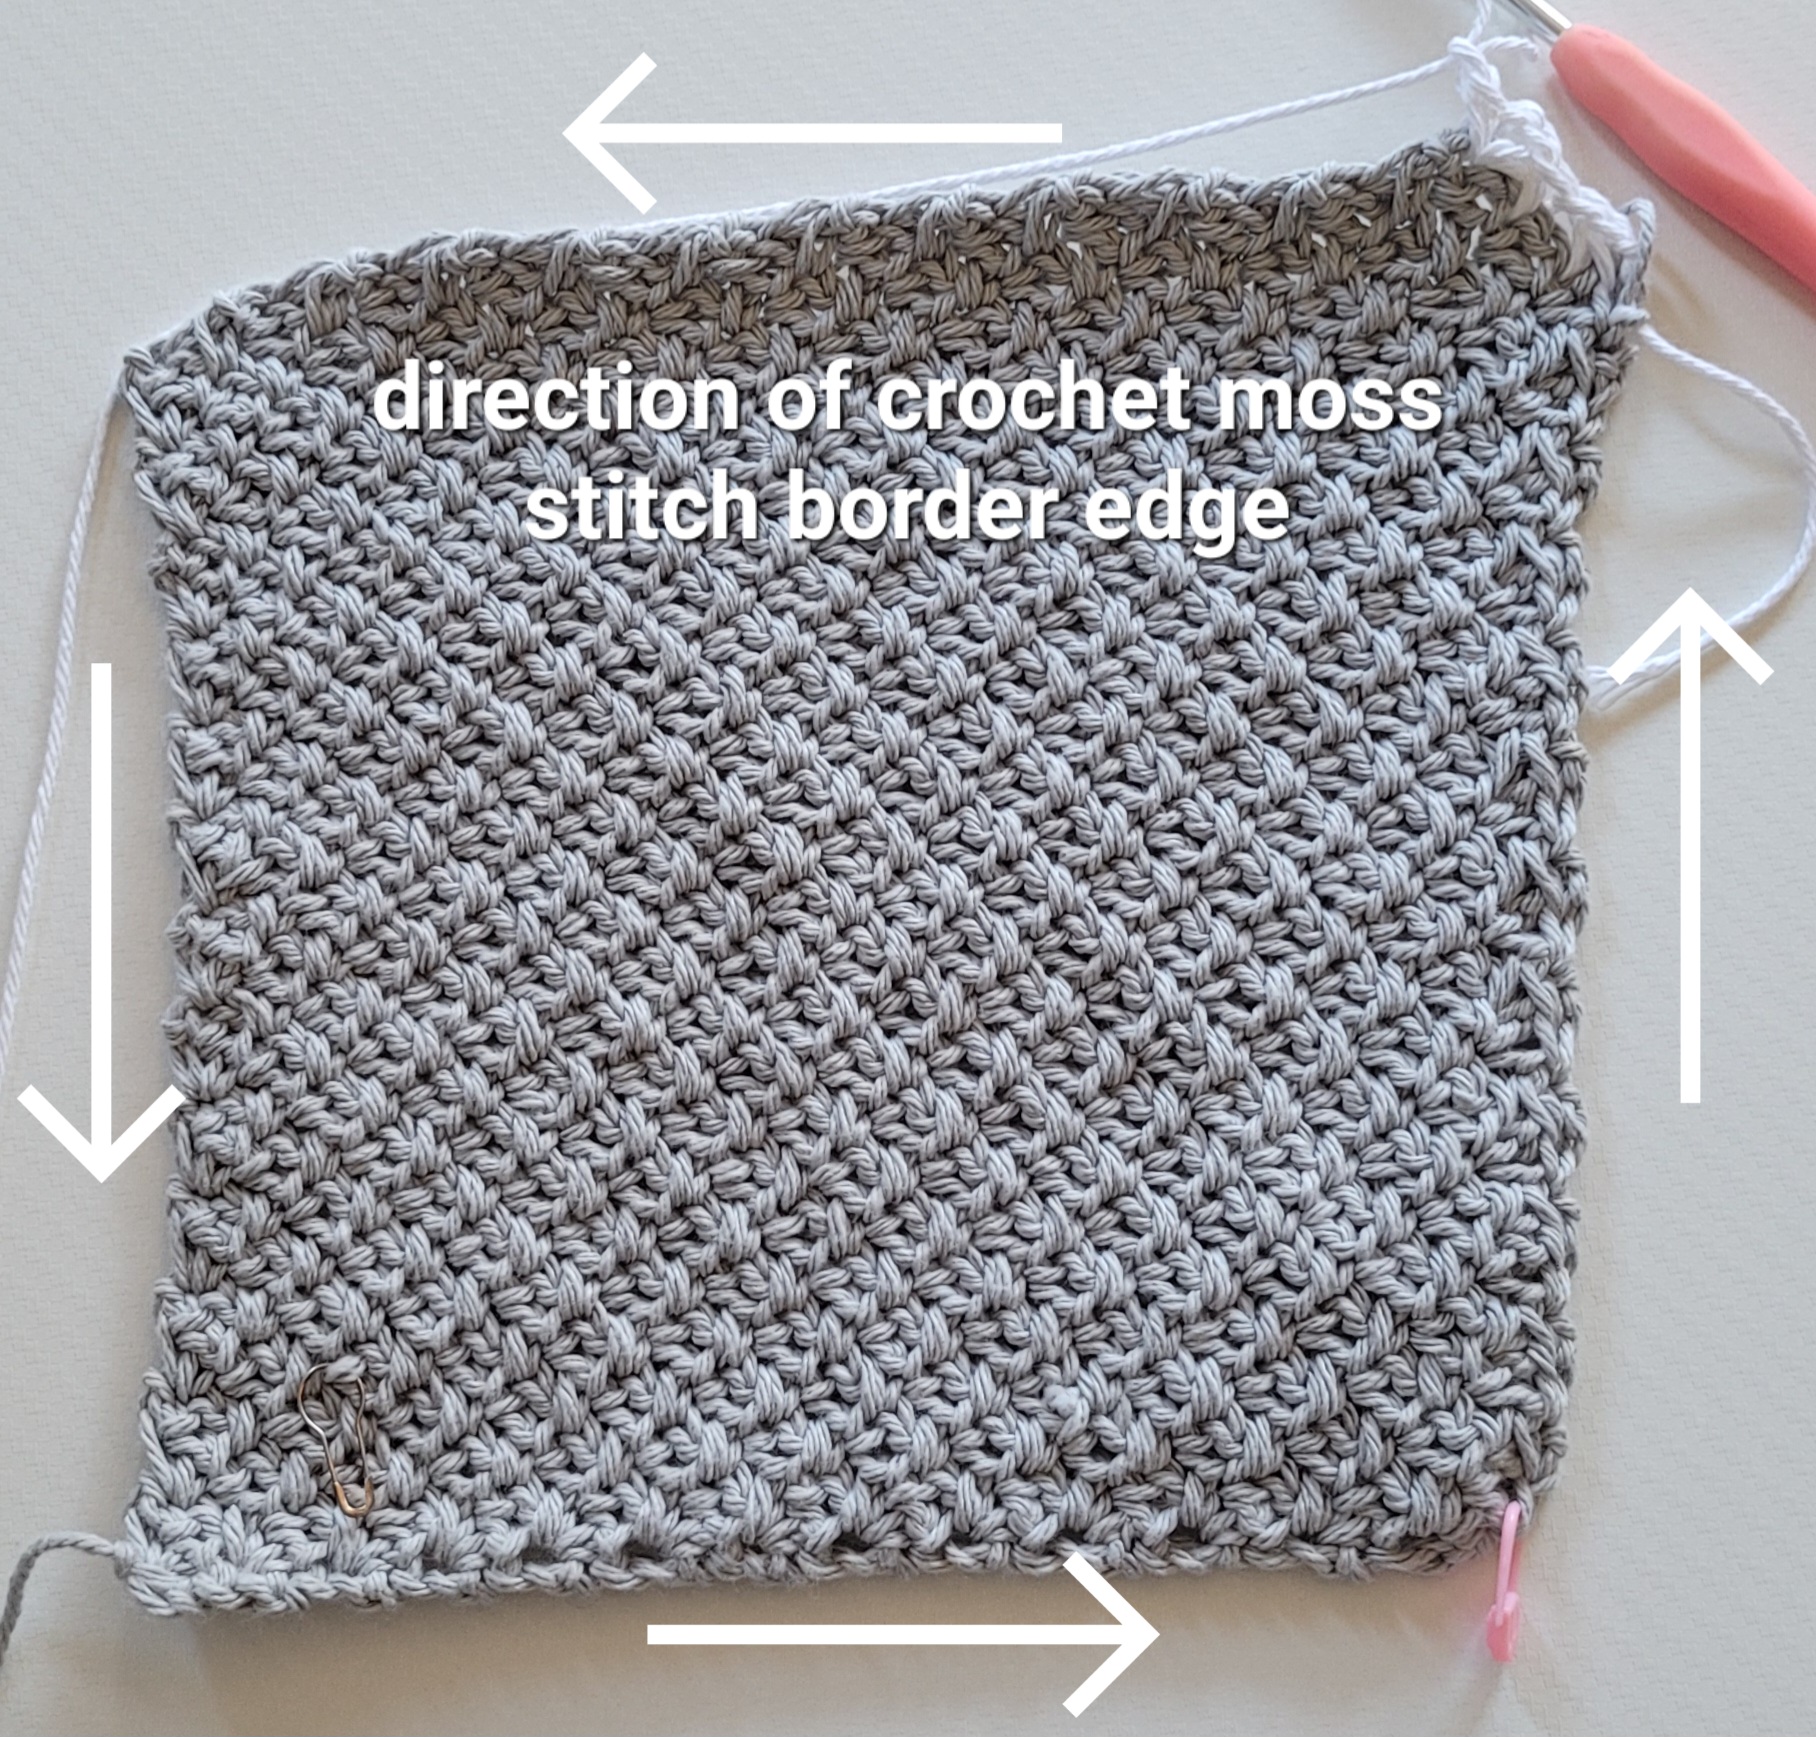
Crochet Moss Stitch Border (in the round):
Round 1:
With the Contrast Colorway yarn and US #7 (4.5 mm) crochet hook continue in the counter clockwise direction
Pick up stitches in the crochet in moss stitch pattern (pick up a stitch and sc, chain 1, skip the next stitch and repeat) all along the first side
At the first corner edge stitch of the dishcloth, sc, chain 2, sc again in the same corner stitch, chain 1
Turn counter clockwise and pick up stitches in the crochet moss stitch pattern (pick up a stitch and sc, chain 1, skip the next stitch and repeat) along the second side of the dishcloth
At the second corner edge stitch (crochet foundation chain corner) of the dishcloth, sc, chain 2, sc again in the same corner stitch, chain 1
Turn counter clockwise and pick up stitches in the crochet in moss stitch pattern (pick up a stitch and sc, chain 1, skip the next stitch and repeat) all along the third side
At the third corner edge stitch of the dishcloth, sc, chain 2, sc again in the same corner stitch, chain 1
Turn counter clockwise and pick up stitches all along the last side of the dishcloth row in the crochet in moss stitch pattern (pick up a stitch and sc, chain 1, skip the next stitch and repeat) till the first stitch of the last decrease row
Slip stitch into the first stitch of the last decrease section row
Chain 12 and slip stitch into the first corner stitch of Round 1
Break yarn and pull yarn tail through the loop on the crochet hook
Weave in the ends, wash and block the Textured Dishcloth
The Textured Dishcloth measures about 8 x 8 inches after blocking. It can be crocheted in any solid or variegated colors of yarn.
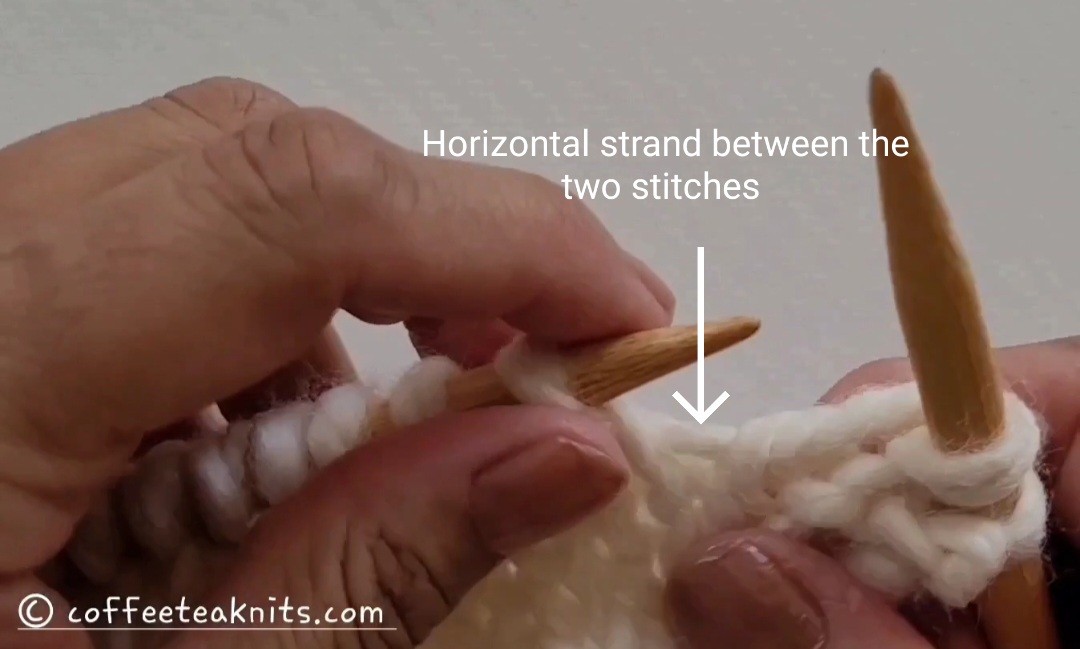
Another way to increase one stitch in knitting is to make one right (M1R) or make one left (M1L). M1L is a left-leaning increase while M1R is a right-leaning increase.
The horizontal strand between the stitch just worked on the right knitting needle and the stitch on the left knitting needle is lifted and placed on the left knitting needle. The loop made by the horizontal strand on the left knitting needle is then knit to create an extra stitch.
The make one (M1R or M1L) increase technique is used in the shaping of knitted items such as shawls, sweaters etc.
The video clip and the written instructions below show how to make one right (M1R) and then how to make one left (M1L) for right hand knitting.
Make One (M1R and M1L):
Written Instructions for M1R and M1L:
Make One Right (M1R):
To M1R increase, insert left knitting needle from back to front under the horizontal strand between the stitch on the right and the left knitting needle
Slip the horizontal strand loop on the left knitting needle
Insert the right knitting needle in the front leg of the loop on the left knitting needle (Tip: Loosen the front leg of the loop by tugging and pulling it with the right knitting needle as shown in the video clip above)
Hello folks, hope 2025 went well for you. For me, 2025 has been an eventful year. I published seven knit or crochet patterns, nine knitting or crochet technique video tutorials, and a few tidbits.
2025 also brought me some endings, loss, grief, celebrations, and not-so-fun health issues.
There’s also been a change in my journey with yarn.
After 55 published patterns, the call of yarn in my life has led me to a new beginning.
Starting January 2026, knit and crochet pattern pdfs will be available for download on a monthly basis on Ravelry and Etsy
Coffee Tea Knits will be returning in January 2026 with new video tutorials and tidbits.
Stay tuned for updates as we explore the world of yarn and needles together.
Thank you to the fiber related crafts community. I am grateful to the subscribers and readers of this blog. Your feedback and encouragement have been invaluable in my journey with yarn.