The Cozy Season Shrug Pattern

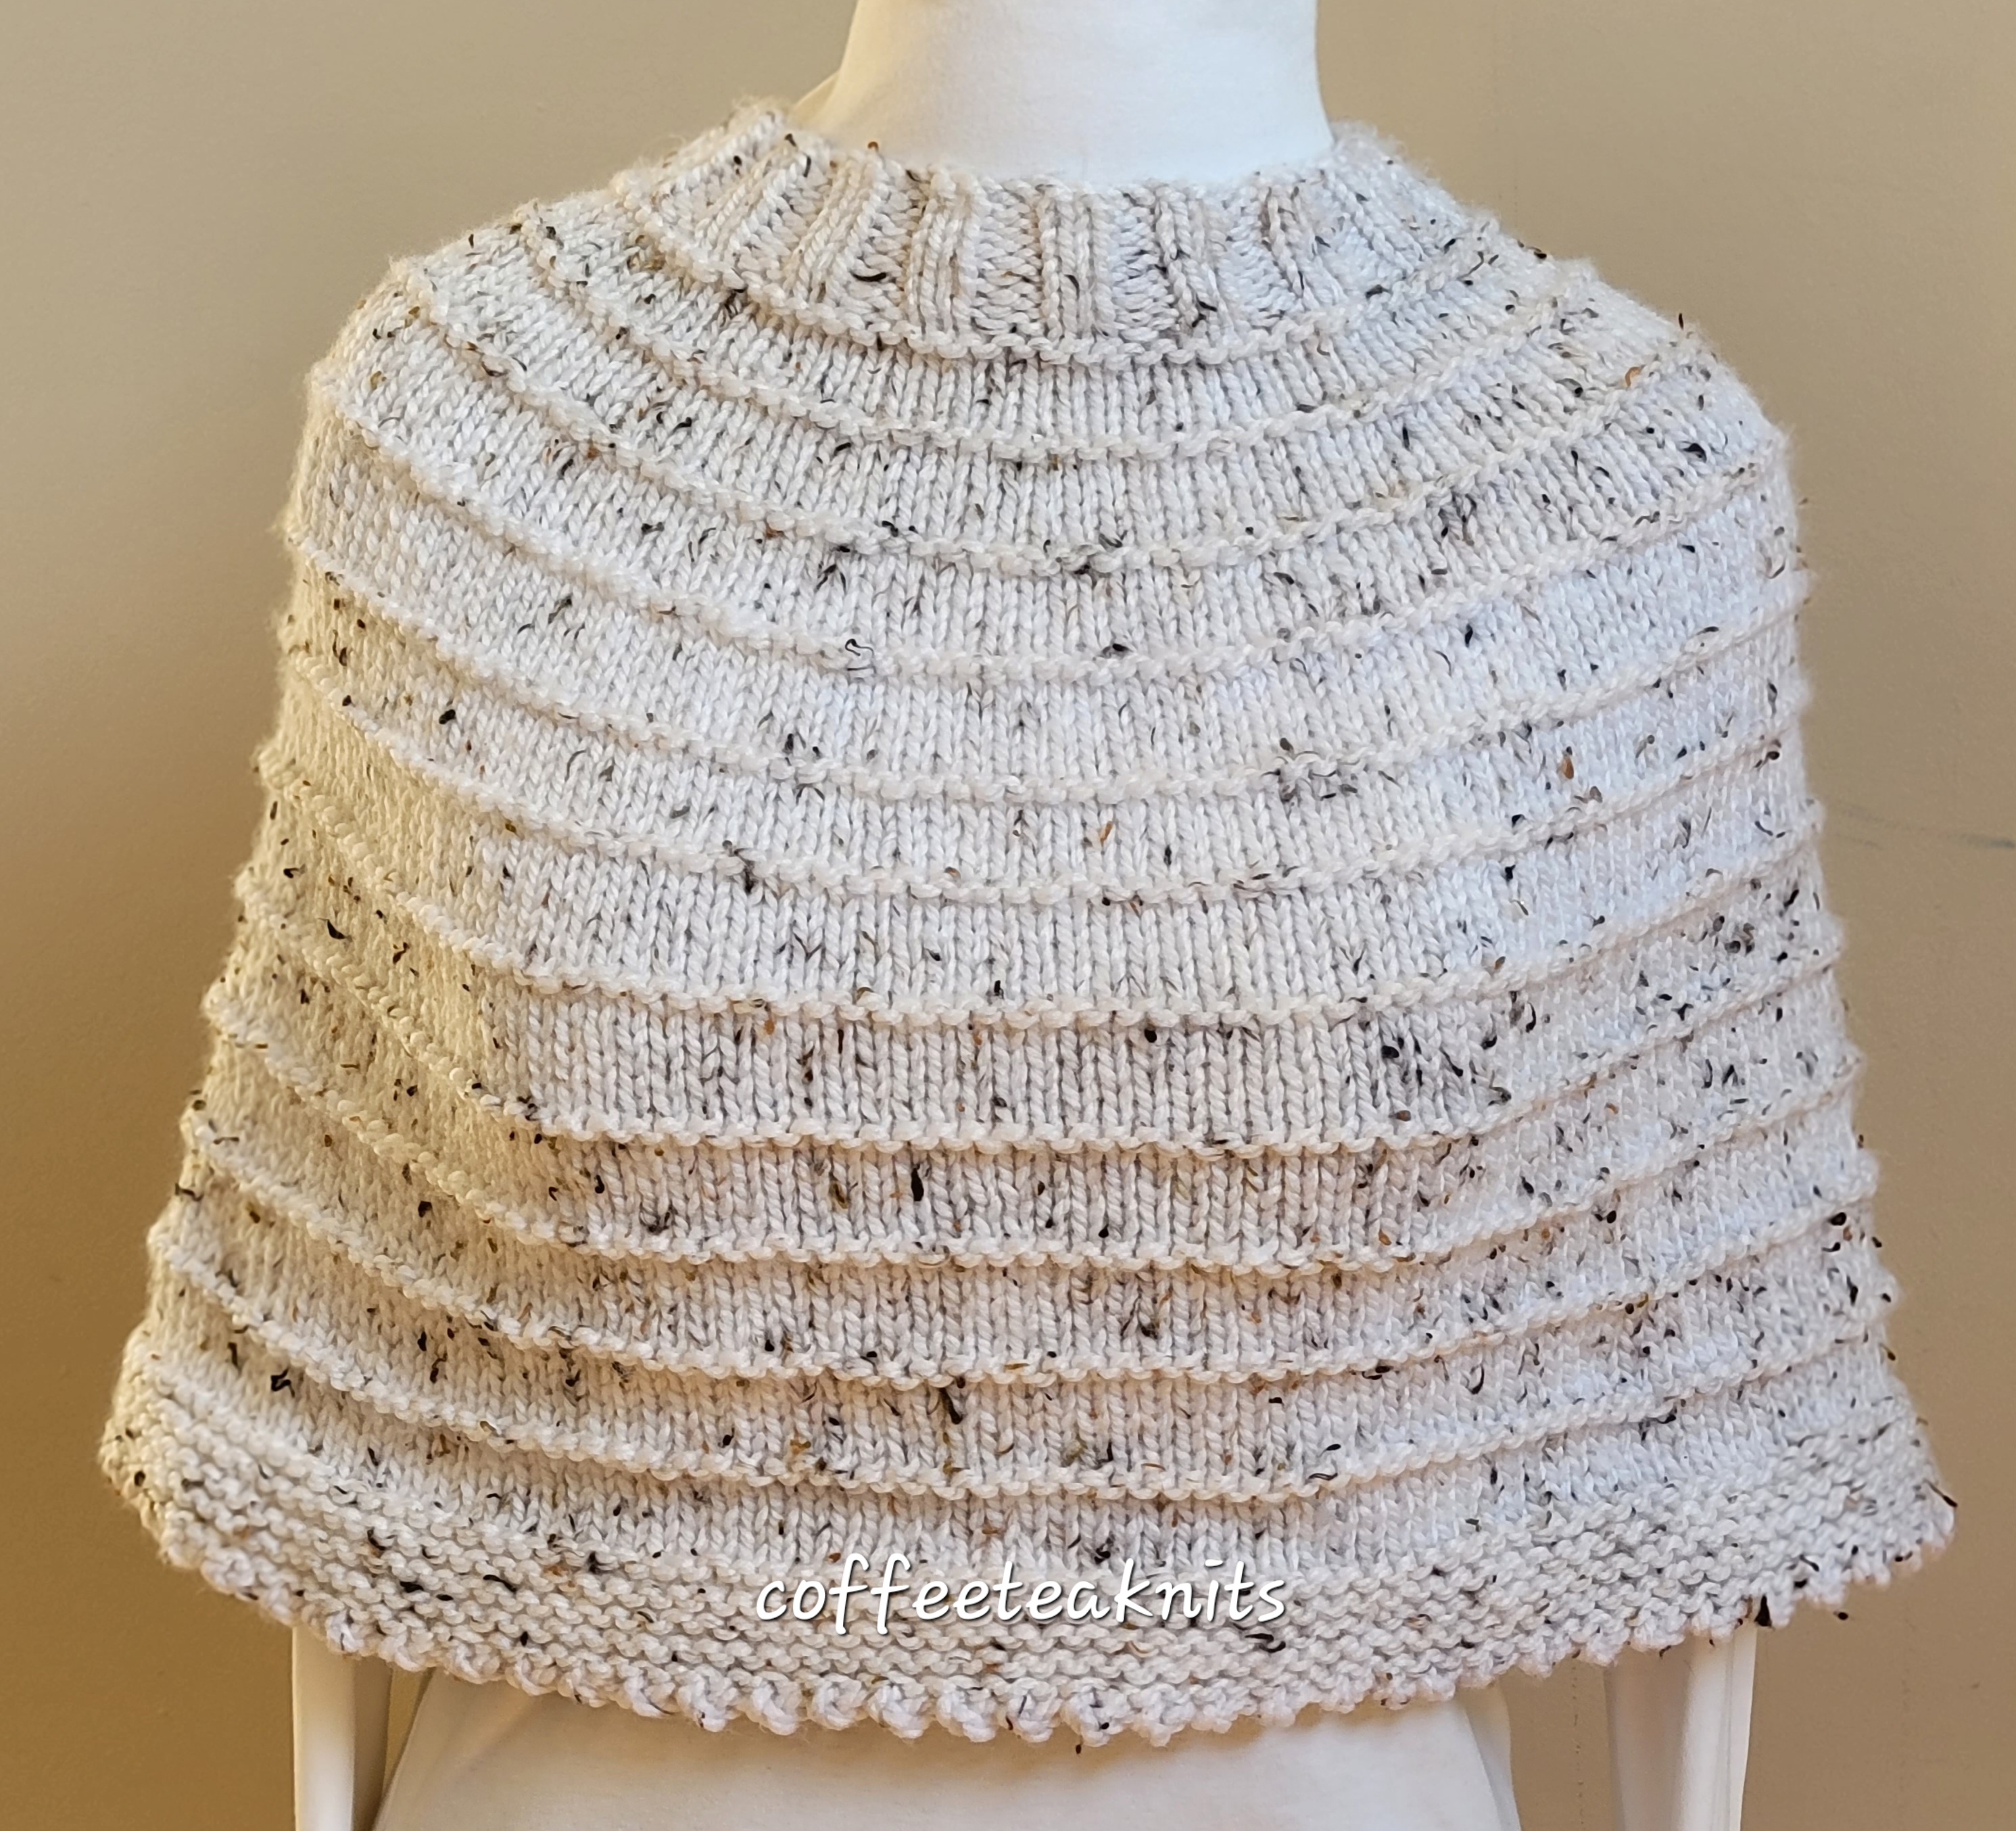
The cozy time of the year has begun and with it a reason to knit the cozy sweaters, shrugs etc. to keep us warm and give us comfort during the cold autumn mornings and evenings. The Cozy Season Shrug is knit with Loops and Threads® Charisma™ yarn that is bulky weight yet it’s light and warm without the itchiness or heaviness of a bulky weight wool yarn. The Cozy Season Shrug knits up quite fast and makes a cozy holiday gift. I knit two Cozy Season Shrugs with the same yarn but in two different colorways which embodies the autumn season to me with the vibrant and earthy tones of the colorway Clay Heather and the snow covered ground and trees of the colorway White Tweed. 

The Cozy Season Shrug is knit top down in a yoke construction with stitches increased in four intervals. It begins with eight rounds of 2 x 2 rib stitch pattern for the collar followed by stockinette stitch pattern with garter stitch ridge/stripe for the body and then a border of eight rounds of garter stitch pattern. The decorative bind off used for the Cozy Season Shrug is a variation of the knotted K2tog (video tutorial below) bind off method. 

The Cozy Season Shrug Pattern (images and text for personal use only)

Yarn: Loops and Threads® Charisma™ Heather yarn in Colorway Clay Heather (4 skeins for this project) and Loops and Threads® Charisma™ Tweed in Colorway White Tweed (5 skeins for this project)
Knitting Needles: US #9 (5.5 mm) 16-inch circular needles; US #10 (6.0 mm) 16-inch and 24-inch or 32-inch circular knitting needles. 
Tapestry needle to weave in ends
Gauge: 12.0 stitches in 4 inches in the stockinette stitch pattern
Size of the Cozy Season Shrug: Length from cast on to bind off is about 17 inches and width around the  shoulders is about 48 inches. 

Abbreviations:
K: Knit
P: Purl
wyif: with working yarn in front
wyib: with working yarn in back
slip knitwise: with working yarn in back slip 1 stitch knitwise from the left needle
[…]: stitch pattern repeats
Kfb: Knit a stitch in the front and back (Kfb tutorial)
BOR marker: Beginning of round marker 

With US #10 size knitting needles, cast on 72 stitches using the cable cast on method. 

Transfer all the stitches to US #9 16-inch circular knitting needles, place a BOR marker on the right needle and join round by knitting the following:
Round 1: With US #9 16-inch circular knitting needle, [K2, P2] repeat […] till BOR marker, slip BOR marker
Round 2 to Round 8: [K2, P2] repeat […] till BOR marker, slip BOR marker

Change to US #10 16-inch circular knitting needle
Round 9: Increase 10 stitches in this round. Knit stitches with a Kfb in 10 stitches spaced evenly in the round till the BOR marker, slip BOR marker (10 stitches increased) 
Round 10: Purl all stitches till the BOR marker, slip the BOR marker
Round 11: Wyib slip the first stitch knitwise, knit all stitches till the BOR marker, slip BOR marker
Round 12 to Round 15: Knit all stitches till BOR marker, slip BOR marker
Round 16: Increase 16 stitches in this round. Knit stitches with a Kfb in 16 stitches spaced evenly in the round till the BOR marker, slip BOR marker (16 stitches increased) 
Round 17: Purl all stitches till the BOR marker, slip the BOR marker
Round 18: Wyib slip the first stitch knitwise, knit all stitches till the BOR marker, slip BOR marker
Round 19 to Round 22: Knit all stitches till BOR marker, slip BOR marker
Round 23: Increase 20 stitches in this round. Knit stitches with a Kfb in 20 stitches spaced evenly in the round till the BOR marker, slip BOR marker (20 stitches increased) 
Round 24: Purl all stitches till the BOR marker, slip the BOR marker
Round 25: Wyib slip the first stitch knitwise, knit all stitches till the BOR marker, slip BOR marker
Round 26 to Round 29: Knit all stitches till BOR marker, slip BOR marker
Round 30: Increase 32 stitches in this round. Knit stitches with a Kfb in 32 stitches spaced evenly in the round till the BOR marker, slip BOR marker (32 stitches increased) 
Round 31: Purl all stitches till the BOR marker, slip the BOR marker

Change to US #10 24-inch or 32-inch circular knitting needle (Total stitch count is 150) 
Round 32: Wyib slip the first stitch knitwise, knit all stitches till the BOR marker, slip BOR marker
Round 33 to 37: Knit all stitches till BOR marker, slip BOR marker
Round 38: Purl all stitches till the BOR marker, slip the BOR marker

Repeat Rounds 32 to 38, seven more times

Garter Stitch Border: 
Round 1: Wyib slip the first stitch knitwise, knit all stitches till the BOR marker, slip BOR marker
Round 2: Purl all stitches till the BOR marker, slip the BOR marker
Round 3: Wyib slip the first stitch knitwise, knit all stitches till the BOR marker, slip BOR marker
Round 4: Purl all stitches till the BOR marker, slip the BOR marker
Round 5: Wyib slip the first stitch knitwise, knit all stitches till the BOR marker, slip BOR marker
Round 6: Purl all stitches till the BOR marker, slip the BOR marker
Round 7: Wyib slip the first stitch knitwise, knit all stitches till the BOR marker, slip BOR marker
Round 8: Purl all stitches till the BOR marker, slip the BOR marker

Knotted K2tog bind off: (short video below after written instruction) 
Bind off Round: K2, wyif slip the 2 stitches on the right needle back to the left knitting needle, wrap working yarn in front of the 2 stitches and K2tog, K1, pass the second stitch over the first stitch on the right needle; [K1, wyif slip the 2 stitches on the right needle back to the left knitting needle, wrap working yarn in front of the 2 stitches and K2tog, K1, pass the second stitch over the first stitch on the right needle; repeat […] till one stitch left. Cut yarn and pull working yarn through the last stitch. 

Weave in the ends, wash and block the Cozy Season Shrug


~coffeeteaknits.com

Tutorial Series: (Kfb) Knit front and back

One way to increase stitches in knitting is the Kfb (knit front and back) method. Increasing stitches in knitting is used to give shape to knitted items, for texture and for lace work. An extra stitch is added in a row or round when a stitch on the left knitting needle is knit both in the front loop as well as in the back loop. This tutorial includes written instructions and two videos (one in slow motion) on how to increase stitches by doing a Kfb for right handed knitting.

Kfb in Slow Motion:

Written Instructions for Kfb (Knit front and back):

  • Insert the right knitting needle into the front loop of the first stitch on the left knitting needle
  • Bring the working yarn around and between the left and right knitting needles
  • Catch and pull the loop made by the working yarn with the right needle
  • Turn the right needle towards the back loop of the same stitch on the left needle
  • Insert the right needle into the back loop of that stitch
  • Bring the working yarn around and between the two needles
  • Catch and pull the new loop made by the working yarn with the right needle
  • Slide the first stitch off the left needle and secure the two new stitches on the right needle

The video below shows Knit 1, KFB, Knit 1, Kfb:


~coffeeteaknits.com

The Layered Bricks Scarf Pattern

The Layered Bricks Scarf


Why am I drawn to yarn that eventually becomes discontinued? One of my favorite pastimes is to go to my local arts and crafts stores to window shop, get some inspiration, or sometimes sample some unique yarn. It was so with the Yarn Bee® Fresh Haven yarn I purchased from Hobby Lobby last year, which I used for a weaving project. I liked the softness of the yarn so I went back to Hobby Lobby to get some more to knit a cardigan or a blanket but couldn’t find any. I later found out that it was discontinued. Fortunately, I had one skein of two different yarn colors left, so I used them to knit the Layered Bricks Scarf.

The yarn is made with 100% Tencel®. Tencel® yarn is made with wood pulp that is chemically processed to create the semi synthetic cellulose fibers (Lyocell). It is known for its strength, is durable and absorbs moisture well. It’s also hypoallergenic making it suitable for those who are sensitive to wool. I just like the yarn because it feels soft, silky and drapes well. I am of course quite disappointed that this yarn has been discontinued.

The Layered Bricks Scarf is knit in the houndstooth pattern using garter stitch pattern with slipped stitches. It’s a four row repeat pattern that alternates the yarn colorway every two rows. The scarf pattern is similar to the Interwoven Earwarmer pattern but knit flat instead of in the round. Unlike the Interwoven Earwarmer, the Layered Bricks Scarf has no purl stitches making this pattern more beginner-friendly.

The Layered Bricks Scarf Pattern (text and images for personal use only)

Yarn: Yarn Bee® Fresh Haven yarn in Colorway A: Red Clay and Colorway B: Grey (The yarn has been discontinued but other yarn with Tencel® or Lyocell fiber can be substituted for it)
Knitting Needles: US #6 (4.0 mm) circular needles or straight needles; US #8 (5.0 mm) knitting needles for the cast on and bind off
Crochet Hooks: US G-6 (4.0 mm)
Tapestry needle to weave in ends
Gauge: 6.0 stitches per inch in the garter houndstooth stitch pattern with US #6 knitting needles after washing
Size of the Layered Bricks Scarf: about 5.5 inches wide and 58.5 inches long without stretching

Abbreviations:
K: Knit
pm: place marker
sm: slip marker
wyif: with working yarn in front
s1 purlwise: with working yarn in back slip 1 stitch purlwise from the left needle
[…]: stitch pattern repeats

With US #8 (5.0 mm) knitting needles and thumb or long tail cast on method, cast on 1 stitch, pm, cast on 33 stitches, pm, cast on 1 stitch (35 stitches in total) with Colorway B (grey) yarn. Knit the following with US #6 knitting needles:

  • Row 1 (RS): With Colorway A (red clay) yarn – K1, sm, [K2, s1 purlwise] repeat […] till marker, sm, wyif S1 purlwise
  • Row 2 (WS): With Colorway A (red clay) yarn – K1, sm, knit to marker, sm, wyif S1 purlwise
  • Row 3 (RS): With Colorway B (grey) yarn – K1, sm, [s1 purlwise, K2] repeat […] till marker, sm, wyif S1 purlwise
  • Row 4 (WS): With Colorway B (grey) yarn – K1, sm, knit to marker, sm, wyif S1 purlwise

Repeat Rows 1 to 4, 118 times.
Repeat Rows 1 and 2 once more. Cut the Colorway A (red clay) yarn and secure it.
With Colorway B (grey) yarn and US # 8 (5.0 mm) knitting needles, bind off loosely in the knit stitch while removing the two markers.
Remove the US #8 needle from the last bind off stitch and insert a G-6 (4.0 mm) crochet hook, then chain one.

  • Turn the scarf and single crochet along the left length of the scarf
  • Turn and single crochet along the cast-on edge
  • Turn and single crochet up along the right side length of the scarf
  • Turn and single crochet along the bind off edge of the scarf

Slip stitch into the beginning stitch of the single crochet. Pull yarn through.
Weave in the ends with the tapestry needle, wash and block the Layered Bricks Scarf

The Layered Bricks Scarf turned out soft and silky as I had expected. It’s stretchy and drapes well too. It keeps me warm and is perfect for this time of the year.


~coffeeteaknits.com

Tutorial Series: K2tog and P2tog

One way to decrease a stitch in knitting is by doing a K2tog on the knit row/round or a P2tog on a purl row/round. K2tog stands for knit two stitches together and P2tog stands for purl two stitches together. The videos below show both ways of decreasing one stitch in right handed knitting.

K2tog:

  • Insert the right needle from back to front of the second stitch on the left knitting needle and then insert it into the first stitch on the left needle
  • Wrap the working yarn around the inserted right needle
  • Pull the right knitting needle and working yarn loop into and through the 2 stitches on the left needle
  • Keep the working yarn loop (the new stitch) on the right needle and slide the 2 stitches off the left needle

P2tog:

  • Insert right needle front to back into the first two stitches on the left knitting needle
  • Wrap the working yarn around the right needle
  • Pull the working yarn loop on the right needle through the two stitches on the left needle and keep the loop (new stitch) on the right needle
  • Slide the first two stitches off the left needle

~coffeeteaknits.com

To Crochet a Cardigan


Last month I completed my very first crochet cardigan. It is based on the free crochet pattern called In the Clouds Cardigan by Grace of For The Frills. The cardigan is beginner friendly and the pattern comes along with a video tutorial on how to crochet this cardigan. The video tutorial for this cardigan was very helpful.

I picked this cardigan because it had a similar crochet moss stitch pattern (single crochet, chain one) yet where the single crochet was placed gave a different texture to the crocheted item. This textured crochet stitch pattern was also my inspiration to design and crochet the Four Sections Blanket pattern.

Briefly, the body of the free cardigan pattern is worked sideways (lengthwise) beginning from the first front panel, then the back, and ending with the second front panel leaving gaps for the armholes. The shoulders are seamed. The sleeves are crocheted flat and then seamed to the armhole edges. The ribbing for the body, sleeves, pockets, and neckband are crocheted separately using smaller crochet hooks and then seamed to the cardigan.

My cardigan looks quite different from In the Clouds Cardigan. Although I used the sideway technique and the same stitch pattern, I made several modifications to the cardigan. The cardigan I crocheted is not oversized nor does it have any pockets. Worsted weight yarn that I had purchased some years ago was used instead of the bulky weight yarn recommended in the pattern. My gauge was different and so were the crochet hooks that I used.

The biggest modification was in the sleeves of the cardigan and the neckband ribbing. Since I didn’t have enough yarn left to crochet long length sleeves, I decided to pick up stitches along the armhole edges with a knitting needle and purled both sleeves (pictured below) ending with a repetition of [Knit 1 through the back loop, purl 1] for the ribbing of the sleeves. For the neckband ribbing, I crocheted several rows of the moss stitch pattern all along one front, the neck and down the other front.


There are two main lessons I learnt from crocheting this beginner friendly cardigan pattern. One is that you need more yarn for a crochet cardigan than for knitted cardigan, and the other is that crocheting a cardigan takes less time than knitting one.

I am satisfied with how the cardigan turned out. Since the time to crochet a cardigan is much shorter than knitting one, I will definitely be crocheting more sweaters. There are several free crochet patterns available on For The Frills website that are quite lovely and beginner friendly. Some patterns also have video tutorials. I can’t wait to crochet another cardigan or a pullover using these free patterns by Grace.


How has your experience with crocheting cardigans been? Share some of your experiences in the comment below.


~coffeeteaknits.com