Somehow the birds chirping, the bright blue sky, the showers, warmer days, new leaves on trees and the vibrant Spring flowers refresh and lighten my mood. I get motivated to declutter, clean and of course start new knitting projects appropriate for Spring and Summer. As the weather gets warmer, I start knitting more with cotton yarn. Spring is in the Air Dishcloth reflects this cheerfulness that comes with warm weather. The dishcloth was knit in the linen stitch pattern with two different colors of cotton worsted yarn. It was knit in the round moving towards the center through a series of decreases every other round. The knitting technique for this dishcloth is similar to The Toward Center Mitered Dishcloth but was knit alternating two different colors of the cotton worsted yarn in each round.
Spring Is In The Air Dishcloth Pattern (text and images for personal use only)
Yarn: Any Cotton Worsted Yarn in 2 different colorways – I used some Lily Sugar’n Cream yarn in White (Colorway 2) and Yellow (Colorway 1)
Knitting Needles: US #10 for cast on and US #9 circular needles to knit the dishcloth
Crochet hook: US size H- 8 or 5.0 mm crochet hook
Tapestry Needle to weave in ends
Gauge: 4 stitches/inch but is not needed for this project
Abbreviations:
- K: Knit
- P: Purl
- K2tog: Knit the first two stitches on the left needle together
- pm: place marker
- sm: slip marker
- BOR: beginning of round
- wyib: with working yarn in the back
- wyif: with working yarn in front
- *…*: pattern repeats within a section
- […]: repeat pattern for each of the 4 sections within brackets
With US #10 knitting needles cast on 140 stitches with Colorway 2 (White) yarn using the long tail cast on or the thumb method.
Transfer all stitches to a 16 inch US #9 circular needles, place a BOR marker and join round to knit the following making sure the stitches are not twisted.
- Round 1: With Colorway 1 yarn (Yellow): [slip 1 stitch wyib, pm, K2tog, (*K1, slip1 wyif* repeat *…* 15 more times), K2tog, pm] repeat […] 2 more times, slip 1 stitch wyib, pm, K2tog, (*K1, slip1 wyif* repeat *…* 15 more times), K2tog, slip BOR marker
- Round 2: With Colorway 2 yarn (White): [K1, sm, *K1, slip 1 wyif* repeat *…* till marker, sm] repeat […] 2 more times, K1, sm, *K1, slip 1 wyif* repeat *…* till BOR marker, slip BOR marker
- Round 3: With Colorway 1 yarn (Yellow): [slip 1 stitch wyib, sm, K2tog, *slip1 wyif, K1* repeat *…* till 2 stitches before marker, K2tog, sm] repeat […] 2 more times, slip 1 stitch wyib, pm, K2tog, *slip 1 wyif, K1* repeat *…* till 2 stitches before BOR marker, K2tog, slip BOR marker
- Round 4: With Colorway 2 yarn (White): [K1, sm, *slip 1 wyif, K1* repeat *…* till marker, sm] repeat […] 2 more times, K1, sm, *slip 1 wyif, K1* repeat *…* till BOR marker, slip BOR marker
- Round 5: With Colorway 1 yarn (Yellow): [slip 1 stitch wyib, sm, K2tog, *K1, slip 1 wyif* repeat *…* till 2 stitches before marker, K2tog, sm] repeat […] 2 more times, slip 1 stitch wyib, pm, K2tog, *K1, slip 1 wyif* repeat *…* till 2 stitches before BOR marker, K2tog, slip BOR marker
- Round 6: With Colorway 2 yarn (White): [K1, sm, *K1, slip1 wyif* repeat *…* till marker, sm] repeat […] 2 more times, K1, sm, *K1, slip 1 wyif* repeat *…* till BOR marker, slip BOR marker
Repeat Rounds 3 – 6, six more times. There are 20 stitches left on the needles after these repeats.
- Round 31: Colorway 1 (Yellow): [slip 1 stitch wyib, sm K2tog, K2tog, sm], repeat […] 2 more times, slip 1 stitch wyib, sm K2tog, K2tog, slip BOR marker
- Round 32: Colorway 2 (White): [K1, sm, slip 1 wyif, K1, sm], repeat […] 2 more times, K1, sm, slip1 wyif, K1, slip BOR marker
- Round 33: Colorway 1 (Yellow) : [slip 1 stitch wyib, sm, K2tog, sm], repeat […] 2 more times, slip 1 stitch wyib, sm, K2tog, slip BOR marker
- Round 34: Colorway 2 (White): Knit all stitches removing all markers except the BOR marker (8 stitches remaining)
Cut the working yarn and pull it through a tapestry needle. Insert the tapestry needle through the remaining eight stitches and pull them tight to close the gap. Secure yarn on the reverse side of the dishcloth.
Single Crochet Edging and hanging loop:
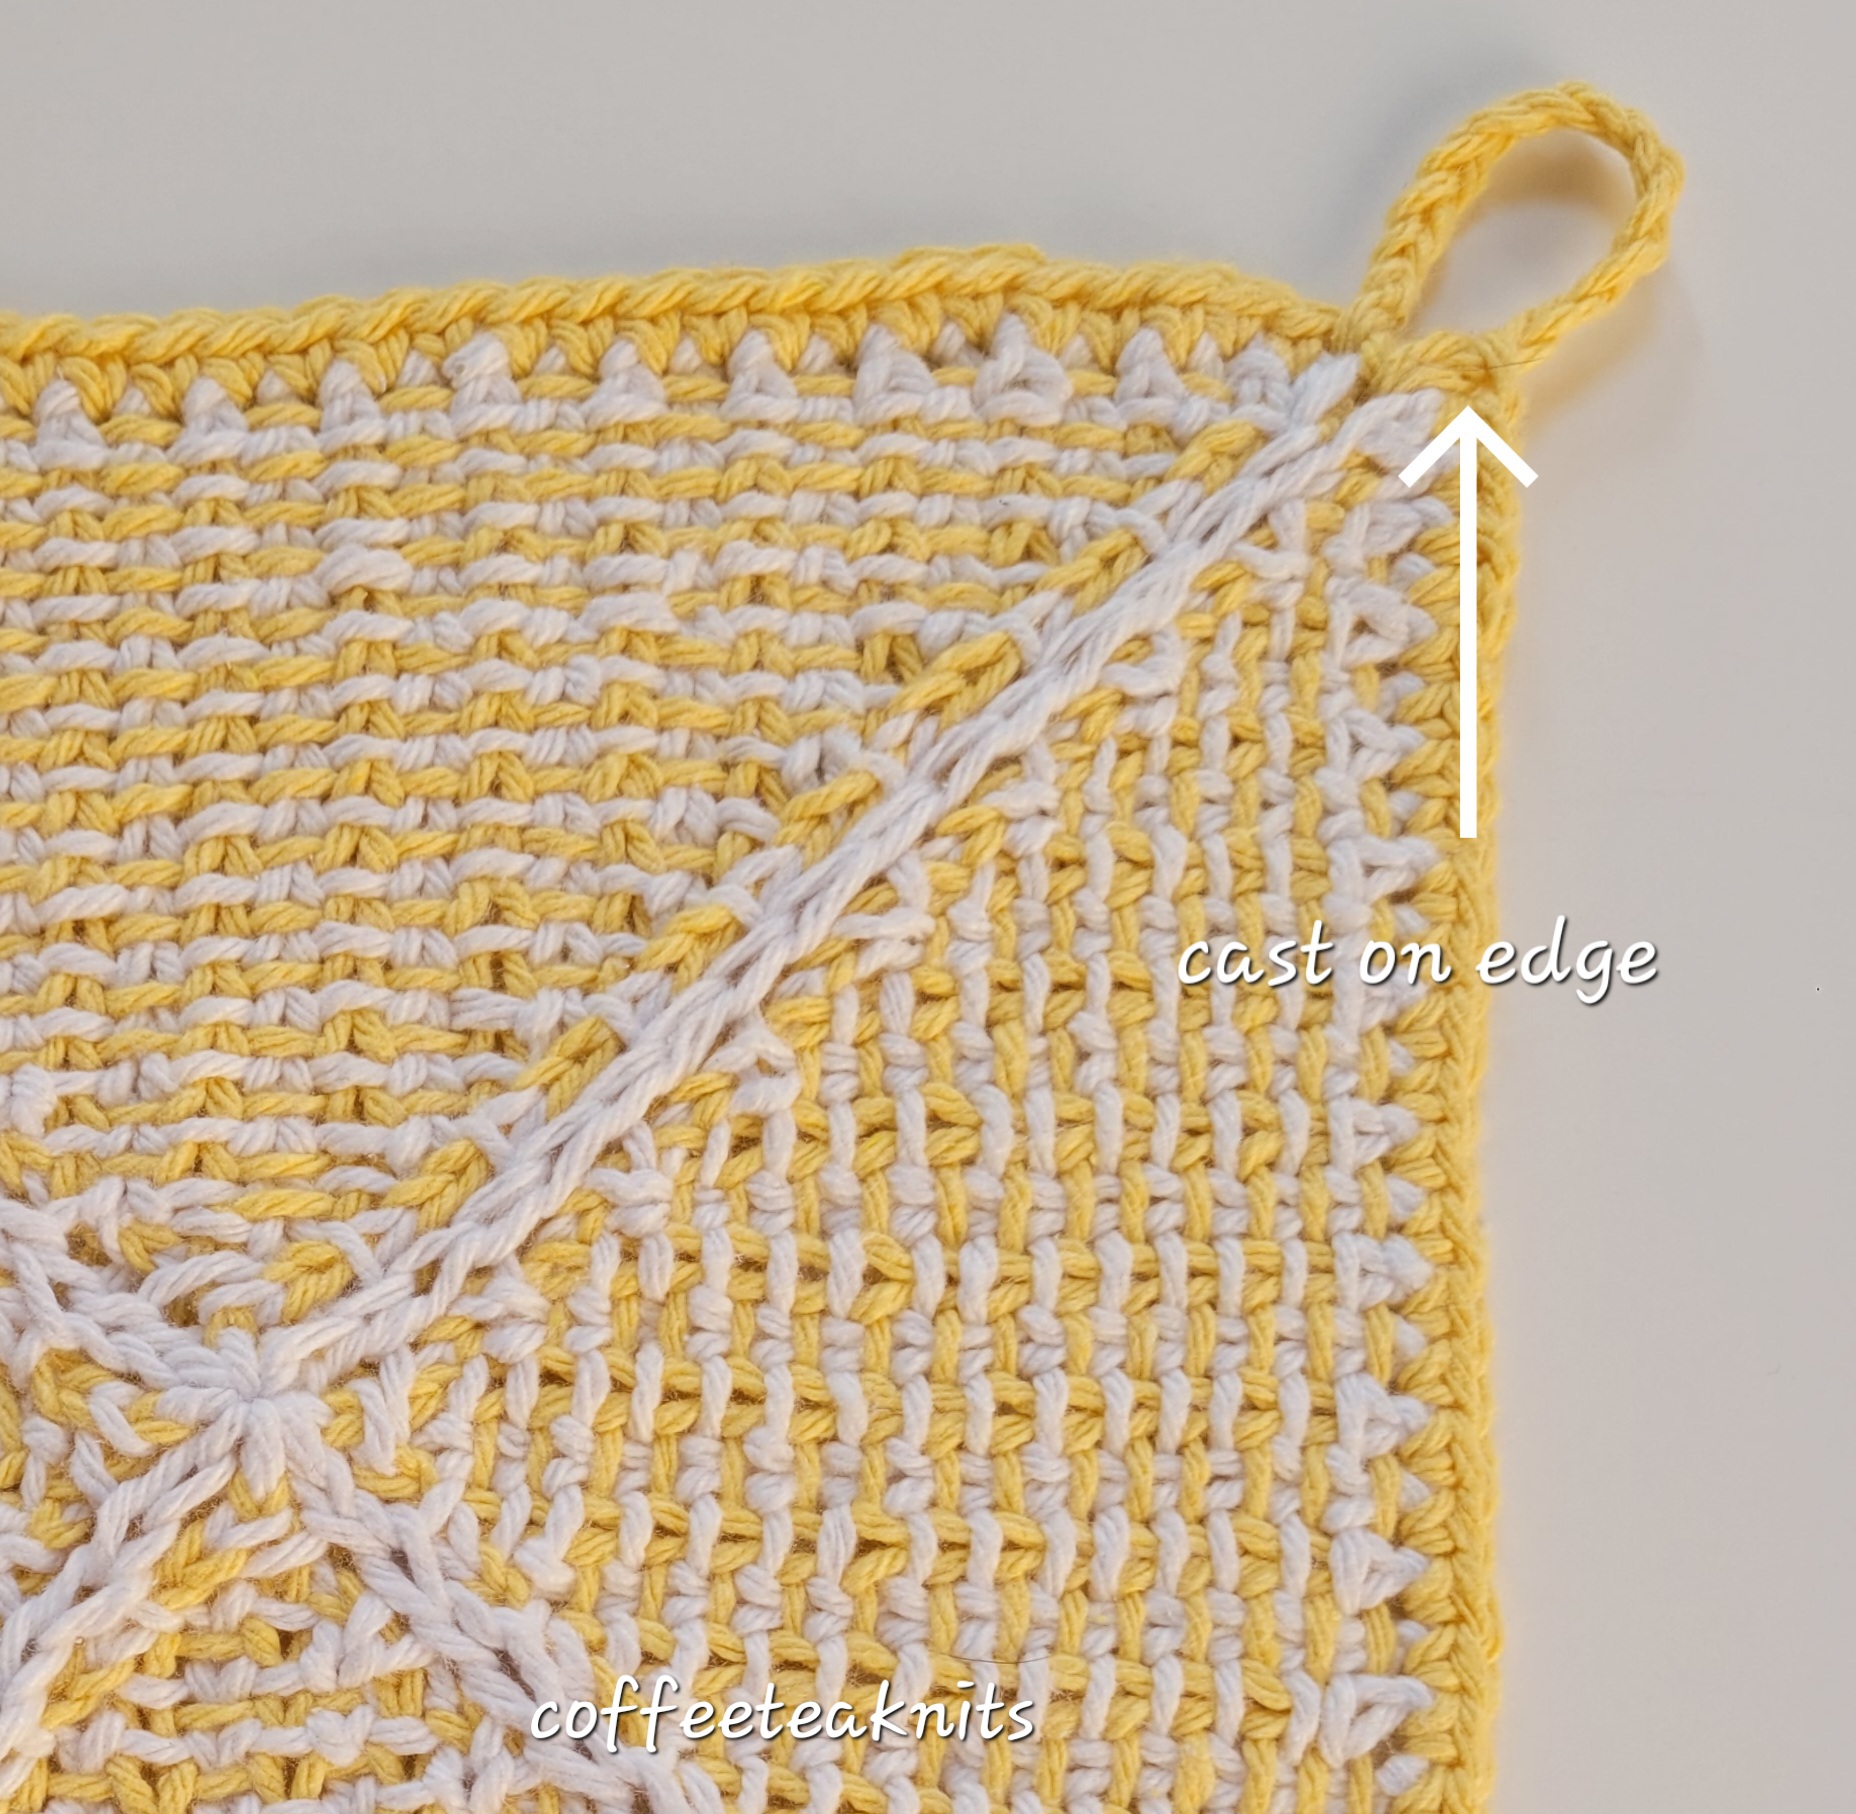
- Crochet edging: Starting at the cast on edge to the right of the center knit stitch (see picture below), pick up and single crochet with H-8 (5.0 mm) crochet hook all around the dishcloth edge with Colorway 1 (yellow) yarn. Slip stitch into the first single crochet border stitch and crochet 12 to 15 chain stitches. Slip stitch into the single crochet stitch on the other side of the center knit stitch.
- Weave in the ends
- Wash and block the dishcloth
Enjoy your knitting this Spring!
~coffeeteaknits.com
© Coffee Tea Knits. All text and images for personal use only. All Rights Reserved.

