Knitting in the round, also known as circular knitting, is a versatile technique. It allows knitters to create seamless items like hats, sweaters, and socks. Using double pointed needles (DPNs) or circular knitting needles, it’s possible to join rounds seamlessly. For knitting in the round, the first stitch is joined to the last stitch in the cast on row. The video and written instructions below show how I join round using circular knitting needles.
How to Join Round:
Written Instructions for How to Join Round:
Cast on the required number of stitches using a circular knitting needle.
Place a beginning of round marker (BOR) on the right circular knitting needle
Check to see all the stitches are facing inwards in one direction in the circular knitting needle
Without twisting the stitches, knit the stitch on the right circular needle to the first stitch on the left circular needle to join round
Continue knitting in the round as specified in the pattern
Since July 2020, I have created and shared 44 knitting and crochet patterns. I am grateful for the support and feedback from the knitting and crochet community, which has inspired and motivated me. I look forward to sharing more patterns in the future.
Coffee Tea Knits is returning in September with new video tutorials, blog posts, and a collection of free knitting patterns for all skill levels. Stay tuned for updates as we explore the world of yarn and needles together.
Another fundamental crochet stitch is the double crochet. It is taller than a single crochet and a half double crochet, but shorter than a treble or triple crochet. Fabric made with the double crochet stitch is less dense than fabric made with a half double crochet or single crochet. Below, you can find video and written instructions demonstrating how to make a double crochet for all the rows after the foundation chain when crocheting with your right hand.
How to Double Crochet (video in slow motion):
Written Instructions on How to Double Crochet in the rows after the Foundation Chain:
After a double crochet in the last chain stitch of the foundation chain row has been worked, chain three and turn the work for the second and all subsequent rows.
Wrap working yarn around the hook (counterclockwise), skip the first three stitches from the loop on the crochet hook and insert the crochet hook under both the strands of the next stitch
Wrap working yarn around hook (counterclockwise), catch and pull yarn under and through both the strands of the next stitch in the row
There are three loops on the crochet hook
Wrap the working yarn around the hook (counterclockwise), catch and pull yarn through the first two loops on the hook. There are two loops left on the crochet hook
Wrap the working yarn around the hook (counterclockwise), catch and pull yarn through the remaining two loops on the hook. There is one loop left on the crochet hook
Wrap working yarn around the hook (counterclockwise) and insert the crochet hook under both the strands of the next stitch in the row
Repeat steps 3 to 6
Repeat steps 7 and 8 till the last stitch in the row
For the last stitch of the row, repeat steps 3 and 6, chain three and turn
Repeat Steps 2 to 9 to double crochet all the subsequent rows
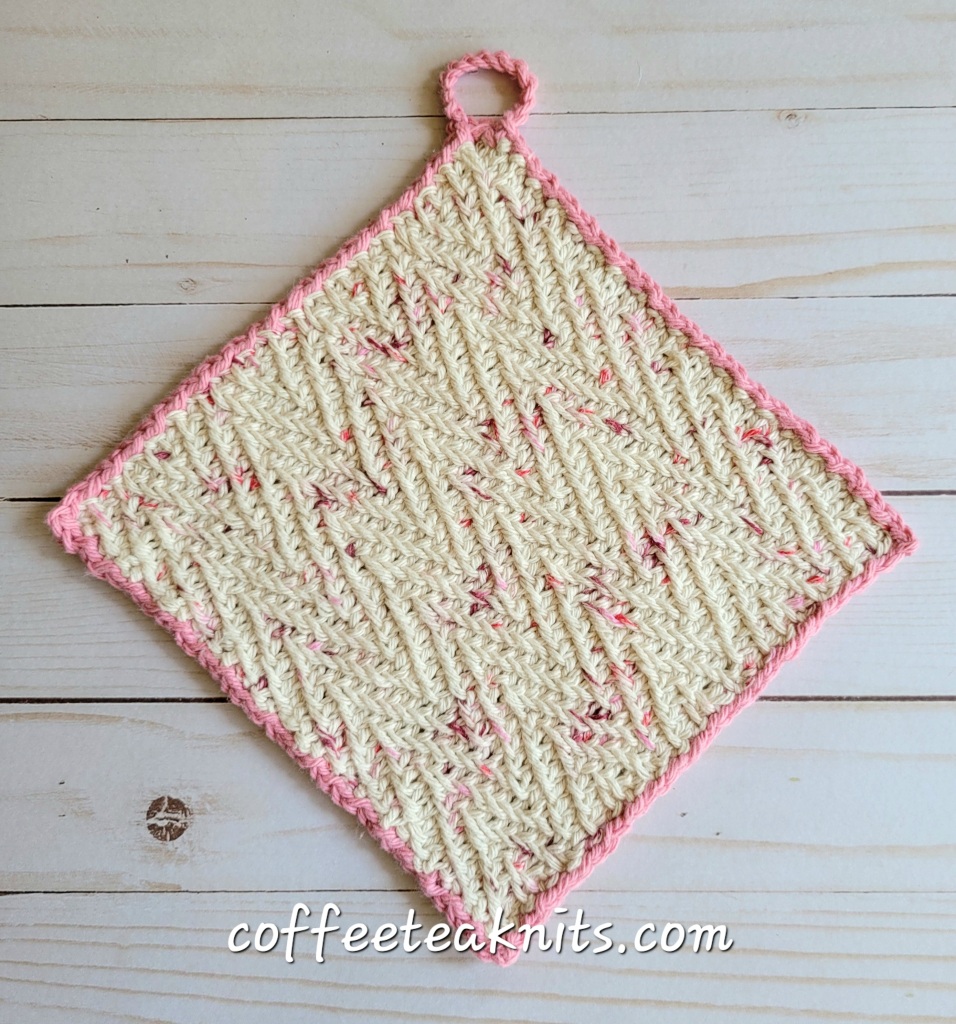
Since July 2020, I’ve been sharing patterns, starting with the Seed Stitch Mitered Dishcloth Pattern. During the COVID-19 pandemic, knitting/crocheting and creating patterns became a healing and therapeutic activity for me. I used Premier Home® Cotton Yarn in the Jelly Dots colorway for this dishcloth and for eight more patterns (see image gallery below)*. I had bought this yarn from the now-closed A.C. Moore arts and craft store before the pandemic. Although the store is closed, I’m grateful that the pandemic is over. The Braided Dishcloth will be the last pattern I make with this yarn as I no longer have it. This yarn colorway quickly became one of my favorites, and I’ve thoroughly enjoyed using it for the numerous dishcloths and other handmade items.
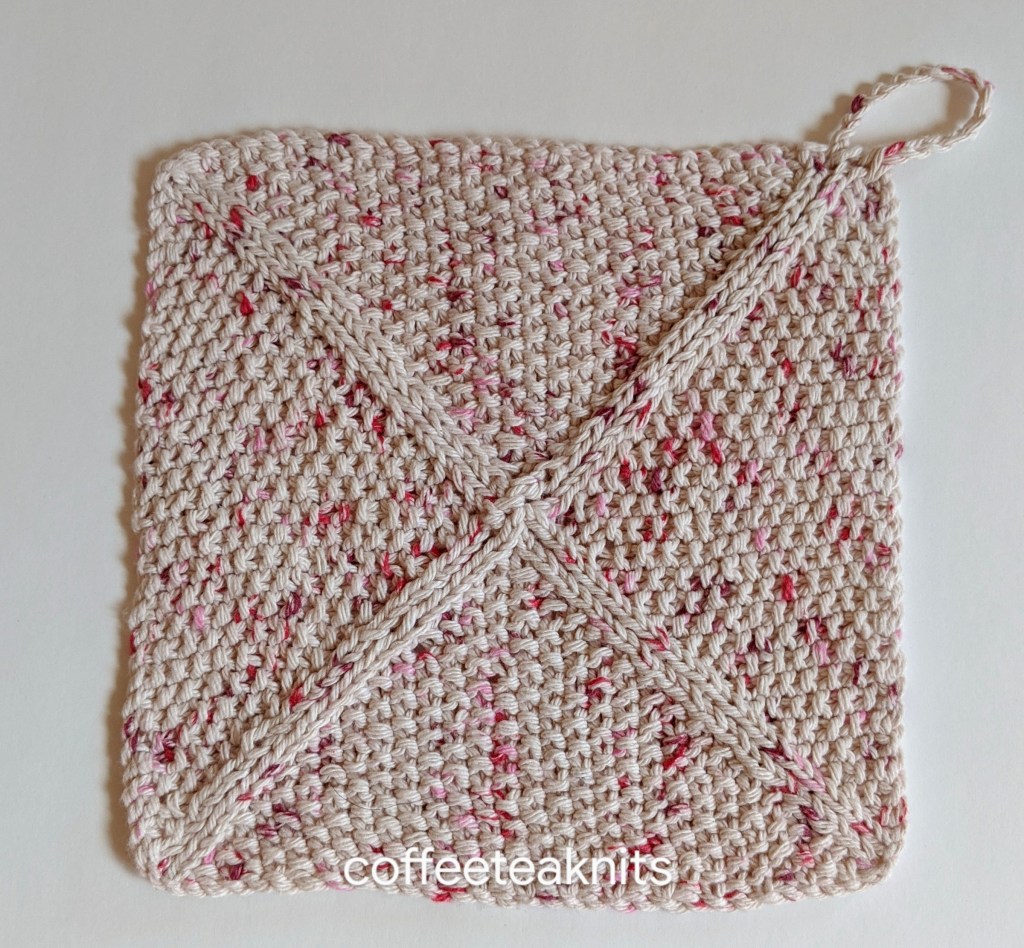
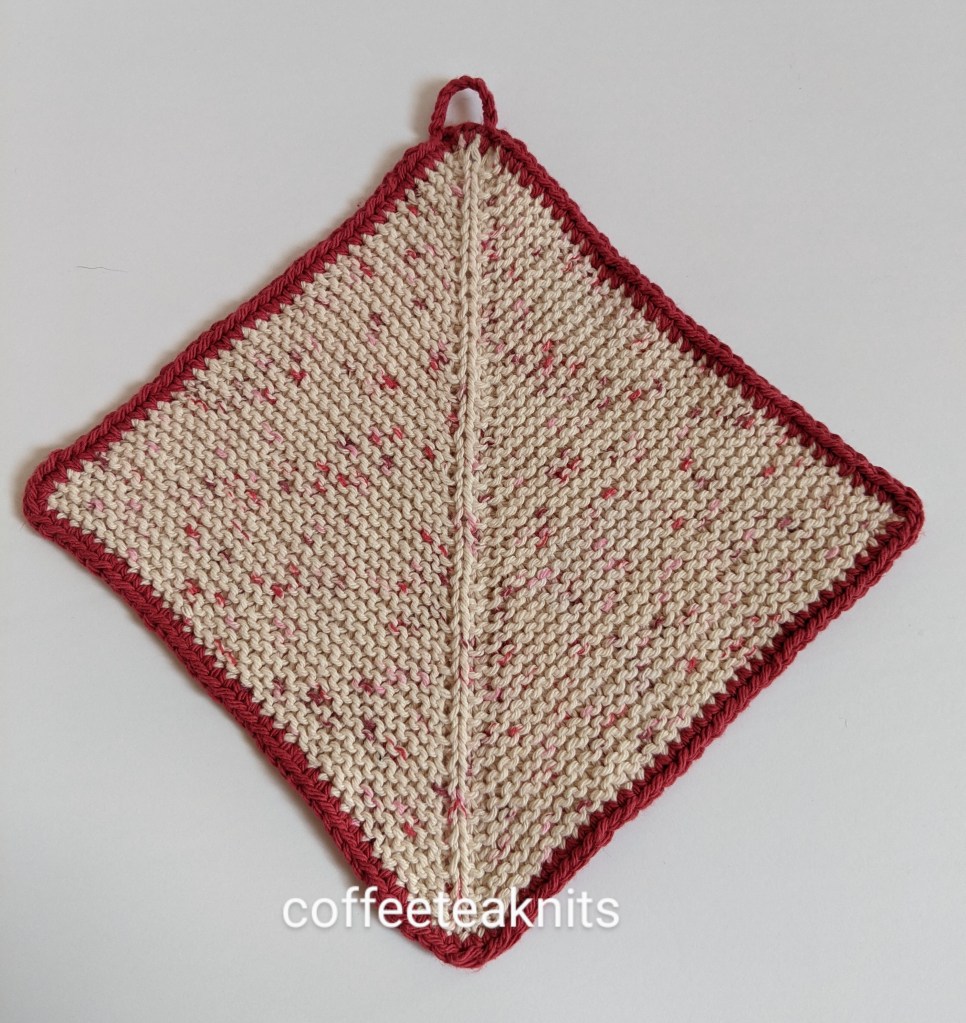
The Braided Dishcloth is crocheted using the brioche stitch pattern, which is also known as the double slip stitch pattern. The brioche stitch is reversible making this a versatile crochet stitch pattern. This stitch is worked similar to the half double crochet stitch but with a slip stitch instead of the third yarn over. The horizontal braids in the brioche crochet stitch reminds me of the Lateral Braid or Vikel Braid knit stitch pattern. The dishcloth is finished with a crochet moss stitch border and a hanging loop, measuring just over 7.5 inches in width and length after blocking.
Materials Needed for the Braided Dishcloth: Yarn: Premier Home Cotton® Cone yarn in Jelly Dots (Colorway 1) and Colorway 2 – any solid color worsted weight cotton yarn for the border (I used some leftover Lily Sugar’n Cream yarn in Country Red that I already had) Tapestry needle to weave in ends Gauge: 4.5 stitches per inch in brioche crochet stitch pattern Crochet hook: US size 7 (4.5 mm) and US G-6 (4.0 mm) for the border edge
Crochet Skill Level: Basic level with single crochet, half double crochet (How to Half Double Crochet) and slip stitches
Abbreviations:
sc: single crochet
[…]: stitch pattern repeats
The Braided Dishcloth Pattern (text and images for personal use only)
Chain 32 stitches (or any number of preferred stitches) with US 7 (4.5 mm) crochet hook
Yarn over (wrap the working yarn around the hook counterclockwise) insert the crochet hook into the top strand of the second foundation chain stitch
Yarn over (wrap the working yarn around the hook counterclockwise), catch and pull yarn through the top strand of the second chain stitch and through the two loops on the crochet hook
Repeat Steps 1 and 2 for all the remaining foundation chain stitch including the last chain stitch of the slip knot end
Chain one in the last stitch and turn for the second row
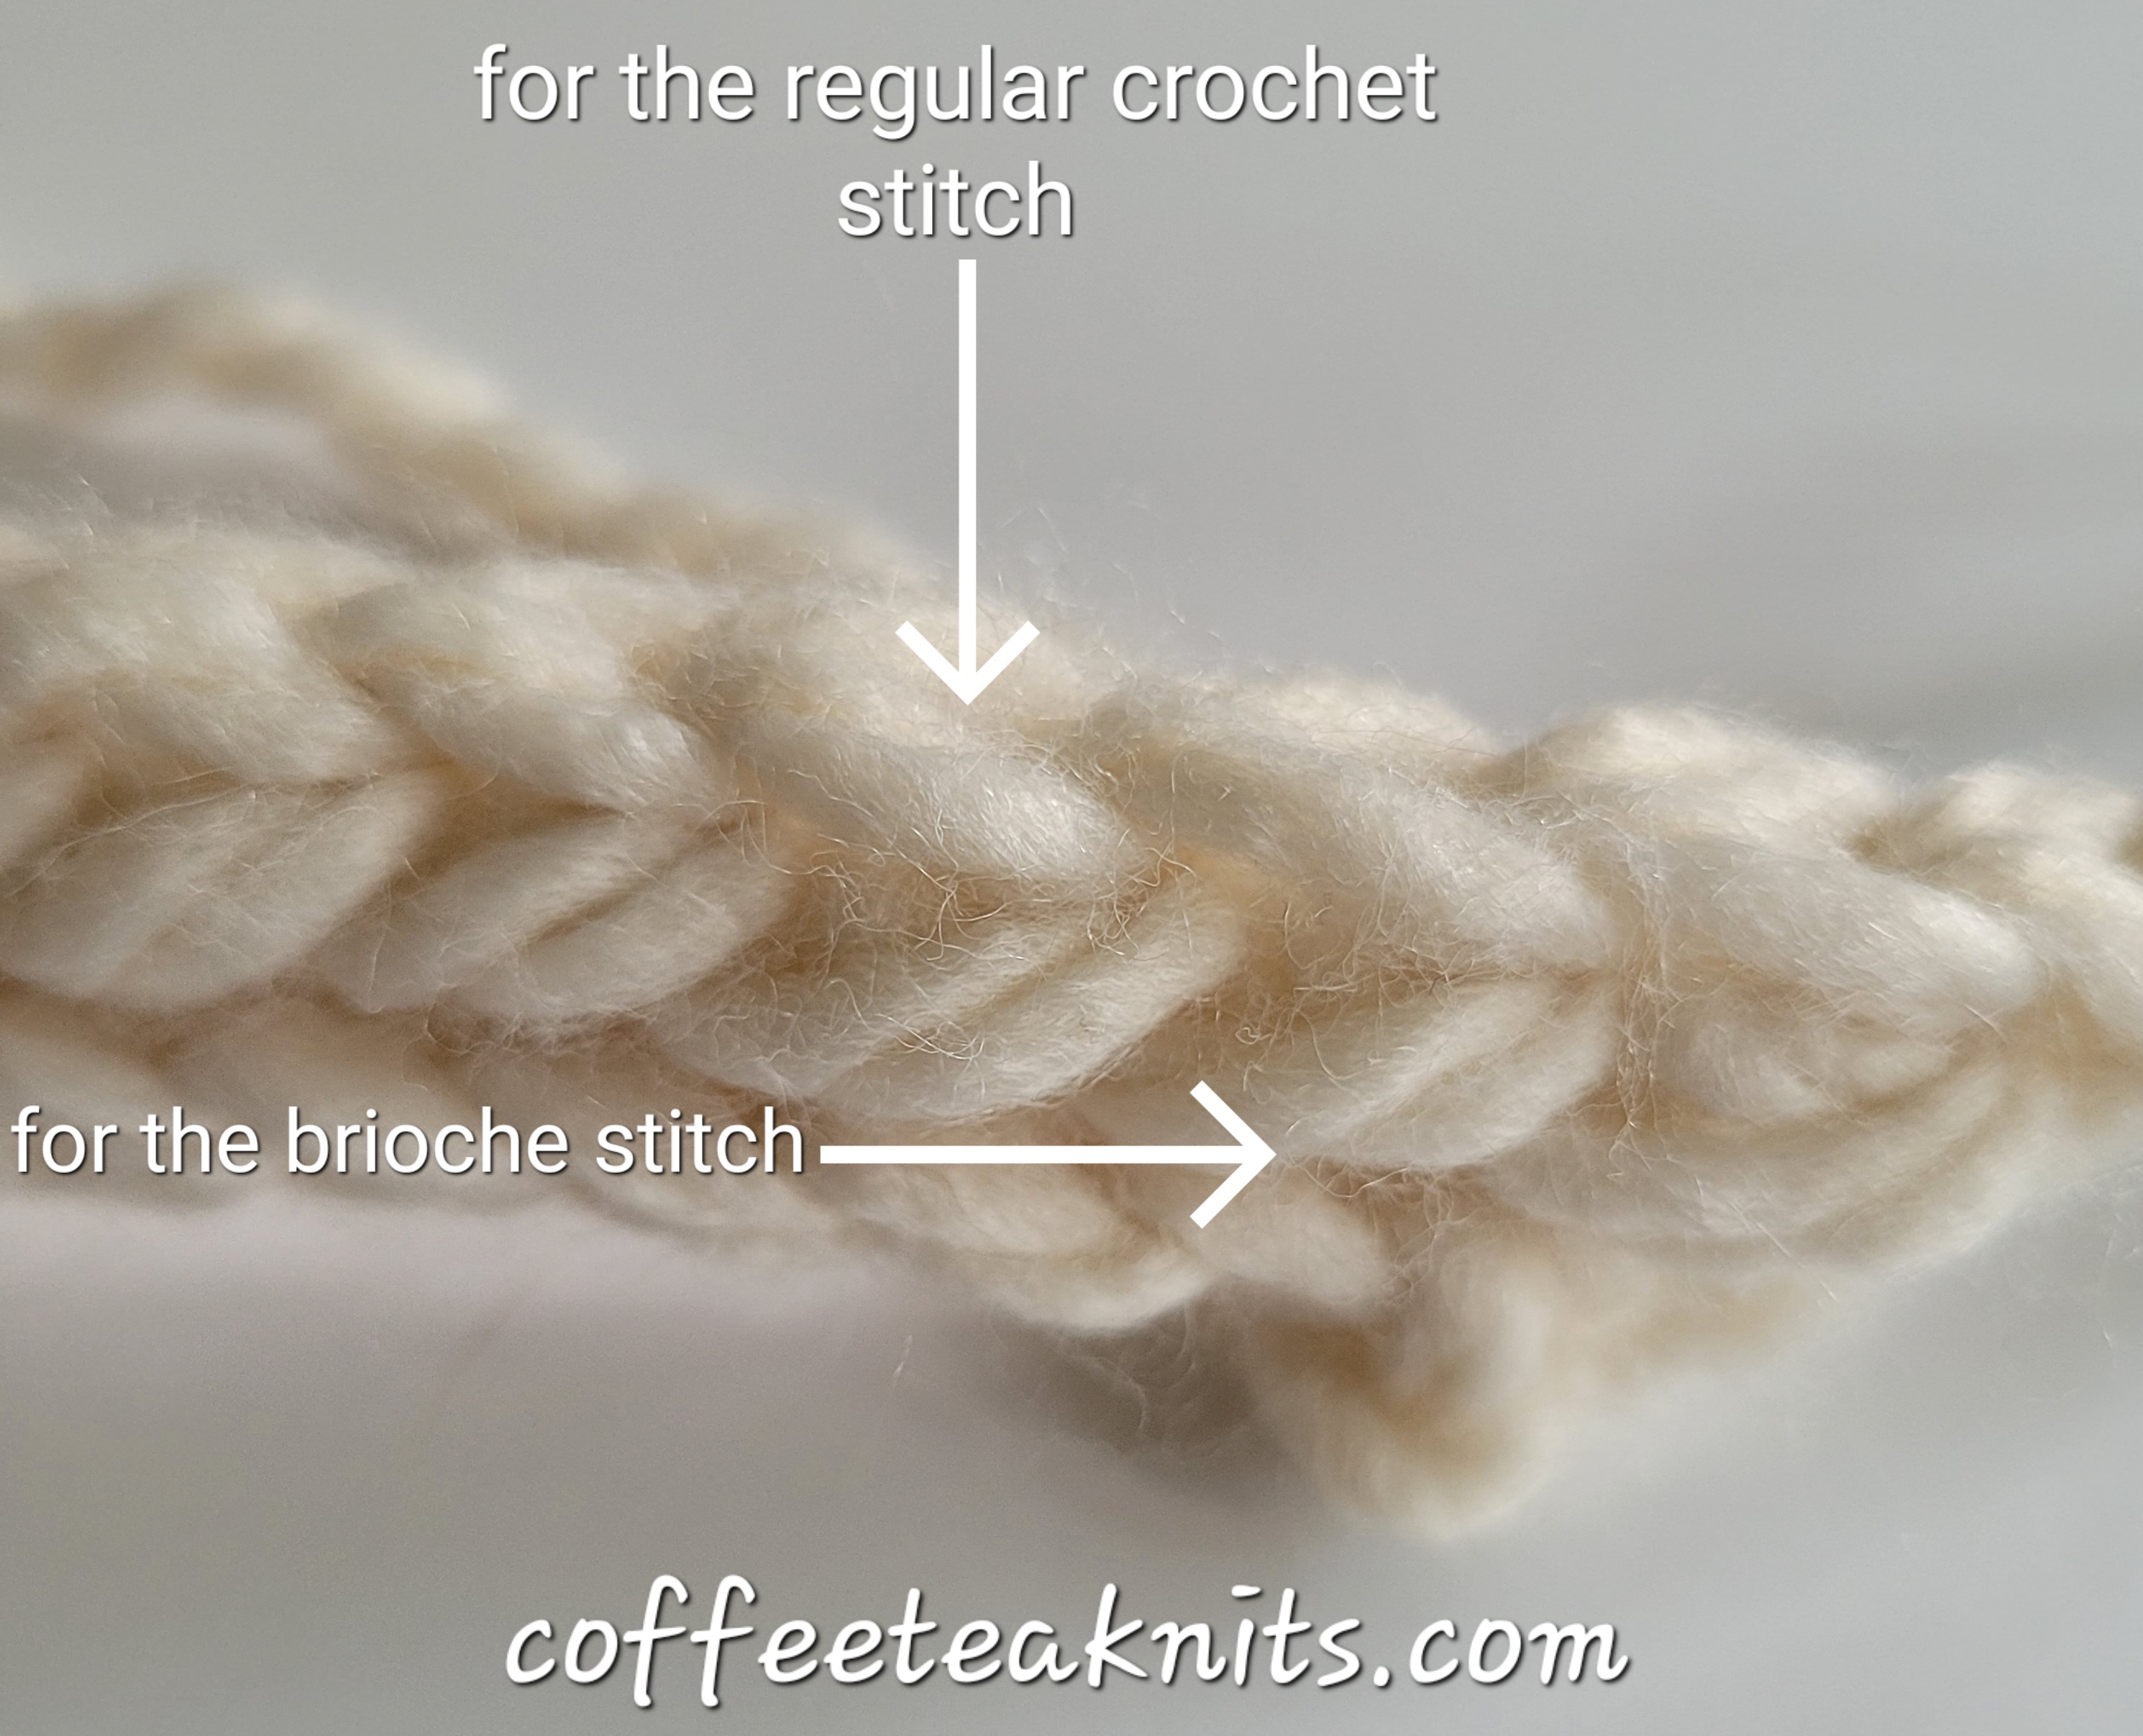
For the brioche crochet stitch (see images below), yarn over and insert hook into the strand below the second regular crochet stitch and repeat step 2
Yarn over and insert hook into the strand below the next regular crochet stitch and repeat step 2 for all the remaining stitches in the row
Chain one in the last stitch of the row and turn
Repeat steps 6 and 7 for the preferred number of row in the brioche stitch pattern
The completed Braided Dishcloth has 17 of the brioche “braids”. This dishcloth can be customized to preferred width and length.
Crochet Moss Stitch Border:
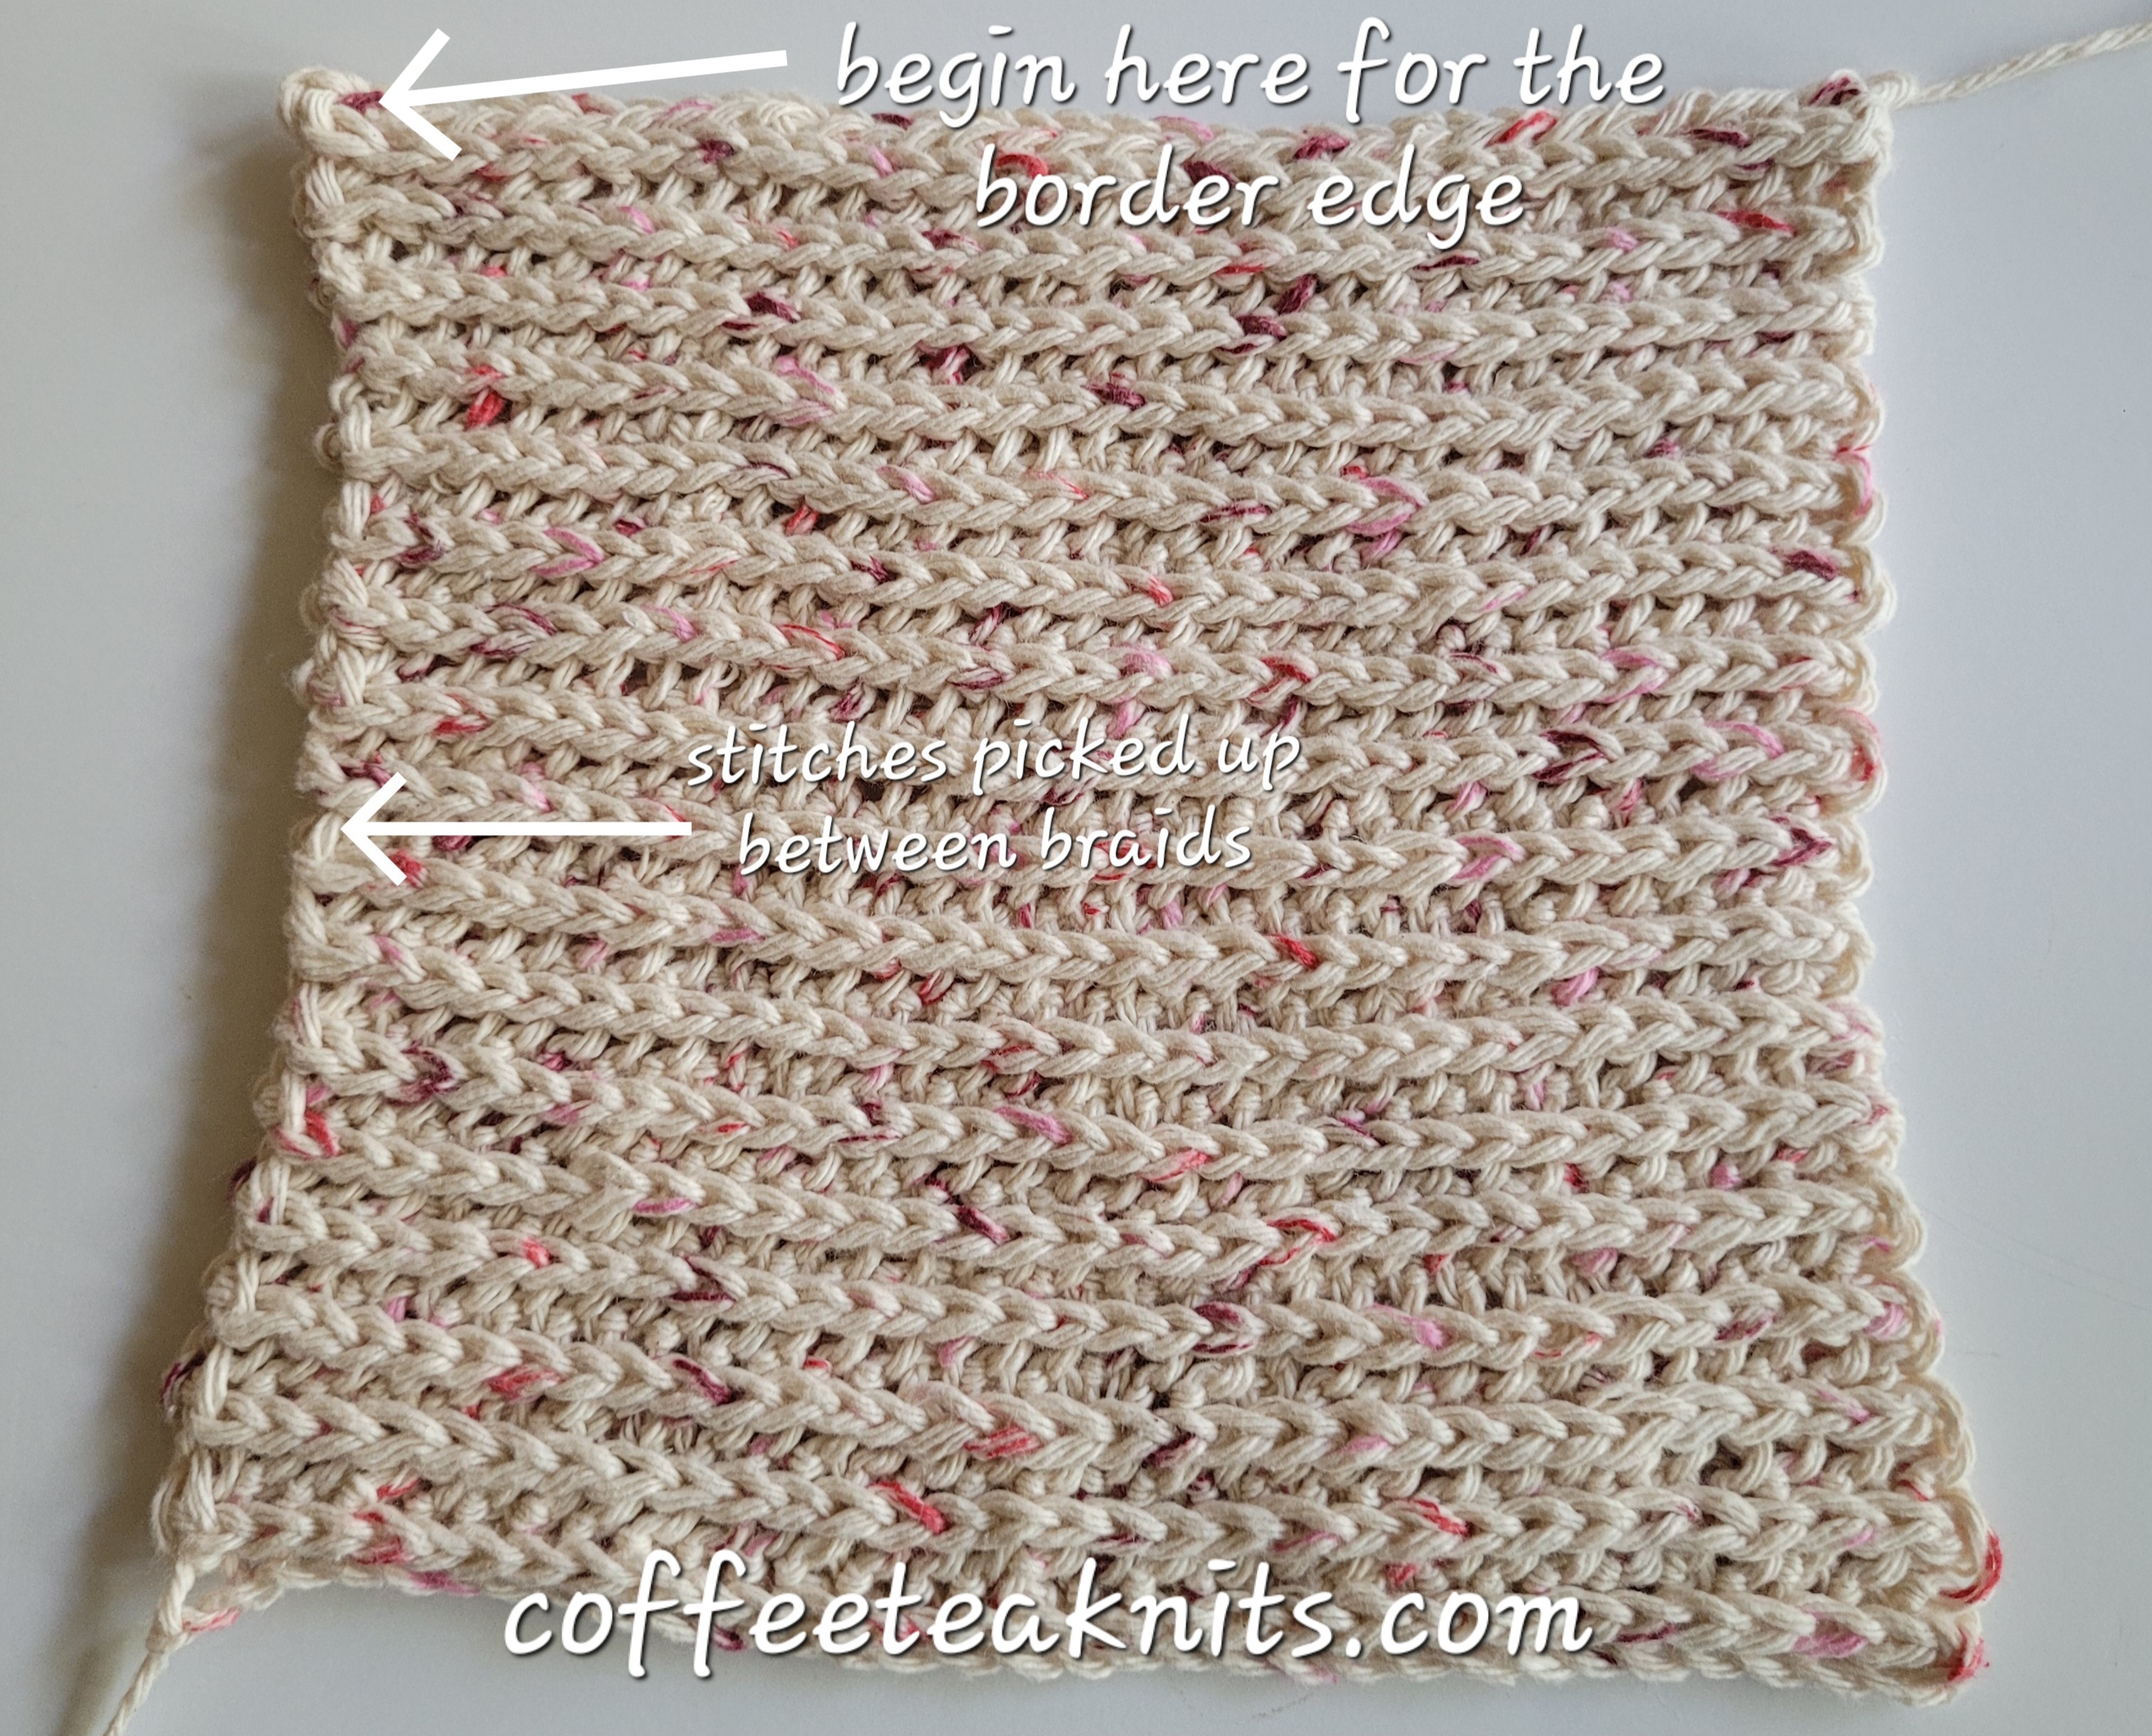
With G-6 (4.0 mm) crochet hook and Colorway 2 yarn, make a slip knot (watch video tutorial) and bring it under and through the V of the second to last stitch of last row on the right side of the dishcloth (see image below)
Chain 1 and single crochet (sc) in the last chain stitch, chain 2, sc, chain 1 in the same stitch. Turn in counter clockwise direction
[Sc in the stitch between the “braids”, chain 1, skip the “braid”], repeat […] all down the front left side of the dishcloth till the last corner stitch (see image above)
Sc in the corner stitch, chain 2, sc chain one all in the same corner stitch, turn in counter clockwise direction
[Sc, chain 1 in the foundation chain stitch edge, skip the next stitch], repeat […] all along the cast on edge till the last corner stitch
Repeat step 3 at the corner stitch
Repeat step 2 going up along the front right side of the dishcloth
Repeat step 3 at the corner stitch.
Repeat step 4 all along the last row edge of the dishcloth till the stitch at beginning of round
Chain 12 for the hanging loop
Slip stitch into the chain 2 space of the crochet moss stitch corner edge and pull yarn through
Weave in the ends, wash and block to finish the Braided Dishcloth
A Seed Stitch Mitered DishclothToward Center Mitered DishclothThe Upside Down DishclothSummertime DishclothThe Knotted DishclothThe Center Out Mitered DishclothSuddenly It’s Summer DishclothThe Brick and Mortar DishclothThe Dotted Dishcloth
Another basic stitch after a single crochet (How to Single Crochet) is the half double crochet. The half double crochet stitch is taller than a single crochet stitch but shorter than a double crochet stitch. The fabric made with the half double crochet stitch is also less dense than the fabric made with a single crochet stitch. The video and written instructions below demonstrate how to make a half double crochet from a foundation chain and for the following rows when crocheting with your right hand.
Half Double Crochet from a Foundation Chain:
Written Instructions on How to Half Double Crochet from a Foundation Chain:
With a loop on the crochet hook, wrap working yarn around the hook (counterclockwise)
Skip the first two chains stitch from the loop on the crochet hook and insert the crochet hook into the top strand of the third chain stitch
Wrap working yarn around hook (counterclockwise), catch and pull yarn through the top strand of the third chain stitch
There are three loops on the crochet hook
Wrap the working yarn around the hook (counterclockwise), catch and pull yarn through all three loops on the crochet hook
There is one loop on the crochet hook
Wrap working yarn around the hook (counterclockwise), insert crochet hook into the top strand of the next foundation chain stitch
Wrap working yarn around hook (counterclockwise), catch and pull yarn through the top strand of the next foundation chain stitch
Repeat steps 4 to 6
Repeat steps 7 to 9 for the rest of the foundation chain stitches including the last slip knot end stitch
Chain 2 and turn to half double crochet the next row
How to Half Double Crochet:
Written Instructions on How to Half Double Crochet:
Wrap working yarn around the hook (counterclockwise), skip the first two stitches from the loop on the crochet hook and insert the crochet hook under both the strands of the next stitch
Wrap working yarn around hook (counterclockwise), catch and pull yarn under and through both the strands of the next stitch in the row
There are three loops on the crochet hook
Wrap the working yarn around the hook (counterclockwise), catch and pull yarn through all the three loops on the crochet hook. There is one loop left on the crochet hook
Wrap working yarn around the hook (counterclockwise) and insert the crochet hook under both the strands of the next stitch in the row
Repeat steps 2 to 4
Repeat steps 5 and 6 till the last stitch in the row
For the last stitch of the row, repeat steps 5 and 6, chain two and turn
Repeat Steps 5 to 8 to half double crochet all the following rows