Tutorial Series: Make One (M1R and M1L)

Another way to increase one stitch in knitting is to make one right (M1R) or make one left (M1L). M1L is a left-leaning increase while M1R is a right-leaning increase.


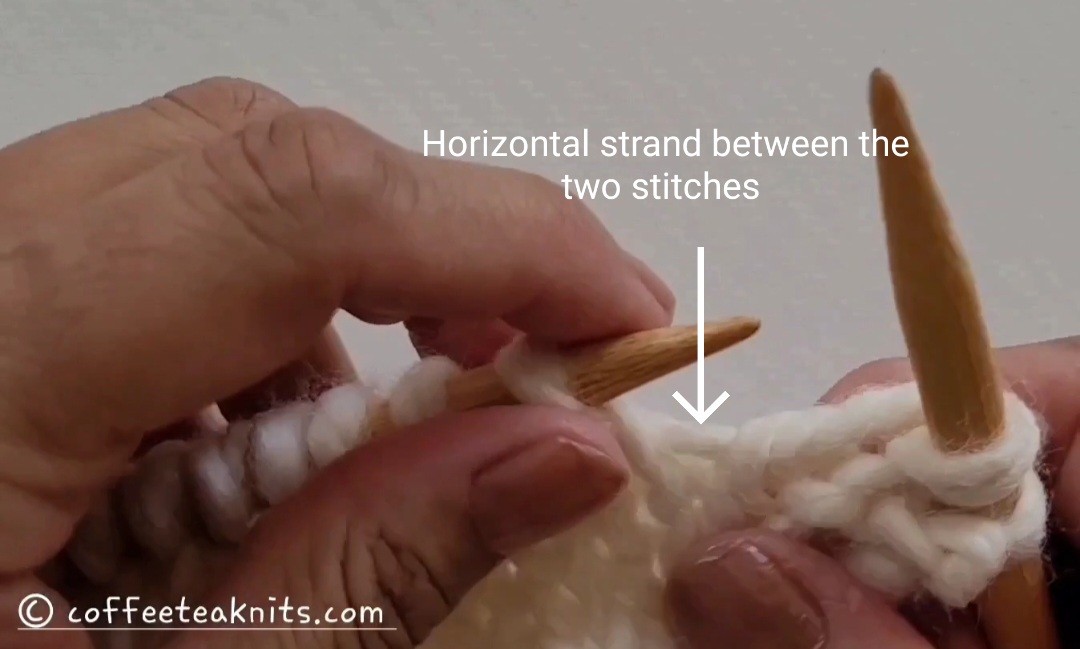
The horizontal strand between the stitch just worked on the right knitting needle and the stitch on the left knitting needle is lifted and placed on the left knitting needle. The loop made by the horizontal strand on the left knitting needle is then knit to create an extra stitch.

The make one (M1R or M1L) increase technique is used in the shaping of knitted items such as shawls, sweaters etc.


The video clip and the written instructions below show how to make one right (M1R) and then how to make one left (M1L) for right hand knitting.

Make One (M1R and M1L):


Written Instructions for M1R and M1L:

Make One Right (M1R):

  • To M1R increase, insert left knitting needle from back to front under the horizontal strand between the stitch on the right and the left knitting needle
  • Slip the horizontal strand loop on the left knitting needle
  • Insert the right knitting needle in the front leg of the loop on the left knitting needle (Tip: Loosen the front leg of the loop by tugging and pulling it with the right knitting needle as shown in the video clip above)
  • Knit (Tutorial Series: Knit and Tink) the front leg of the horizontal strand loop to increase one stitch

Make One Left (M1L):

  • To M1L increase, insert left knitting needle front to back under the horizontal strand between the stitch on the right and the left knitting needle
  • Slip the horizontal strand loop on the left knitting needle
  • Insert the right knitting needle in the back leg of the loop on the left knitting needle
  • Knit (Tutorial Series: Knit and Tink) the back leg of the horizontal strand loop to increase one stitch


~coffeeteaknits.com

The Dotted Dishcloth Pattern PDF

The Dotted Dishcloth Pattern PDF includes the following:

  • It is 4 pages with images
  • It has detailed knitting instructions to knit the Dotted Dishcloth with the textured woven transverse herringbone knit stitch pattern
  • It has the Abbreviations and Materials sections for this dishcloth
  • It also includes detailed instructions with an image on how to crochet the slip stitch border edge

Knitting Skills: knit, purl, slipping stitches purlwise, cast-on, and bind off
Crochet Skills: slip knot, crochet slip stitch, and chain one

Good for beginners who want to explore textured stitch patterns and techniques

Download and enjoy this ad-free pattern pdf. The Dotted Dishcloth pattern was originally posted in June 2024 on Coffee Tea Knits

Thank you to my subscribers and readers of this blog. As always your feedback is much appreciated.


~coffeeteaknits.com

.

.

2025 Year in Review and an Announcement

Hello folks, hope 2025 went well for you. For me, 2025 has been an eventful year. I published seven knit or crochet patterns, nine knitting or crochet technique video tutorials, and a few tidbits.

2025 also brought me some endings, loss, grief, celebrations, and not-so-fun health issues.

There’s also been a change in my journey with yarn.

After 55 published patterns, the call of yarn in my life has led me to a new beginning.

Coffee Tea Knits will be returning in January 2026 with new video tutorials and tidbits.

Stay tuned for updates as we explore the world of yarn and needles together.

Thank you to the fiber related crafts community. I am grateful to the subscribers and readers of this blog. Your feedback and encouragement have been invaluable in my journey with yarn.

All the best to you in the New Year!


~coffeeteaknits.com

The Dilemma of Leftover Yarn

Hello folks, I’m in the process of organizing my yarn. I face a dilemma because I do not know what to do with the project leftover yarn. The project leftover yarn has accumulated quite a bit over the years I’ve been knitting or crocheting.

I sometimes have a whole skein or two left over and sometimes just a small amount of yarn left over. With a skein or two of leftover yarn, making a hat, a dishcloth, or other small knitted items is possible. I have made such items in the past. I have also donated leftover skeins of yarn to charity.

The small amount of project leftover yarn puzzles me. I have no idea what to do with these bits of yarn leftover from a knitting or crochet project. Below is a picture of a small sample of the leftover yarn that I have. I probably have about 2 bags full of these bits and pieces of yarn.


Leftover yarn a, b, c, d, and e in the image above are from these knitting and crochet projects:


Is there something I can make out of this that is aesthetically pleasing? It’s hard for me to find the time. I struggle to find the motivation to mix them up to knit or crochet something. I don’t find the prospect of just knitting or crocheting for the sake of making something very appealing.

Your Suggestions/Feedback:

Do you also have an accumulation of project leftover yarn? Comment below on how you deal with these bits and pieces of project leftover yarn?


~coffeeteaknits.com

Tutorial Series: Slip, Knit, Pass (Skp)

The Skp is a method used to decrease one stitch in knitting. Skp means to slip 1 stitch, either knitwise or purlwise. Then, knit 1 stitch. Finally, pass the slipped stitch over the knit stitch. Unlike K2tog (Tutorial Series: K2tog and P2tog) which is a right slanting decrease, Skp is a left slanting decrease. When you slip the stitch knitwise or purlwise, the knitting looks different. This topic is covered in the Tutorial Series: Slipping Stitches (knitwise and purlwise). A knitting pattern usually will specify how to slip a stitch. Below are samples of Skp knitwise and Skp purlwise.


The video and written instructions below show how to slip stitches knitwise and purlwise for right-hand knitting.

Slip, Knit, Pass (Skp): Video below shows how to Skp knitwise and then purlwise


Written Instructions for Skp (knitwise and then purlwise):

  • Slip the next stitch (knitwise or purlwise) on the left knitting needle onto the right knitting needle
  • Knit (Tutorial Series: Knit and Tink) the next stitch on the left knitting needle
  • Insert the left knitting needle into the front loop of the slipped stitch on the right knitting needle
  • Pull and lift the slipped stitch with the left knitting needle and pass it over the knitted stitch on the right knitting needle
  • Slide the slipped stitch off the right knitting needle
  • Repeat as specified in a knitting pattern to make one stitch decrease

~coffeeteaknits.com