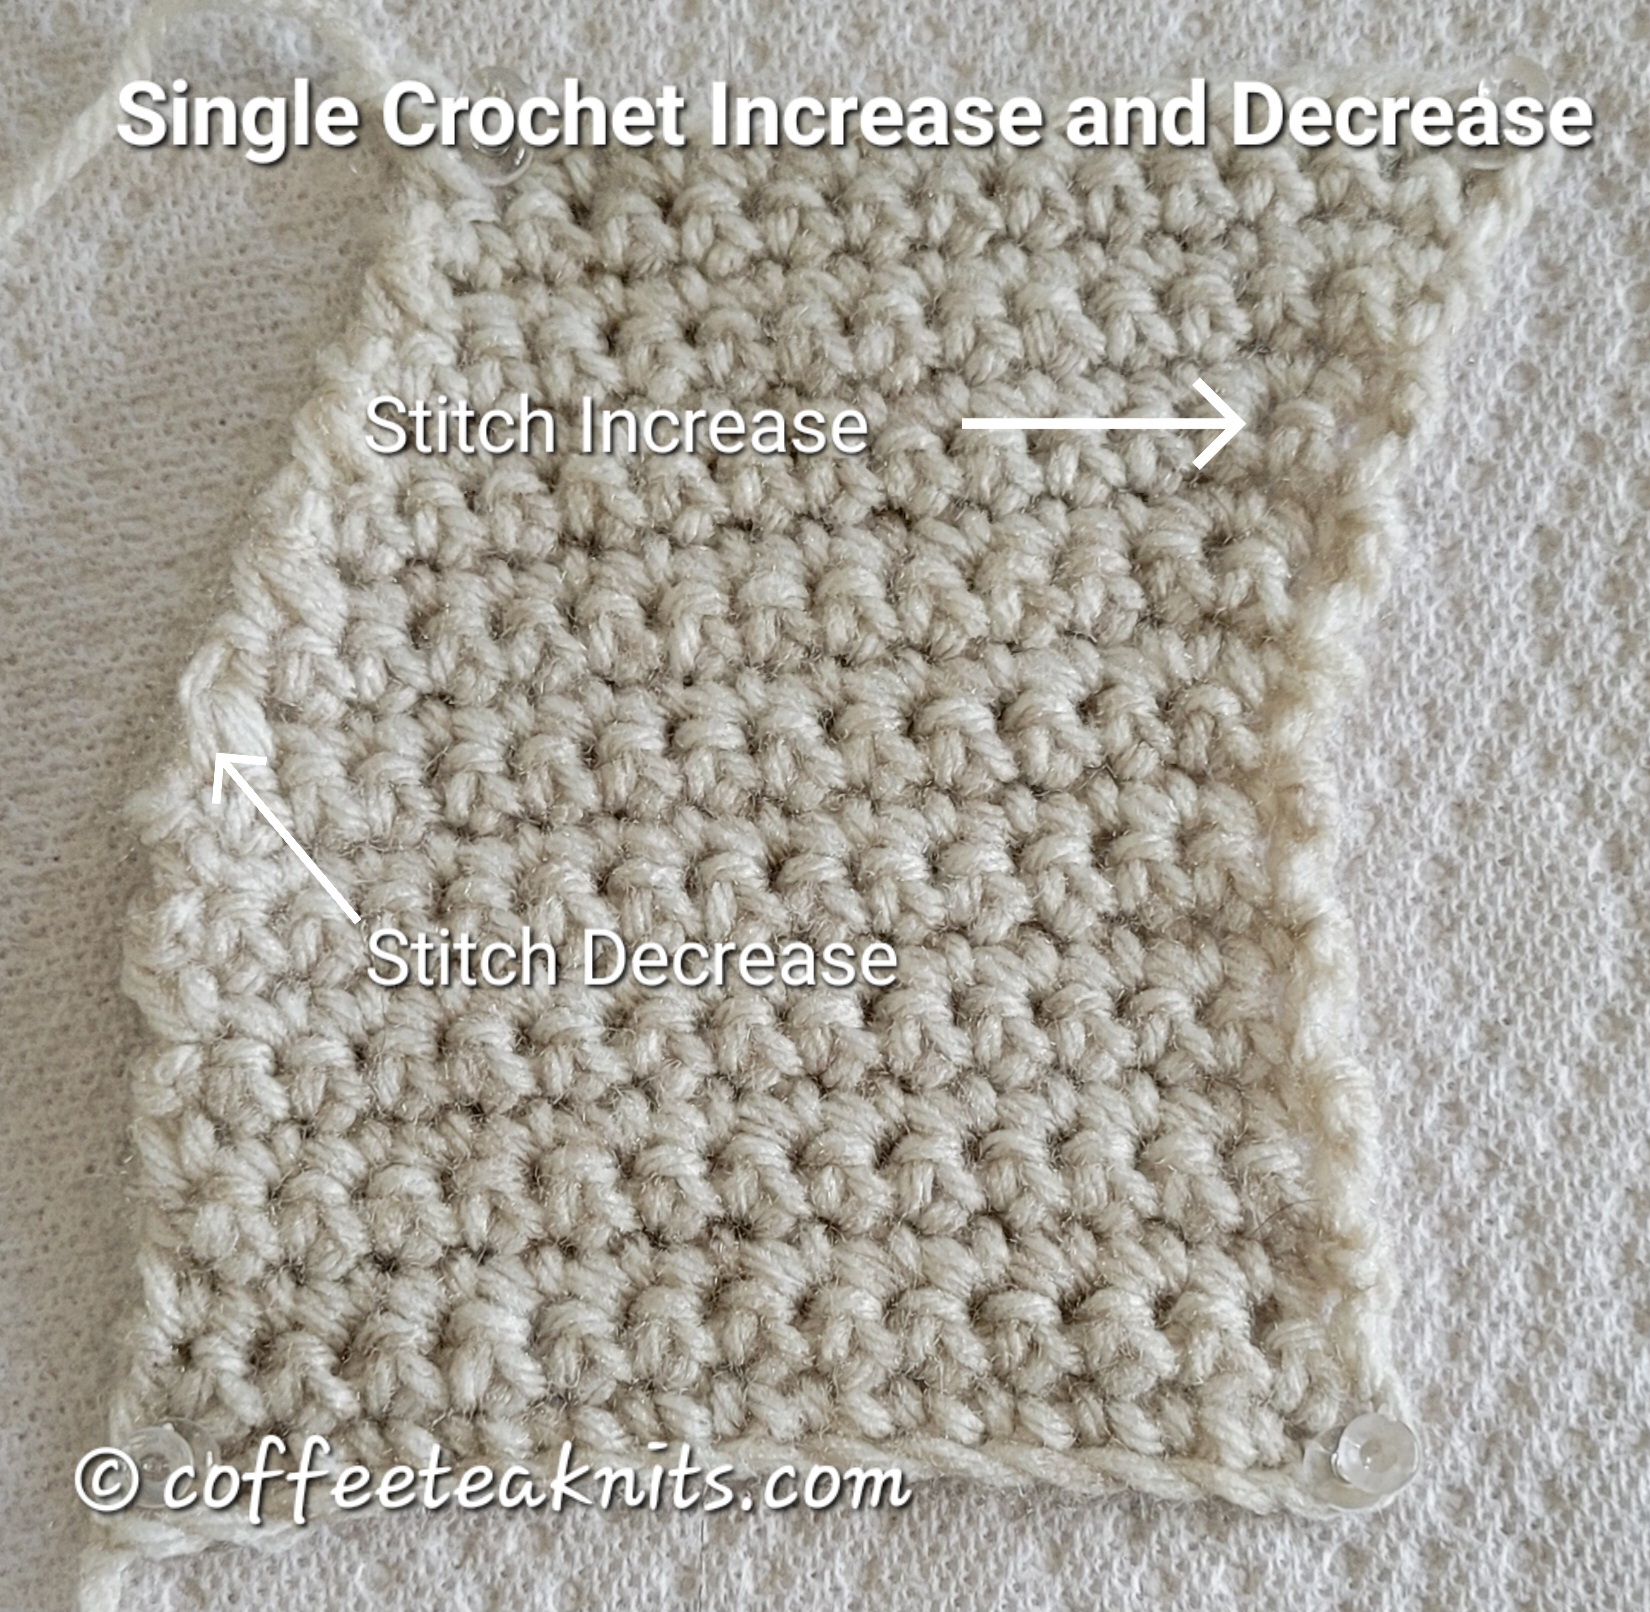
As in knitting, shaping in crochet also includes increasing or decreasing of stitches in a pattern. For a stitch increase in single crochet, another single crochet is made in the same stitch. For a stitch decrease, the crochet hook is inserted into two single crochet stitches and then the yarn over loop is pulled through all the loops on the crochet hook. The image below shows one stitch increase and one stitch decrease in single crochet.
The written instructions and video below show how to increase and decrease a stitch in single crochet for right-handed crocheting.
Stitch Increase in Single Crochet:
Written Instructions for Stitch Increase in Single Crochet:
Insert the crochet hook under both the strands of a stitch
Wrap working yarn counterclockwise around hook (yarn over), catch and pull the loop through both the strands of that stitch
There are two loops on the crochet hook
Wrap the working yarn counterclockwise around hook (yarn over), catch and pull loop through the two loops on the crochet hook (one single crochet stitch made)
Repeat Steps 2 to 5 in the same stitch again for one single crochet stitch increase (two single crochet stitches made in the same stitch)
Stitch Decrease in Single Crochet:
Written Instructions for Stitch Decrease in Single Crochet:
Insert the crochet hook under both the strands of a stitch as if to single crochet
Wrap working yarn counterclockwise around hook (yarn over), catch and pull the loop through both the strands of that stitch (2 loops on the hook)
Insert crochet hook under both strands of the next stitch
Wrap working yarn counterclockwise around hook (yarn over), catch and pull the loop through both the strands of that stitch (3 loops on the hook)
Wrap working yarn counterclockwise around hook (yarn over), catch and pull loop through all three loops on the crochet hook
One single crochet stitch decreased
Repeat Steps 1 to 5 to decrease one single crochet stitch
Change is inevitable, whether we want it or not, and embracing it allows us to move forward with enthusiasm. Whenever I face challenges in decision-making, thinking about my favorite activities brings me joy. I like exploring the yarn aisles at arts and craft stores and choosing beautiful yarn. Spending time knitting or crocheting is also a favorite thing of mine. While it’s true that Jo-Ann stores are closing, I will cherish the memories of browsing their colorful yarn selections. I’ve created some wonderful patterns using Jo-Ann yarns, like The Long Striped Crochet Scarf and The Unexpected Find Wrap. I, of course, had to stock up on some Jo-Ann store-brand yarn before the store closes. Every time I knit or crochet with these yarns, I will fondly remember the joy of exploring their yarn aisles.
The Favorite Things Cowls are bandana-style cowls crocheted flat with a variation of the crochet moss stitch pattern. One uses K + C yarn and the other uses Loops and Threads yarn. Both start with a chain of 2 and are increased every other row to form a triangle. The cowl lengths are then extended without any row increases. One cowl is extended over 2 inches long, and the other over 3 inches. The edges of the extended section are joined, and a fringe is added at the end. These cowls are quick one-skein projects, perfect for keeping the neck warm and cozy.
The Favorite Things Cowl Pattern
Materials Needed: Yarn: Cowl 1 – K + C Botanical yarn in Colorway: Feather Gray (one skein of yarn from Jo-Ann store) Yarn: Cowl 2 – Loops and Threads® Luxe Merino™ Wool Blend Colorway: Raindrops Gauge: 4.0 stitches per inch for Favorite Things Cowl 1 and Favorite Things Cowl 2 in the variation crochet moss stitch pattern (gauge not necessary) Crochet hook: US size H-8 (5.00 mm) for Favorite Things Cowl 1 and US size 7 (4.5 mm) for the Favorite Things Cowl 2 Tapestry needle to weave in ends
Abbreviations: sc: single crochet (Tutorial Series: How to Single Crochet) […]: pattern repeat Skill Level: Beginner friendly pattern with single crochet and crochet chains
The Favorite Things Cowl Pattern (images and text for personal use only)
Row 1 (RS): Single crochet, chain 1 in the second foundation chain stitch from the crochet hook, sc, chain 1 again in the same second stitch and turn
Row 2 (WS): Single crochet in the second stitch from the crochet hook, chain 1, skip a stitch and sc in the last stitch, chain 1 and turn (4 stitches)
Row 3 (RS): Single crochet in the second stitch from the crochet hook, chain 1, sc in the same stitch again, chain 1, skip a stitch, and sc in the last stitch, chain 1, sc in the same last stitch again, chain 1 and turn
Row 4 (WS): Single crochet in the second stitch from the crochet hook, chain 1, [skip a stitch, sc in the next stitch, chain 1], repeat […] till the last stitch, sc in the last stitch, chain 1 and turn (8 stitches)
Row 5 (RS): Single crochet in the second stitch from the crochet hook, chain 1, sc in the same stitch again, chain 1, [skip a stitch, sc in the next stitch, chain 1], repeat […] till the last stitch of the row, sc in the last stitch, chain 1, sc again in the same last stitch, chain 1 and turn
Row 6 (WS): Single crochet in the second stitch from the crochet hook, chain 1, [skip a stitch, sc in the next stitch, chain 1], repeat […] till the last stitch, sc in the last stitch, chain 1 and turn (12 stitches)
Repeat Rows 5 and 6 till the cowl is wide enough to fit around the neck with some positive ease. For both cowls I repeated the rows till I reached 92 stitches (Cowl 1 is between 26 – 27 inches and Cowl 2 is between 22 to 23 inches after blocking)
Cowl Length Extended:
Row 1 (RS): Single crochet in the second stitch from the crochet hook, chain 1, [skip a stitch, sc in the next stitch, chain 1], repeat […] till the last stitch, sc in the last stitch, chain 1, and turn
Repeat Row 1 till the preferred length reached. Cowl 1 is a little over 3 inches and Cowl 2 is a little over 2 inches.
Joining the Extended Section: For Cowl 1, I used size H-8 (5.00 mm) crochet hook and the zig zag crochet slip stitch method to join the two edges. For Cowl 2, I just seamed the two edges together with a tapestry needle.
Weave in the ends, wash and block the Favorite Things Cowls
Optional: Add a fringe of preferred length to the foundation chain edge
Another variation of single crochet is the single crochet in front loop (SCFL). The stitch pattern gives a changed texture to a garment. This stitch pattern looks quite different from SCBL (Tutorial Series: Single Crochet in Back Loop).
After the foundation row for a single crochet has been worked (Tutorial Series: How to Single Crochet), all the following rows are worked only into the front loop. This gives the fabric a distinct textured pattern on both sides of the work. The video and written instructions provided below show how to make a single crochet in the front loop holding the crochet hook in your right hand.
How to Single Crochet in Front Loop (SCFL):
Written Instructions on How to Single Crochet in Front Loop (SCFL):
Skip the first stitch from the hook, and insert crochet hook in the front loop of the next stitch
Catch and pull yarn loop under and through the front loop of the stitch
There are two loops on the crochet hook now
Yarn over (wrap the working yarn around the hook counterclockwise)
Catch and pull yarn through the remaining two loops on the hook.
There is one loop left on the crochet hook
Repeat Steps 2 to 7 till end of the row and all other subsequent rows (chain one after working the last stitch end of each row and turn to the next row)
This year at the New Jersey Sheep and Fiber Festival, I was happy to see Marian of the Marianted Yarns since it was her last time vending there. A few years ago, I bought a Practicality 75/25 (superwash merino/nylon) fingering weight skein in the Beeswax colorway from her. I wanted another skein in that colorway this year, but it was unavailable. Instead, I chose the Honeycomb colorway and purchased it. Both colors remind me of the autumn leaves in my yard. I will miss Marianated Yarns next year, but the Autumn Leaves Cowl will help me remember this wonderful day at the festival.
The Autumn Leaves Cowl is crocheted back and forth, holding two strands of the same colorway of yarn together. The single crochet V stitch pattern is repeated several times, with alternating colorways every 2 rows. A row of crochet moss stitch is made from the right side to the left. This helps flatten the bump from the V stitch cluster. A row of crochet moss stitch is also made on the foundation chain edge, starting at the slip knot stitch. The 2 edges are then joined using the crochet zig-zag join method. Lastly, the Autumn Leaves Cowl is completed with a crochet moss stitch border. This border is on both the top and bottom edges of the cowl.
The Autumn Leaves Cowl Pattern (text and images for personal use only)
Materials Needed: Yarn: Marianted Yarns in Beeswax and Honeycomb colorways (1 skein each) Tapestry needle to weave in ends Gauge: 4 stitches per inch in the single crochet V stitch pattern Crochet hook: US size F-5 or 3.75 mm for the single crochet V stitch pattern. US size E-4 or 3.5 mm for the top and US size G6 or 4.00 mm for the bottom crochet moss stitch border edges
Abbreviations: sc: single crochet hdc: half double crochet RS: right side WS: wrong side […]: pattern repeat
Crochet Skill Level: Basic level with single crochet, half double crochet and slip stitches
Holding two strands of Beeswax colorway yarn together, make a slip knot (How to Slip Knot) and with US size F-5 (3.75 mm) crochet hook chain 47 stitches (How to Crochet Chain).
Row 1 (RS): With the Beeswax colorway – Skip the first chain from the hook, and make a hdc (How to Half Double Crochet) in the back of the second chain (the purl bump) from the hook. Optional: You can also make the hdc on the top strand of the second chain stitch, [Skip two chains and sc (How to Single Crochet) in the next chain (back of the stitch or the top strand of the stitch), chain 2, sc again in the same stitch], Repeat […] till three stitches left, Make a hdc in the last stitch of the foundation chain (slip knot stitch), chain 1 and turn
Row 2 (WS): With the Beeswax colorway – Make a hdc in the second chain from the hook, [Make a sc in the next chain 2 space of the single crochet V stitch, chain 2, and sc again in the same chain 2 space], Repeat […] for the chain 2 spaces in the row till the last stitch, In the last stitch, make a hdc, attach two strands of the Honeycomb colorway and with it chain 1, turn
Row 3 (RS): With the two strands of the Honeycomb colorway – make a hdc in the second stitch from the hook, [Make a sc in the next chain 2 space of the single crochet V stitch, chain 2, and sc again in the same chain 2 space], Repeat […] for the chain 2 spaces in the row till the last stitch, In the last stitch, make a hdc, chain 1 and turn
Row 4 (WS): With the two strands of the Honeycomb colorway – make a hdc in the second stitch from the hook, [Make a sc in the next chain 2 space of the single crochet V stitch, chain 2, and sc again in the same chain 2 space], Repeat […] for the chain 2 spaces in the row till the last stitch, In the last stitch, make a hdc, change to two strands of Beeswax colorway and with it chain 1, turn
Row 5 (RS): With the Beeswax colorway – Make a hdc in the second chain from the hook, [Make a sc in the next chain 2 space of the single crochet V stitch, chain 2, and sc again in the same chain 2 space], Repeat […] for the chain 2 spaces in the row till the last stitch, In the last stitch, make a hdc, chain 1, turn
Row 6 (WS):With the Beeswax colorway – Make a hdc in the second chain from the hook, [Make a sc in the next chain 2 space of the single crochet V stitch, chain 2, and sc again in the same chain 2 space], Repeat […] for the chain 2 spaces in the row till the last stitch, In the last stitch, make a hdc, change to two strands of the Honeycomb colorway and with it chain 1, turn
Repeat Rows 3 to 6, twenty-five more times. Cut yarn (Beeswax colorway) and pull through the last stitch
Joining the Foundation Chain Edge to the Bind off (last row) Edge:
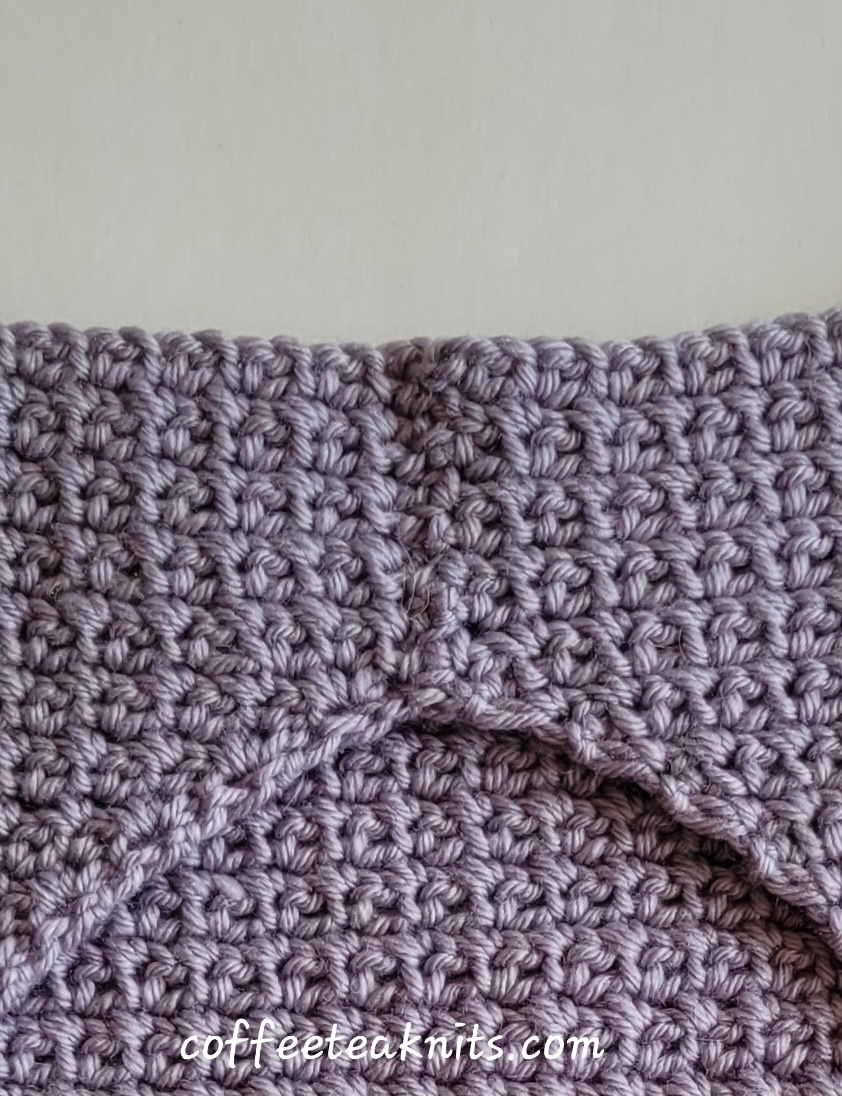
The Bind off (last row) Edge – With 2 strands of the Honeycomb colorway yarn, crochet one row of the moss stitch, [sc into the stitch between the V stitch clusters, chain 1, sc into the next stitch between the V stitch clusters], repeat […] all along the bind off edge row. This is to flatten the V stitch cluster bumps of the last row (bind off edge) (see image below)
Cut yarn and pull through the last stitch
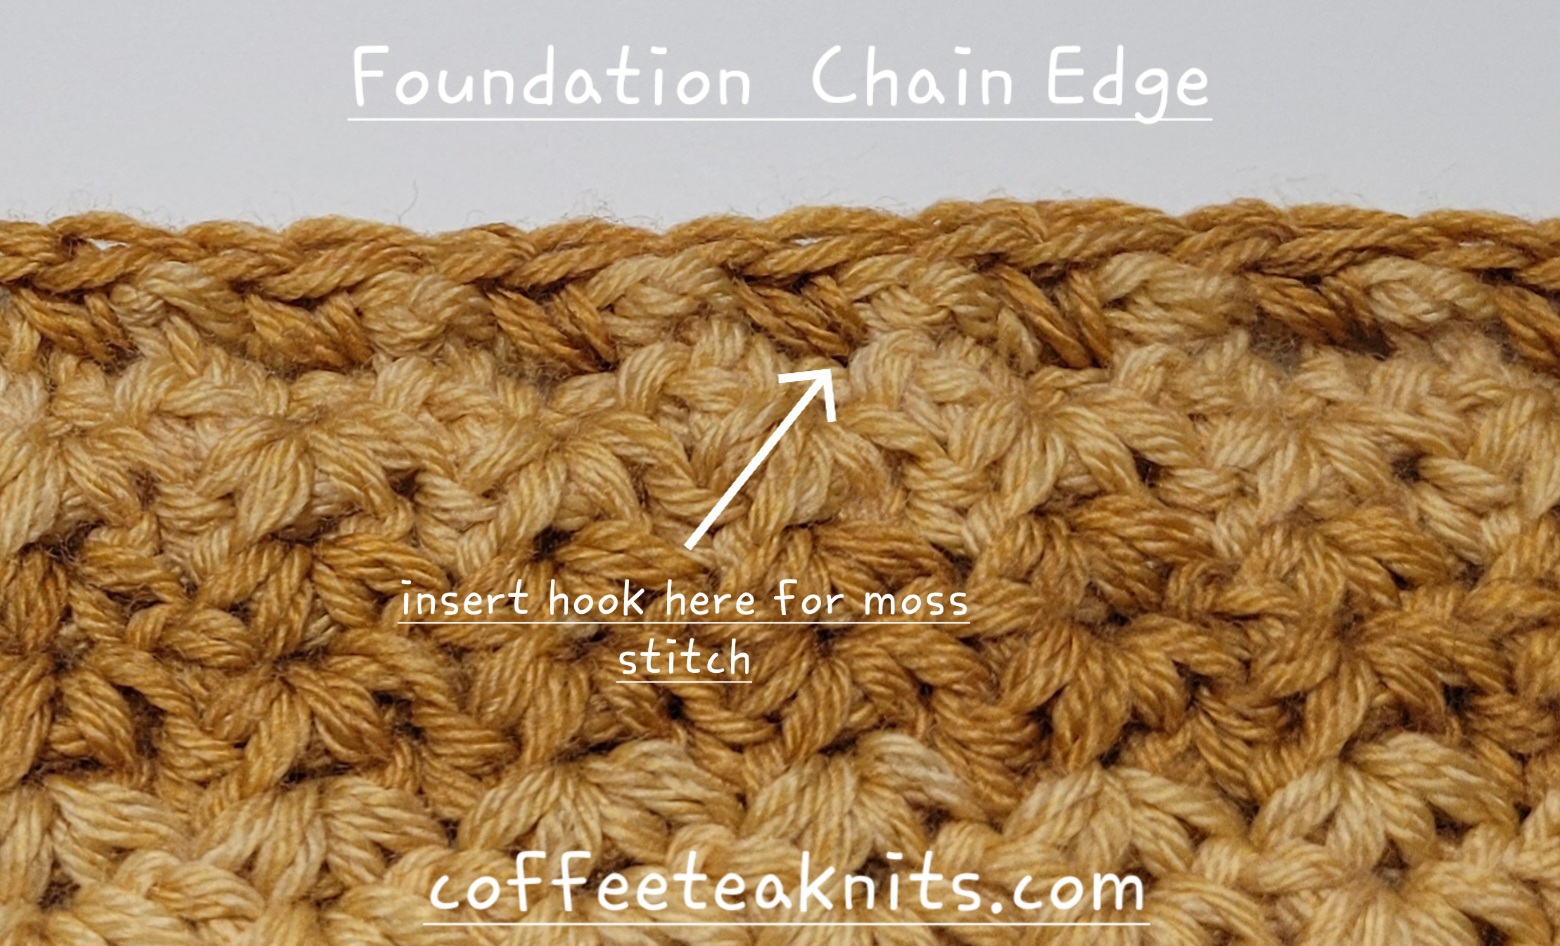
Foundation Chain Edge – With 2 strands of the Honeycomb colorway yarn, crochet one row of the moss stitch to the foundation chain edge (see image below)
Cut yarn and pull through the last stitch.
With 2 strands of the Honeycomb colorway yarn, make a slip knot and pull the slip knot through the last crochet moss stitch on the left side (see image below) and chain 1
Make a crochet zig zag* join going from the left to the right side of the cowl
Crochet Moss Stitch for the Top Edge Border: Continuing with the Honeycomb colorway yarn, change to US size E-4 (3.5 mm) crochet hook. Begin with the last stitch of the crochet zig zag join (beginning of round).
Round 1: [sc, chain 1, skip the next stitch], repeat […] all along the right side (top edge) of the cowl Round 2: [sc in the chain 1 space, chain, sc in the next chain 1 space], repeat[…] till the end of the round Rounds 3 and 4: Repeat Round 2 Round 5: Repeat Round 2 till the beginning of round. Slip stitch into the first stitch of the round, cut yarn and pull yarn through
Crochet Moss Stitch for the Bottom Edge Border: With 2 strands of Honeycomb colorway yarn and US size G-6 (4.0 mm) crochet hook, make a slip knot. Insert hook into the first stitch of the crochet zig zag join and pull it through, chain 1 (beginning of round)
Round 1:[sc, chain 2, skip the next stitch], repeat […] all along the bottom edge of the cowl Round 2: [sc in the chain 2 space, chain 2, sc in the next chain 2 space], repeat […] till the end of the round Rounds 3 and 4: Repeat Round 2 Round 5: Repeat Round 2 till the beginning of round. Slip stitch into the first stitch of the round, cut yarn and pull yarn through
Weave in the ends, wash and block to complete the Autumn Leaves Cowl
Another fundamental crochet stitch is the double crochet. It is taller than a single crochet and a half double crochet, but shorter than a treble or triple crochet. Fabric made with the double crochet stitch is less dense than fabric made with a half double crochet or single crochet. Below, you can find video and written instructions demonstrating how to make a double crochet for all the rows after the foundation chain when crocheting with your right hand.
How to Double Crochet (video in slow motion):
Written Instructions on How to Double Crochet in the rows after the Foundation Chain:
After a double crochet in the last chain stitch of the foundation chain row has been worked, chain three and turn the work for the second and all subsequent rows.
Wrap working yarn around the hook (counterclockwise), skip the first three stitches from the loop on the crochet hook and insert the crochet hook under both the strands of the next stitch
Wrap working yarn around hook (counterclockwise), catch and pull yarn under and through both the strands of the next stitch in the row
There are three loops on the crochet hook
Wrap the working yarn around the hook (counterclockwise), catch and pull yarn through the first two loops on the hook. There are two loops left on the crochet hook
Wrap the working yarn around the hook (counterclockwise), catch and pull yarn through the remaining two loops on the hook. There is one loop left on the crochet hook
Wrap working yarn around the hook (counterclockwise) and insert the crochet hook under both the strands of the next stitch in the row
Repeat steps 3 to 6
Repeat steps 7 and 8 till the last stitch in the row
For the last stitch of the row, repeat steps 3 and 6, chain three and turn
Repeat Steps 2 to 9 to double crochet all the subsequent rows