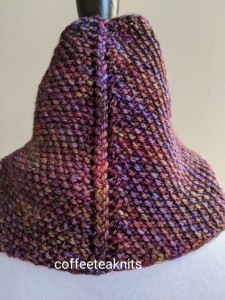
Autumnal Leaves Cowl Pattern

It never ceases to amaze me how fast the colors of the leaves change from Summer to Autumn. Around the autumn equinox, the leaves start displaying their autumnal colors and brighten our days as we adjust to the cooler weather and shorter days. 

The tonal and earthy colors of the yarn in the Autumnal Leaves Cowl represent the changing colors of the leaves in Autumn to me. It will be there to provide me warmth during the cold season ahead and also to remind me of the bright colors of the leaves in Autumn.  

The Autumnal Leaves Cowl is knit bottom up and in-the-round in a simple textured pattern with two strands of the same yarn held together. The cowl narrows slightly at the top for a cozier fit around the neck.

Yarn: Yarn Bee Authentic™ Hand-dyed Tonal Yarn in the chestnut ember colorway 
Knitting Needles: US #4, #5 and US #6 16-inch or more circular needles; US #7 knitting needles for the cable cast on 
Tapestry needle to weave in ends
Gauge: 6 stitches per inch in pattern stitch after blocking with US #6 knitting needles
Abbreviations:
K: Knit
P: Purl
BOR: beginning of round marker
yo: yarn over
psso: pass the slipped stitch over (the yarn over and knit stitch)
[…]: stitch pattern repeats

The Autumnal Leaves Cowl Pattern (text and image for personal use only)

With US #7 knitting needles cast on 128 stitches using the cable cast on method
Slip all the stitches on US #5 16-inch circular knitting needles 
Place a BOR marker and making sure yarn is not twisted, join the round by knitting the rib stitch round
Rib Stitch Round: K2, P2 till the BOR marker, slip BOR marker
Repeat Rib Stitch Round, eleven more times

Change to US #6 16-inch circular needles and knit the textured pattern:
Round 1: [slip 1 stitch purlwise with the working yarn in back, yo, K1, psso over yo and knit stitch, K2] repeat […] till the BOR marker, slip BOR marker
Round 2: Knit all stitches till BOR marker, slip BOR marker
Round 3: Repeat Round 1
Round 4: Repeat Round 2
Round 5: [K2, slip 1 stitch purlwise with working yarn in back, yo, K1, psso over yo and knit stitch] repeat […] till BOR marker, slip BOR marker
Round 6: Knit all stitches till BOR marker, slip BOR marker
Round 7: Repeat Round 5 
Round 8: Repeat Round 6
Repeat Rounds 1 to 8, six more times

Change to US #5 circular knitting needles and knit
Round 1: [slip 1 stitch purlwise with working yarn in back, yo, K1, psso over yo and knit stitch, K2] repeat […] till the BOR marker, slip BOR marker
Round 2: Knit all stitches till BOR marker, slip BOR marker
Round 3: Repeat Round 1
Round 4: Repeat Round 2
Round 5: [K2, slip 1 stitch purlwise with working yarn in back, yo, K1, psso over yo and knit stitch] repeat […] till BOR marker, slip BOR marker
Round 6: Knit all stitches till BOR marker, slip BOR marker
Round 7: Repeat Round 5 
Round 8: Repeat Round 6
Repeat Rounds 1 to 3, one more time

Change to US #4 circular knitting needles and knit
Rib Stitch Round: K2, P2 till BOR marker, slip BOR marker
Repeat Rib Stitch Round, four more times
Bind off stitches with US #6 knitting needles

Weave in ends, wash and block cowl.


Happy Autumnal knitting!
~coffeeteaknits


Winterland Cowl

Hello folks hope your new year has begun smoothly. My family and I had a rough start to the new year. The first couple weeks were spent with illness and the rest of the month trying to get better. During those weeks, knitting the Winterland Cowl gave me a sense of calm and rest. The soothing colors, the warmth and soft fuzziness of the yarn reminded me of the coziness of the winter season, the beauty of the snow covered trees, and the quietness of nature. It’s a time when nature slows down and rests. I am grateful knitting, crocheting and weaving helped me slow down and heal this month.

The yarn is a blend of acrylic and alpaca that I purchased several years ago. Unfortunately, it has been discontinued but recommendations for other yarns that can be substituted for it can be found on Yarn Sub. Winterland Cowl is knit flat and in a rectangle with 2 different strands of yarn held together. It’s knit mainly in the stockinette knit stitch pattern and can be knit longer or shorter to preferred length or width. The bind off edge is then joined to the left border of the cast on edge with a zig-zag crochet join method. The Winterland Cowl is then finished with a few rounds of single crochet border at the neck and bottom edge.

Yarn: Premier Yarn Alpaca Dance in the Soft White and Silver Fog colorways
Knitting Needles: US #8 and US #10 (for cast on and bind off) 
Gauge: 4.5 stitches / 6.5 rows per inch in stockinette stitch with US #8 knitting needles
Crochet hook: US size 7 or 4.5 mm crochet hook
Abbreviations:
K: Knit
P: Purl
RS: right side
WS: wrong side
pm: place marker
rm: remove marker
sm: slip marker
wyif S1: bring working yarn to the front before slipping the next stitch purlwise

The Winterland Cowl Pattern*

With 2 strands of yarn held together (one in each colorway) cast on 32 stitches with US #10 knitting needles

With US #8 knitting needles knit:

  • Row 1 (RS): K2, pm, knit to 2 stitches before marker, pm, K1, wyif S1
  • Row 2 (WS): K2, sm, purl to marker, sm, K1, wyif S1
  • Row 3 (RS): K2, sm, knit to marker, sm, K1, wyif S1
  • Row 4 (WS): K2, sm, purl to marker, sm, K1 wyif S1

Repeat Rows 3 and 4 till length of the knitted piece is about 32 inches (or preferred length) ending with the WS row.

Bind off (RS row): Bind off using US #10 knitting needles

With 2 strands of the Silver Fog colorway held together join the bind off edge with a zig zag crochet join method (several tutorials available for this method on Youtube) to the left side of the cast on edge as shown in the image above. 

With 2 strands of the Silver Fog colorway held together, add 5 rounds of single crochet border to the neck and bottom edge of the cowl with a US size 7 crochet hook. 

Hand wash and dry flat. Weave in the ends to finish the Winterland Cowl.


* text and images for personal use only
~coffeeteaknits

Goes with Everything Cowl

 Goes  with  Everything  Cowl

Hello fellow knitters and crocheters, welcome to my first blog post of 2021. It’s common to write about one’s knitting and crocheting goals for the year, but I will skip all that. Instead, I will write about how I knitted the Goes with Everything Cowl. I chose this name for the cowl because the yarn colorway seems to go with everything I have in my wardrobe. I purchased this yarn (one skein) a couple of years ago on a wonderful summer vacation trip. This cowl was a quick and simple knit and I’m satisfied with how it turned out. I’ll be wearing it quite a bit during this frigidly cold winter.

The cowl is knitted flat in a rectangle from one corner to another. The two shorter sides of the rectangle are then joined to make a warm and comfortable circular cowl. You begin with casting on one stitch and increase two stitches every other row till the desired width is reached. The cowl is then worked on for the desired length with no net increase. Lastly the cowl is decreased two stitches every other row till one stitch is left on the needle. The shorter sides of the knitted rectangle are then joined together using the zigzag crochet join method.

Goes with Everything Cowl Pattern**
Yarn: Malabrigo Yarn – Rios in the RIO877 (Queguay) colorway
Knitting Needles: US #7
Crochet hook: US size 7 or 4.5 mm crochet hook
Gauge: 16 stitches/ 4 inches (this pattern is generic so gauge not so critical)
Abbreviations:

  • K: Knit
  • P: Purl
  • Kfb: Knit front and back (knit one stitch first in the front and then knit the same stitch in the back before slipping it off the left needle – 1 stitch increase)
  • K2tog: Knit the first two stitches together on the left needle (1 stitch decrease)
  • pm: place marker
  • rm: remove marker
  • sm: slip marker
  • wyif: with yarn in front
  • RS: right side
  • WS: wrong side

The seed stitch pattern:
Row 1 (RS): *K1, P1*; repeat from *…* to end of the row
Row 2 (WS): *P1, K1*; repeat  from *…* to end of the row
*Knit in seed stitch pattern: Knit the purl stitches and purl the knit stitches

With a size US #7 knitting needle cast on 1 stitch with this yarn

Increase Rows:

  • Row 1 (RS): Kfb and turn to the WS row
  • Row 2 (WS): K2
  • Row 3 (RS): Kfb, Kfb
  • Row 4 (WS): K1, pm, K2, pm, wyif S1
  • Row 5 (RS): K1, sm, Kfb, Kfb, sm, wyif S1. Place a removable stitch marker for the RS row.
  • Row 6 (WS): K1, sm, K1, P1, K2, sm, wyif S1
  • Row 7 (RS): K1, sm, Kfb, K1, P1, Kfb, sm, wyif S1
  • Row 8 (WS): K1, sm, K1, [K1, P1] 2x, K1, sm, wyif S1
  • Row 9 (RS): K1, sm, Kfb, [knit in seed stitch pattern*] till 1 stitch before marker, Kfb, sm, wyif S1
  • Row 10 (WS): K1, sm, K1, [knit in seed stitch pattern*] till 1 stitch before marker, K1, wyif S1

Repeat rows 9 and 10 till the number of stitches for the preferred cowl width is reached. The width for this cowl is about 7.5 inches.

Length increase Rows:

  • Row 1 (RS): K1, sm, Kfb, [knit in seed stitch pattern*] till 2 stitches before marker, K2tog, sm, wyif S1
  • Row 2 (WS): K1, sm, K1, [knit in seed stitch pattern*] till 1 stitch before marker, K1, sm, wyif S1

Repeat these two rows till desired length is reached. The length for this cowl is about 19.5 inches.

Decrease Rows:

  • Row 1 (RS): K1, sm, K2tog, [knit in seed stitch pattern*] till 2 stitches before marker, K2tog, sm, wyif S1
  • Row 2 (WS): K1, sm, K1, [knit in seed stitch pattern*] till 1 stitch before marker, K1, sm, wyif  S1

Repeat Rows 1 and 2 till 6 stitches left on the needle ending on the WS row

  • RS row: K1, sm, K2tog, K2tog, sm, wyif S1
  • WS row: K1, rm, K2, rm, wyif S1 (do not remove the RS removable marker)
  • RS row: K2tog, K2tog
  • WS row: Bind off (hold the remaining stitch with a removable stitch marker)

Crochet join (optional):

Insert a size 7 or 4.5 mm crochet hook in the remaining stitch, remove the stitch marker, chain one, and align the two shorter sides of the knitted rectangle together on the RS. Use the zigzag crochet join method to join the two sides together (several online video tutorials are available for this crochet join method).

Alternately, the two sides can be joined with any other join method of choice.

Weave in the ends, wash and block cowl.


** text and images for personal use only

Stay warm and stay safe
~coffeeteaknits

The Increases and Decreases Cowl

The Increases and Decreases Cowl

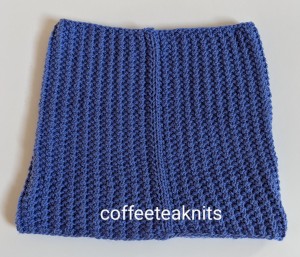
Last year, I purchased a single skein of the Lion Brand ZZ Twist yarn in the Periwinkle colorway.  I wanted to see how this yarn spun with a “Z ” twist would knit up. I knit this Increases and Decreases Cowl (free pattern below) using a blanket rib knit stitch pattern. This stitch pattern is a two round pattern where all the stitches are doubled in the first round, and then decreased to the original number of stitches in the second round.

The Increases and Decreases Cowl Pattern*

Yarn: Lion Brand ZZ Twist yarn in the Periwinkle colorway
Circular Knitting Needles: US #8 and US #9
Knitting Needle: US #10 for cast on
Gauge: 16 stitches / 4 inches in blanket rib stitch pattern with US #8 needles
Abbreviations:

  • K: Knit
  • P: Purl
  • Kfb: Knit front and back (knit one stitch first in the front and then knit the same stitch in the back before slipping it off the left needle – 1 stitch increase) 
  • K2tog: Knit the first two stitches together on the left needle (1 stitch decrease)
  • P2tog: Purl the first two stitches together on the left needle (1 stitch decrease)
  • BOR: beginning of round

With a circular US #10 needle, cast on 85 stitches using the long tail cast on method.
Sip all the stitches to a circular US #9 needle, place a BOR marker, join round (make sure the stitches are not twisted) by knitting as follows:

  • Round 1: K1, *Kfb*; repeat from *…* till one stitch before the BOR marker, K1, slip BOR marker.
  • Round 2: K1, P2tog, *K2tog, P2tog*; repeat from *…* till one stitch before BOR marker, K1, slip BOR marker.

Repeat Rounds 1 and 2 –  9 more times.
Switch to circular US #8 needles and knit Rounds 1 and 2 until the desired cowl length is reached. 
Bind off in pattern ending in Round 2.
Wash and weave in the ends.


I liked the stitch definition and drape of this yarn. I think the blanket rib stitch pattern with this “Z” twisted yarn makes it look more like a crochet stitch rather than a knit stitch. This yarn is also very soft and smooth to work with, budget friendly, machine washable, and wool free. My knitting experience was very satisfying with this yarn and I plan to continue knitting or crocheting more projects with it.


* text and images for personal use only
There are tutorial videos available on YouTube for Kfb, K2tog, P2tog, long tail cast on, knitting in the round etc.

How has your knitting experience been with the ZZ Twist yarn? 
~coffeeteaknits