JoAnn Fabrics closed it stores May 2025. Of course I went on a yarn-buying spree there before it closed. I’m sure other knitters and crocheters did too. One of my purchases was KC Botanical by K+C Yarns, a yarn exclusive to JoAnn Fabrics. Unfortunately it’s not available now since the store has closed. While the yarn is discontinued, there may be some still be available on eBay, Amazon, etc. Yarn Sub offers a list of yarns the can be substituted for the KC Botanical yarn. This yarn is a bamboo viscose and cotton blend with a soft shiny sheen. It’s smooth and drapes well. I used this yarn in a different colorway to crochet The Favorite Things Cowl. The yarn is thick and made up of several (I counted 18) strands of thinner threads. Because of the several strands it has a tendency to split at times while crocheting. Overall I like this yarn and crocheted The Silky Long Scarf with it.
The Silky Long Scarf is a rectangular scarf. It is crocheted flat from corner to corner using a single crochet, chain one stitch pattern. The Silky Long Scarf like The Springtime Baby Blanket and Favorite Things Cowl starts with a chain of 2. There is an increase section, a length extension section, and a decrease section. In the increase section, four stitches are increased every other row. This continues until a specific number of stitches is reached. In the length extending section the number of stitches stays the same while the scarf increases in length. Finally in the decrease section, four stitches are decreased every other row down to one stitch. A crochet moss stitch in the round is used as a border to finish the scarf. The Silky Long Scarf pattern is beginner friendly and the length or the width can be customized easily.
The Silky Long Scarf Pattern (text and images for personal use only)
Materials Needed:
Yarn: KC Botanical by K+C Yarn in the Camel colorway (2 skeins used for the scarf). An image of the yarn label with more information is shown below
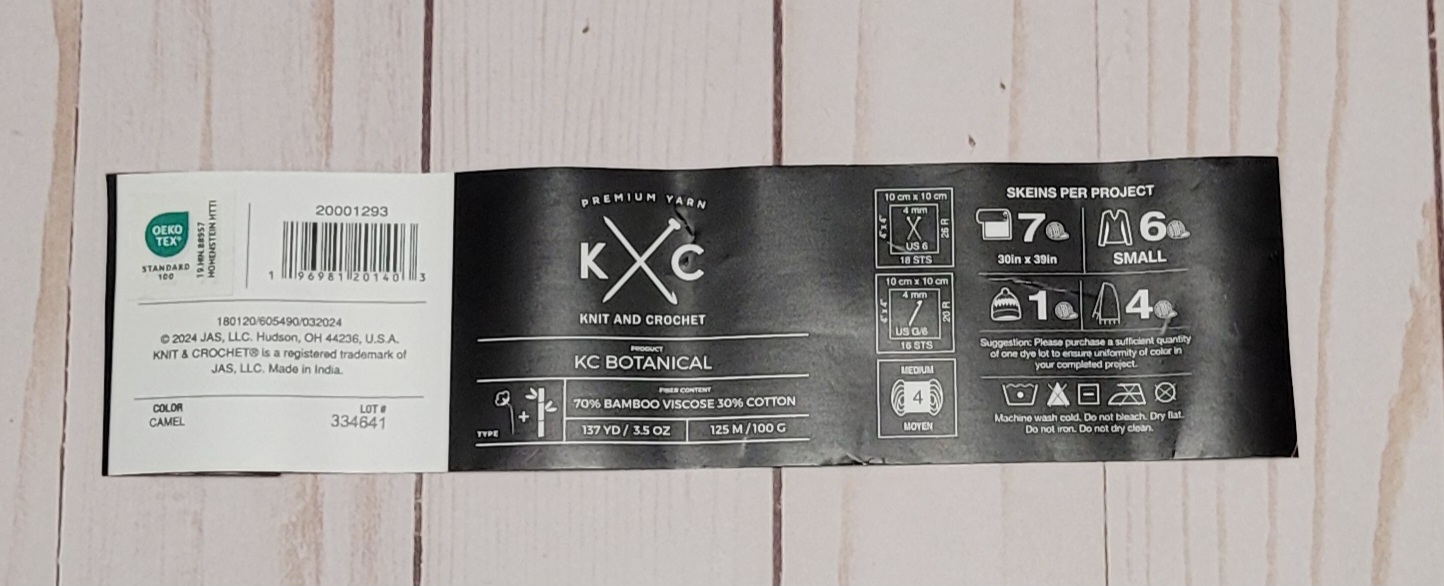
Gauge: 4.5 stitches per inch in the variation crochet moss stitch pattern
Crochet hook: US size H-8 (5.00 mm)
Tapestry needle to weave in ends
Abbreviations:
sc: single crochet (Tutorial Series: How to Single Crochet)
[…]: pattern repeat
Skill Level: Beginner friendly pattern with single crochet and crochet chains
Crochet Foundation Chain:
- Chain 2 using US size H-8 (5.00 mm) crochet hook
Increase Section:
- Row 1 (RS): Single crochet, chain 1 in the second foundation chain stitch from the crochet hook, sc, chain 1 again in the same second stitch and turn
- Row 2 (WS): Single crochet in the second stitch from the crochet hook, chain 1, skip a stitch and sc in the last stitch, chain 1 and turn (4 stitches)
- Row 3 (RS): Single crochet in the second stitch from the crochet hook, chain 1, sc in the same stitch again, chain 1, skip a stitch, and sc in the last stitch, chain 1, sc in the same last stitch again, chain 1 and turn
- Row 4 (WS): Single crochet in the second stitch from the crochet hook, chain 1, [skip a stitch, sc in the next stitch, chain 1], repeat […] till the last stitch, sc in the last stitch, chain 1 and turn (8 stitches)
- Row 5 (RS): Single crochet in the second stitch from the crochet hook, chain 1, sc in the same stitch again, chain 1, [skip a stitch, sc in the next stitch, chain 1], repeat […] till the last stitch of the row, sc in the last stitch, chain 1, sc again in the same last stitch, chain 1 and turn
- Row 6 (WS): Single crochet in the second stitch from the crochet hook, chain 1, [skip a stitch, sc in the next stitch, chain 1], repeat […] till the last stitch, sc in the last stitch, chain 1 and turn (12 stitches)
Repeat Rows 5 and 6 of the increase section till 28 stitches in the row. The width can be increased by continuing repeats of Rows 5 and 6 till preferred width reached. The Silky Long Scarf is about 5 inches wide.
Length Extension Section: There is an increase of two stitches in the beginning of the row and a decrease of two stitches at the end of the row.
- Row 1 (RS): Single crochet in the second stitch from the crochet hook, chain 1, sc in the same stitch again, chain 1, [skip a stitch, sc in the next stitch, chain 1], repeat […] till 4 stitches left, insert crochet hook into the next stitch, yarn over and pull the loop under and through that stitch (there are 2 loops on the crochet hook), skip a stitch and insert hook in the last stitch, yarn over and pull the loop under and through that stitch (three loops on the hook), yarn over and pull loop through the three loops on the hook, chain 1 and turn
- Row 2 (WS): Single crochet in the second stitch from the crochet hook, chain 1, [skip a stitch, sc in the next stitch, chain 1], repeat […] till the last stitch, sc in the last stitch, chain 1 and turn
Repeat Rows 1 and 2 of the length extension section till preferred length is reached. The Silky Long Scarf is about 94 inches in length
Decrease Section:
- Row 1 (RS): Skip the first stitch, insert crochet hook into the next stitch, wrap yarn around the crochet hook and pull the loop under and through that stitch (there are 2 loops on the crochet hook), skip a stitch and insert hook in the next stitch (4th stitch from the beginning), wrap yarn around the crochet hook and pull the loop under and through that stitch (three loops on the hook now), yarn over and pull loop through the three loops on the hook, chain 1, [skip a stitch, sc in the next stitch, chain 1], repeat […] till 4 stitches left, insert crochet hook into the next stitch, yarn over and pull the loop under and through that stitch (there are 2 loops on the crochet hook), skip a stitch and insert hook in the last stitch, yarn over and pull the loop under and through that stitch (three loops on the hook), yarn over and pull loop through the three loops on the hook, chain 1 and turn
- Row 2 (WS): [Skip the first stitch and sc in the next stitch, chain 1], repeat […] till 2 stitches left, sc in the last stitch, chain 1, and turn
Repeat Rows 1 and 2 of the decrease section till 4 stitches left. Facing the right side of the work, insert hook into the second stitch, yarn over and pull the working yarn through that stitch (2 loops on the hook). Skip a stitch and insert crochet hook into the next stitch, yarn over and pull working yarn through that stitch (three loops on the hook). Yarn over and pull working yarn through all three loops. One loop remains on the crochet hook.
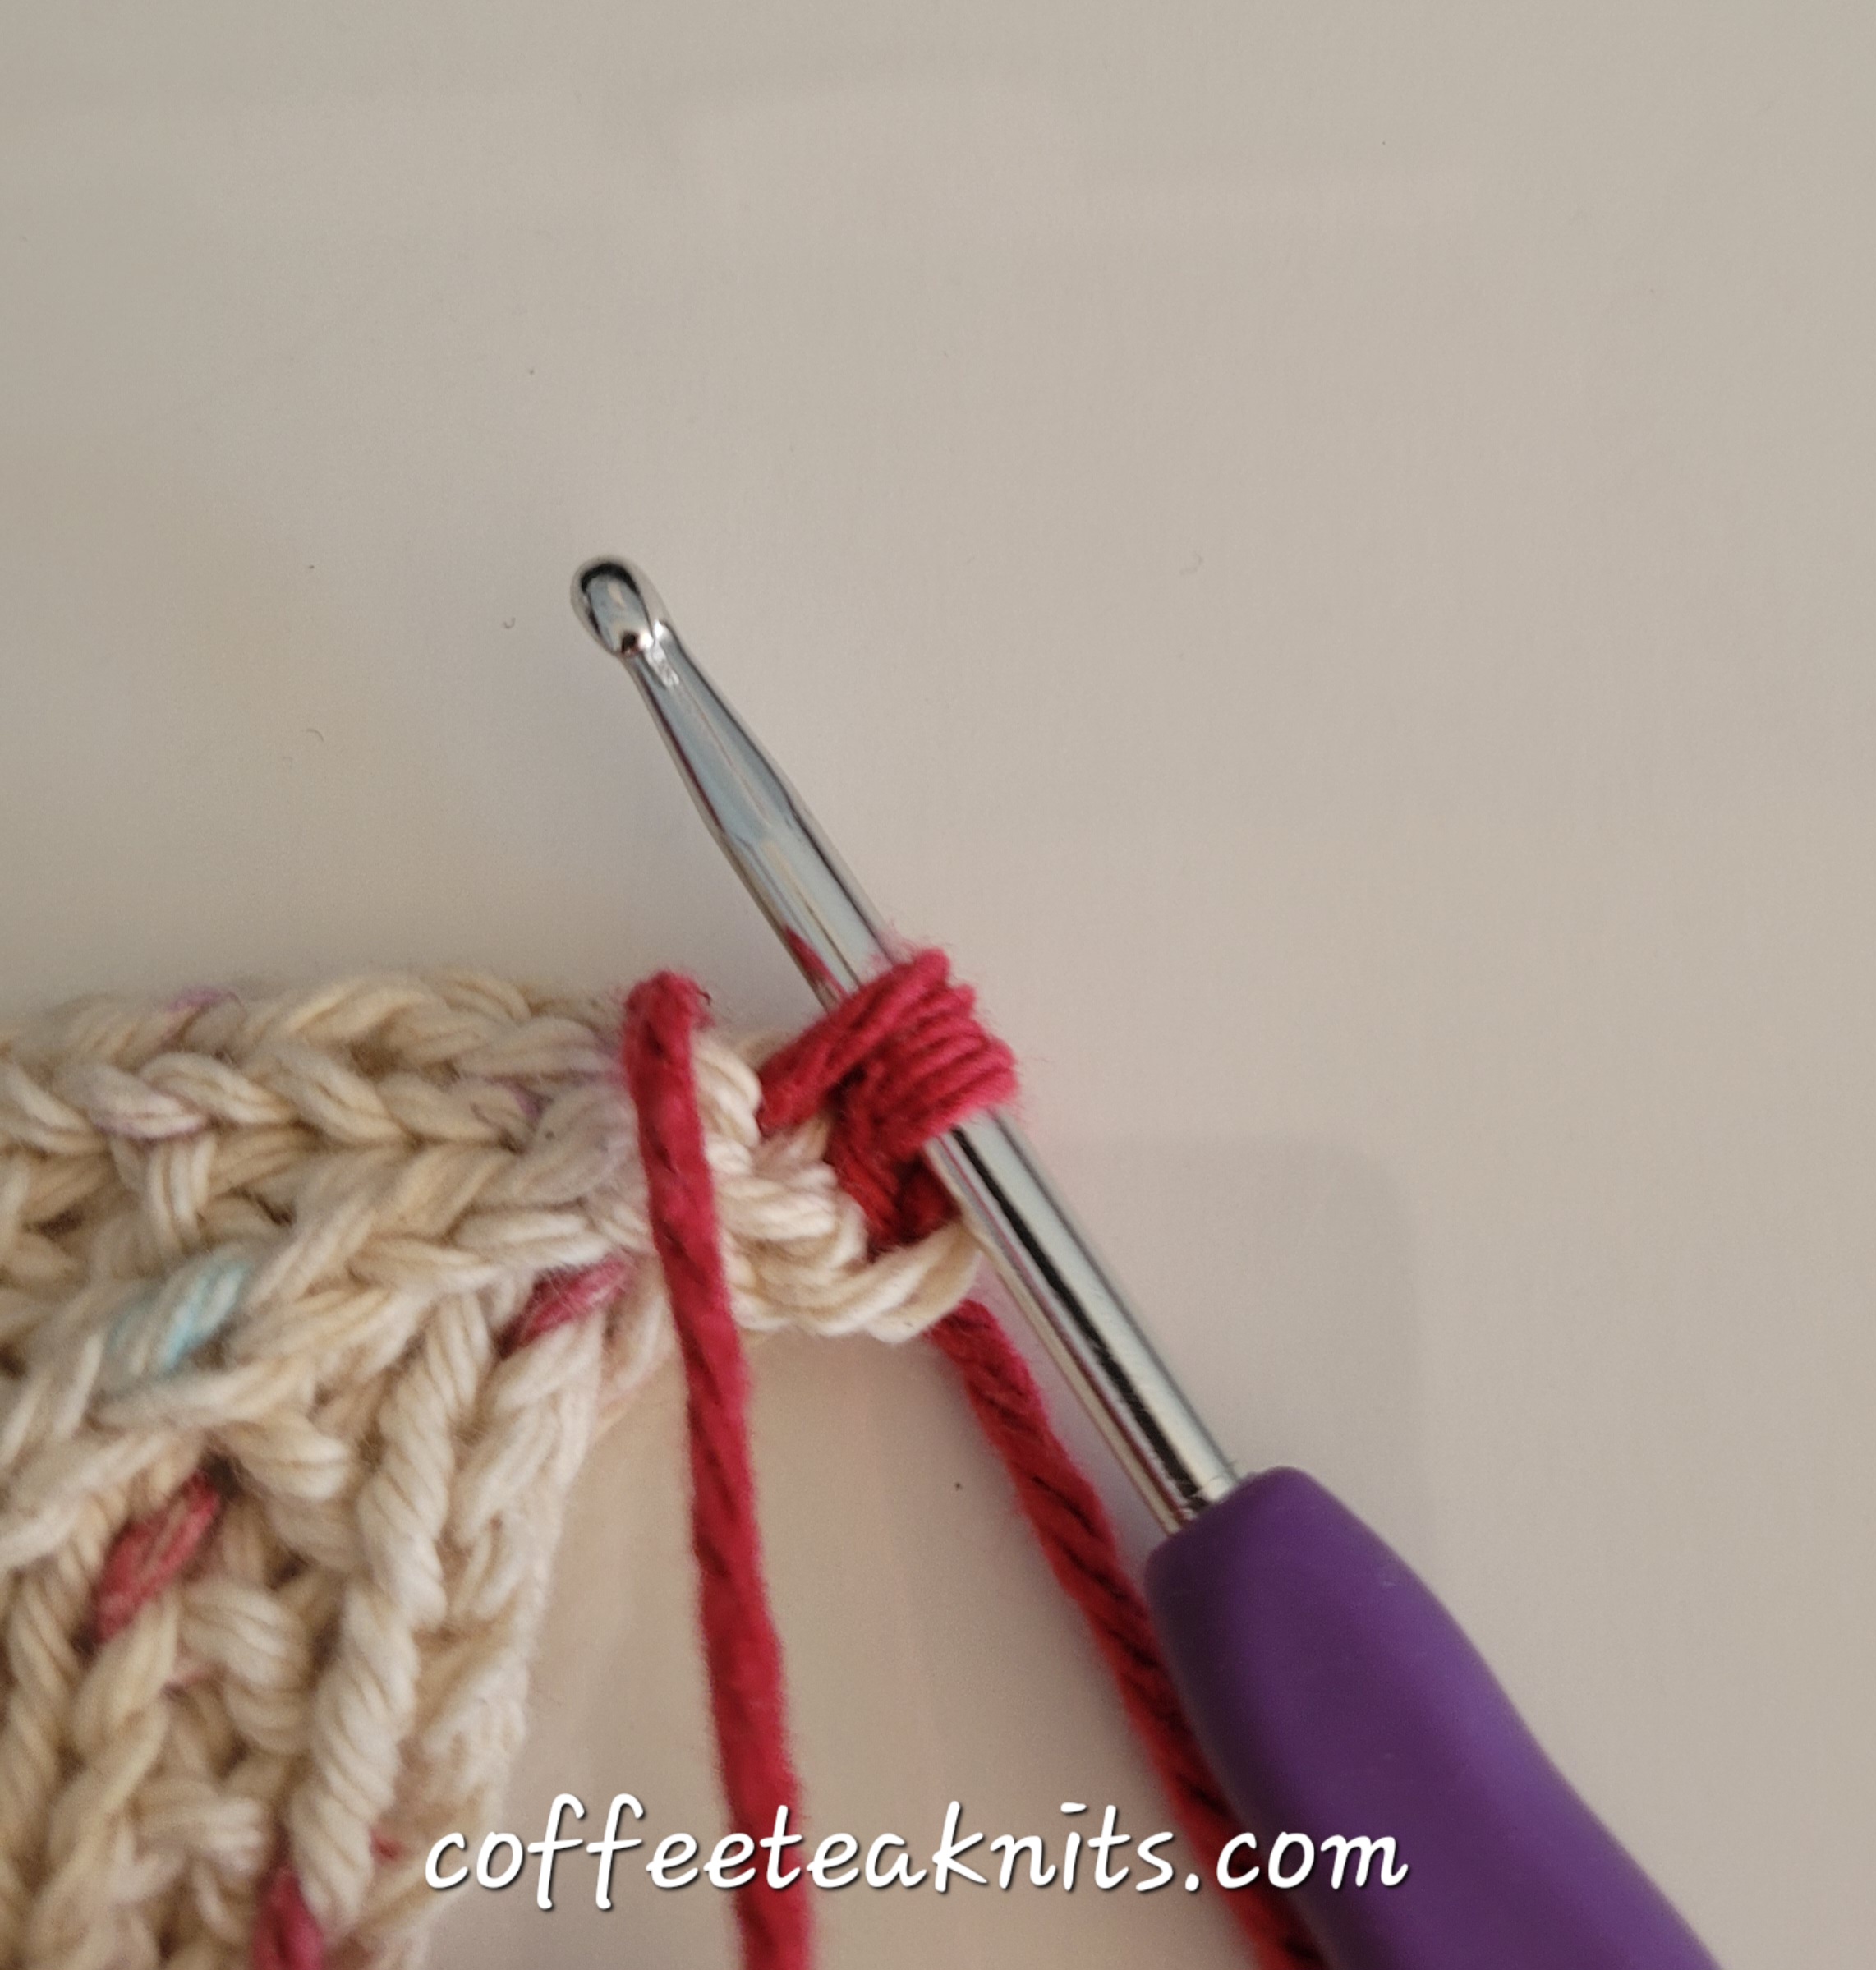
Crochet Moss Stitch Border (in the round):
Round 1:
- With the remaining loop on the hook, chain 2, sc in the same stitch again and chain 1 (beginning of round). Facing the top left corner of right side of the scarf turn counter clockwise
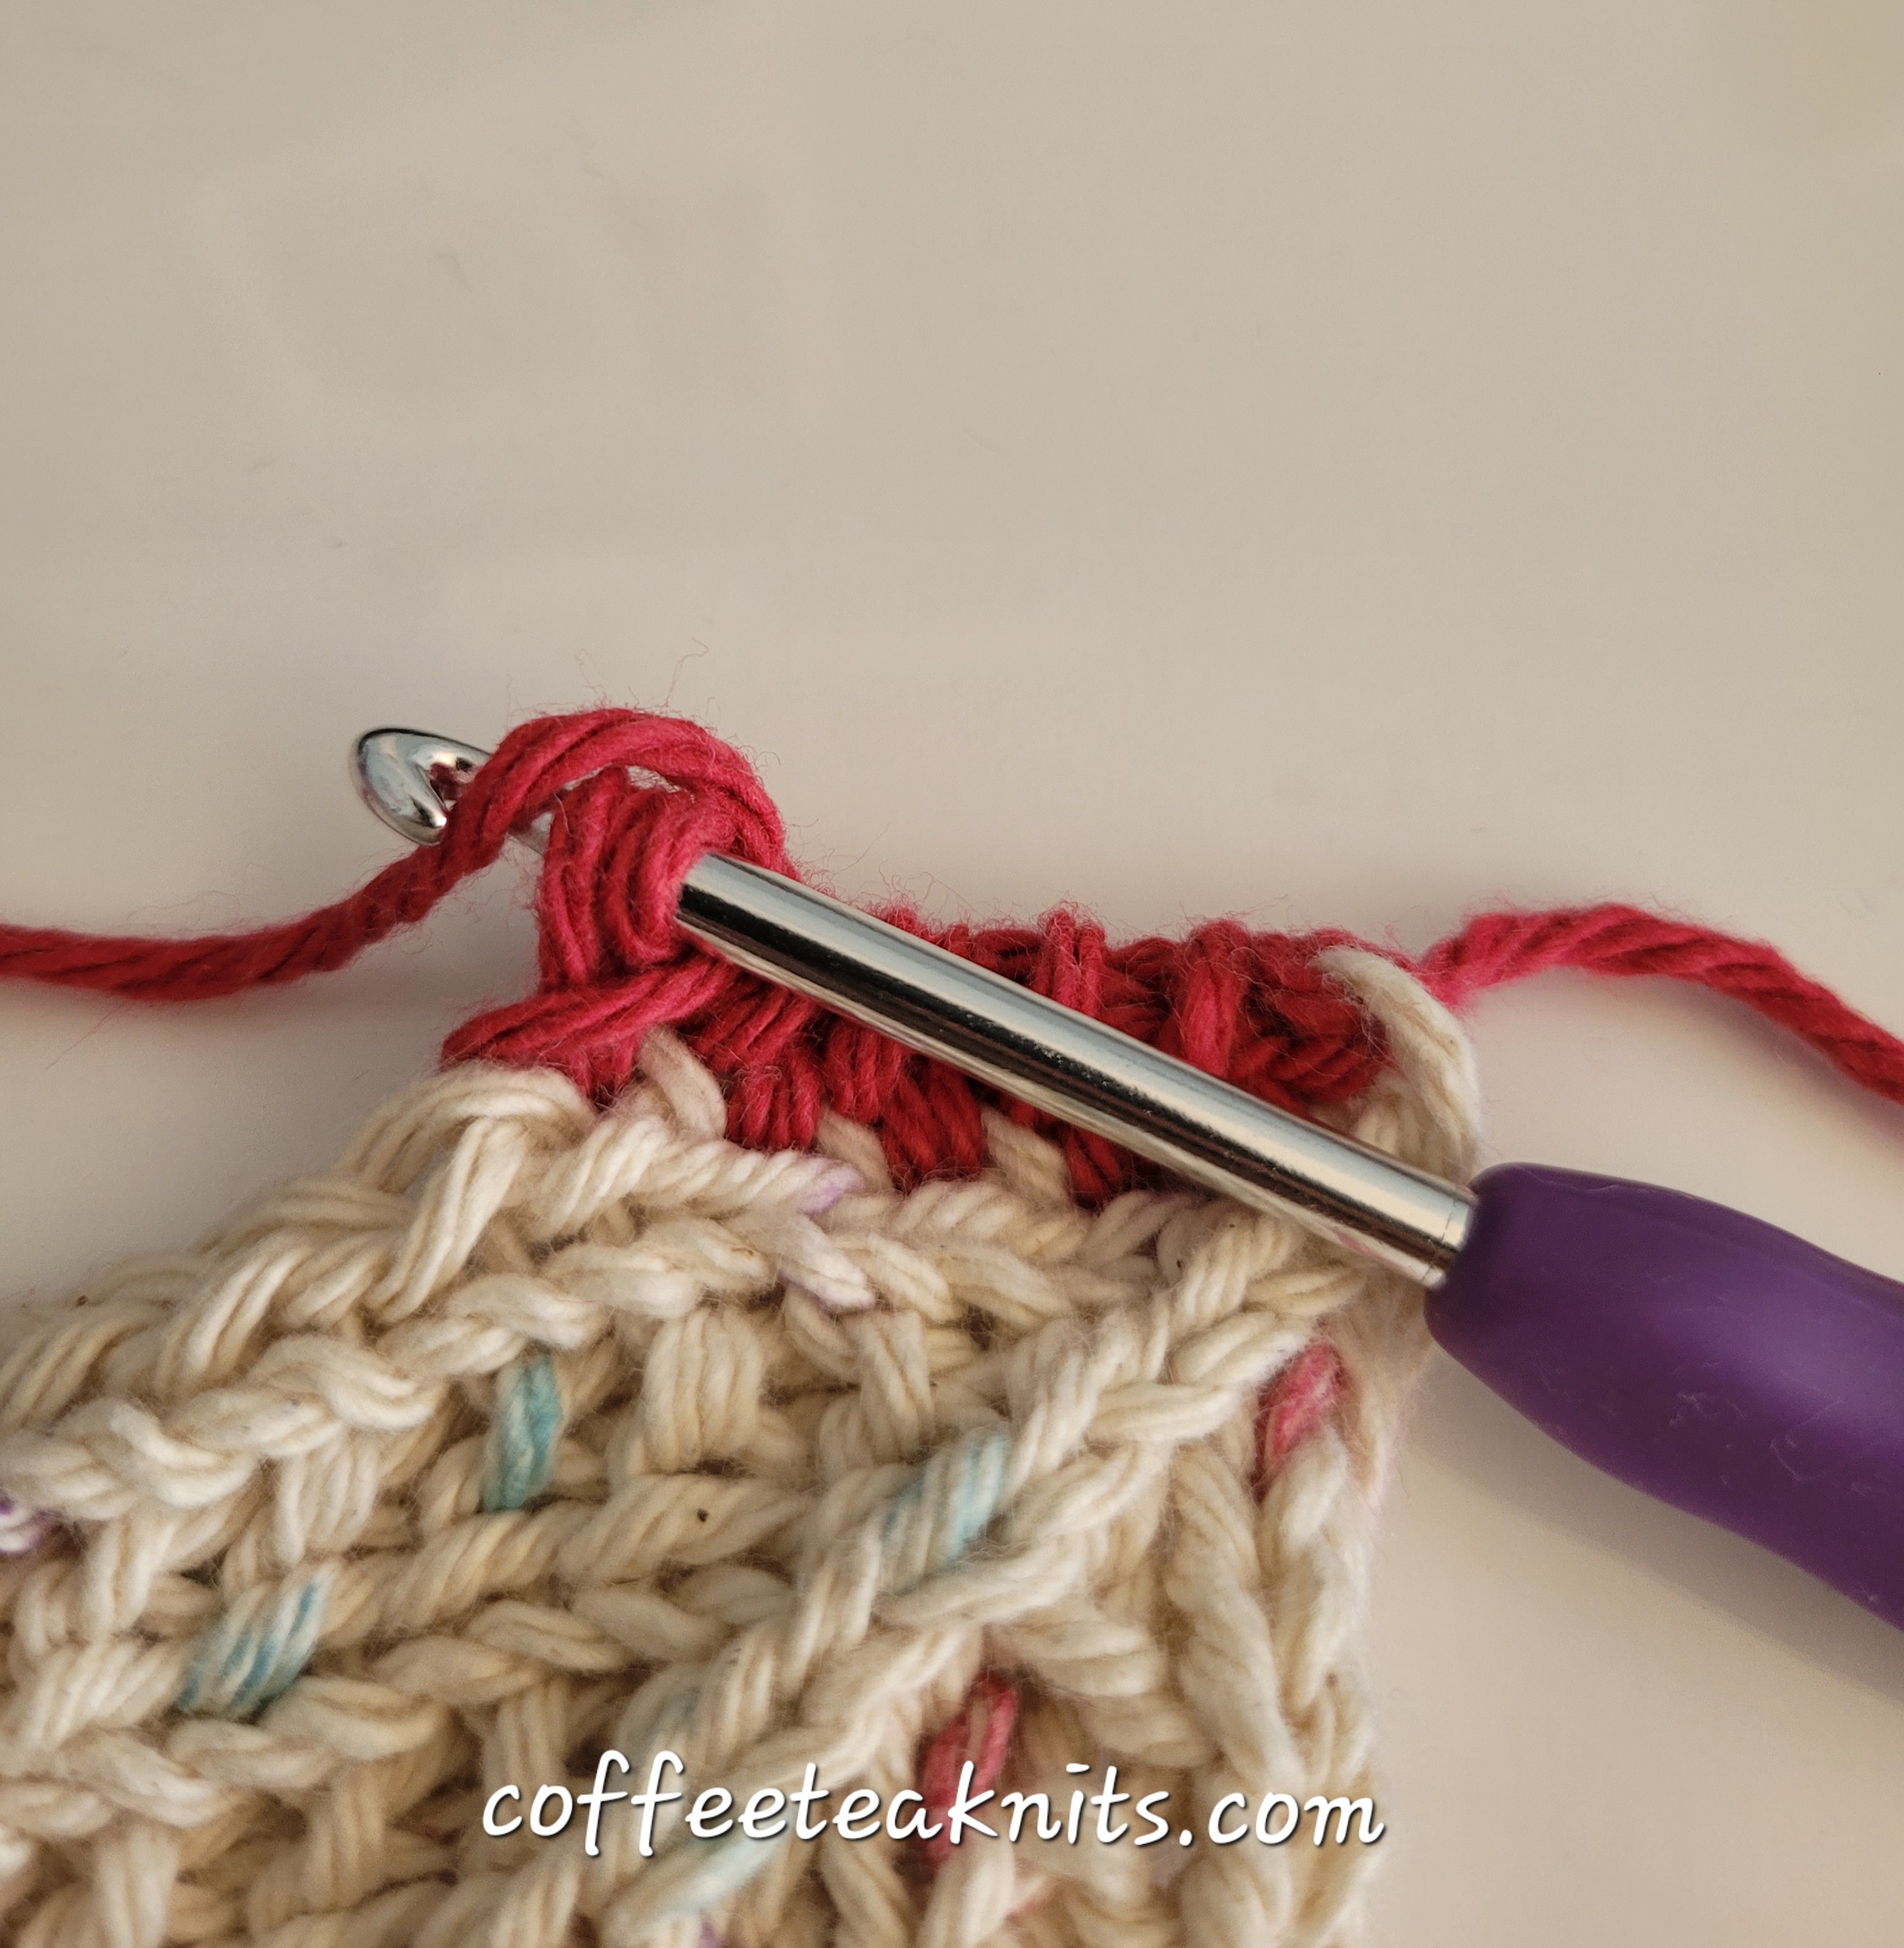
- Pick up stitches in the crochet in moss stitch pattern (pick up a stitch and sc, chain 2, skip the next stitch and repeat) all along the left side
- At the bottom left corner edge stitch of the right side of the scarf, sc, chain 2, sc again in the same corner stitch, chain 2
- Turn and pick up stitches in the crochet moss stitch pattern (pick up a stitch and sc, chain 2, skip the next stitch and repeat) along the bottom edge.
- At the bottom right corner edge stitch of the right side of the scarf, sc, chain 2, sc again in the same corner stitch, chain 2
- Turn and pick up stitches in the crochet in moss stitch pattern (pick up a stitch and sc, chain 2, skip the next stitch and repeat) going up all along the right side
- At the top right corner edge stitch of the right side of the scarf, sc, chain 2, sc again in the same corner stitch, chain 2
- Turn and pick up stitches in the last row in the crochet in moss stitch pattern (pick up a stitch and sc, chain 2, skip the next stitch and repeat) along that last row till the beginning of the round.
Insert hook into the chain 2 space of the beginning of round stitch, yarn over and pull working yarn through the remaining loop on the crochet hook.
Weave in the ends. Wash and block the Silky Long Scarf.
~coffeeteaknits.com
© Coffee Tea Knits. All text and images for personal use only. All Rights Reserved.