The Wintry Weather Hat Pattern

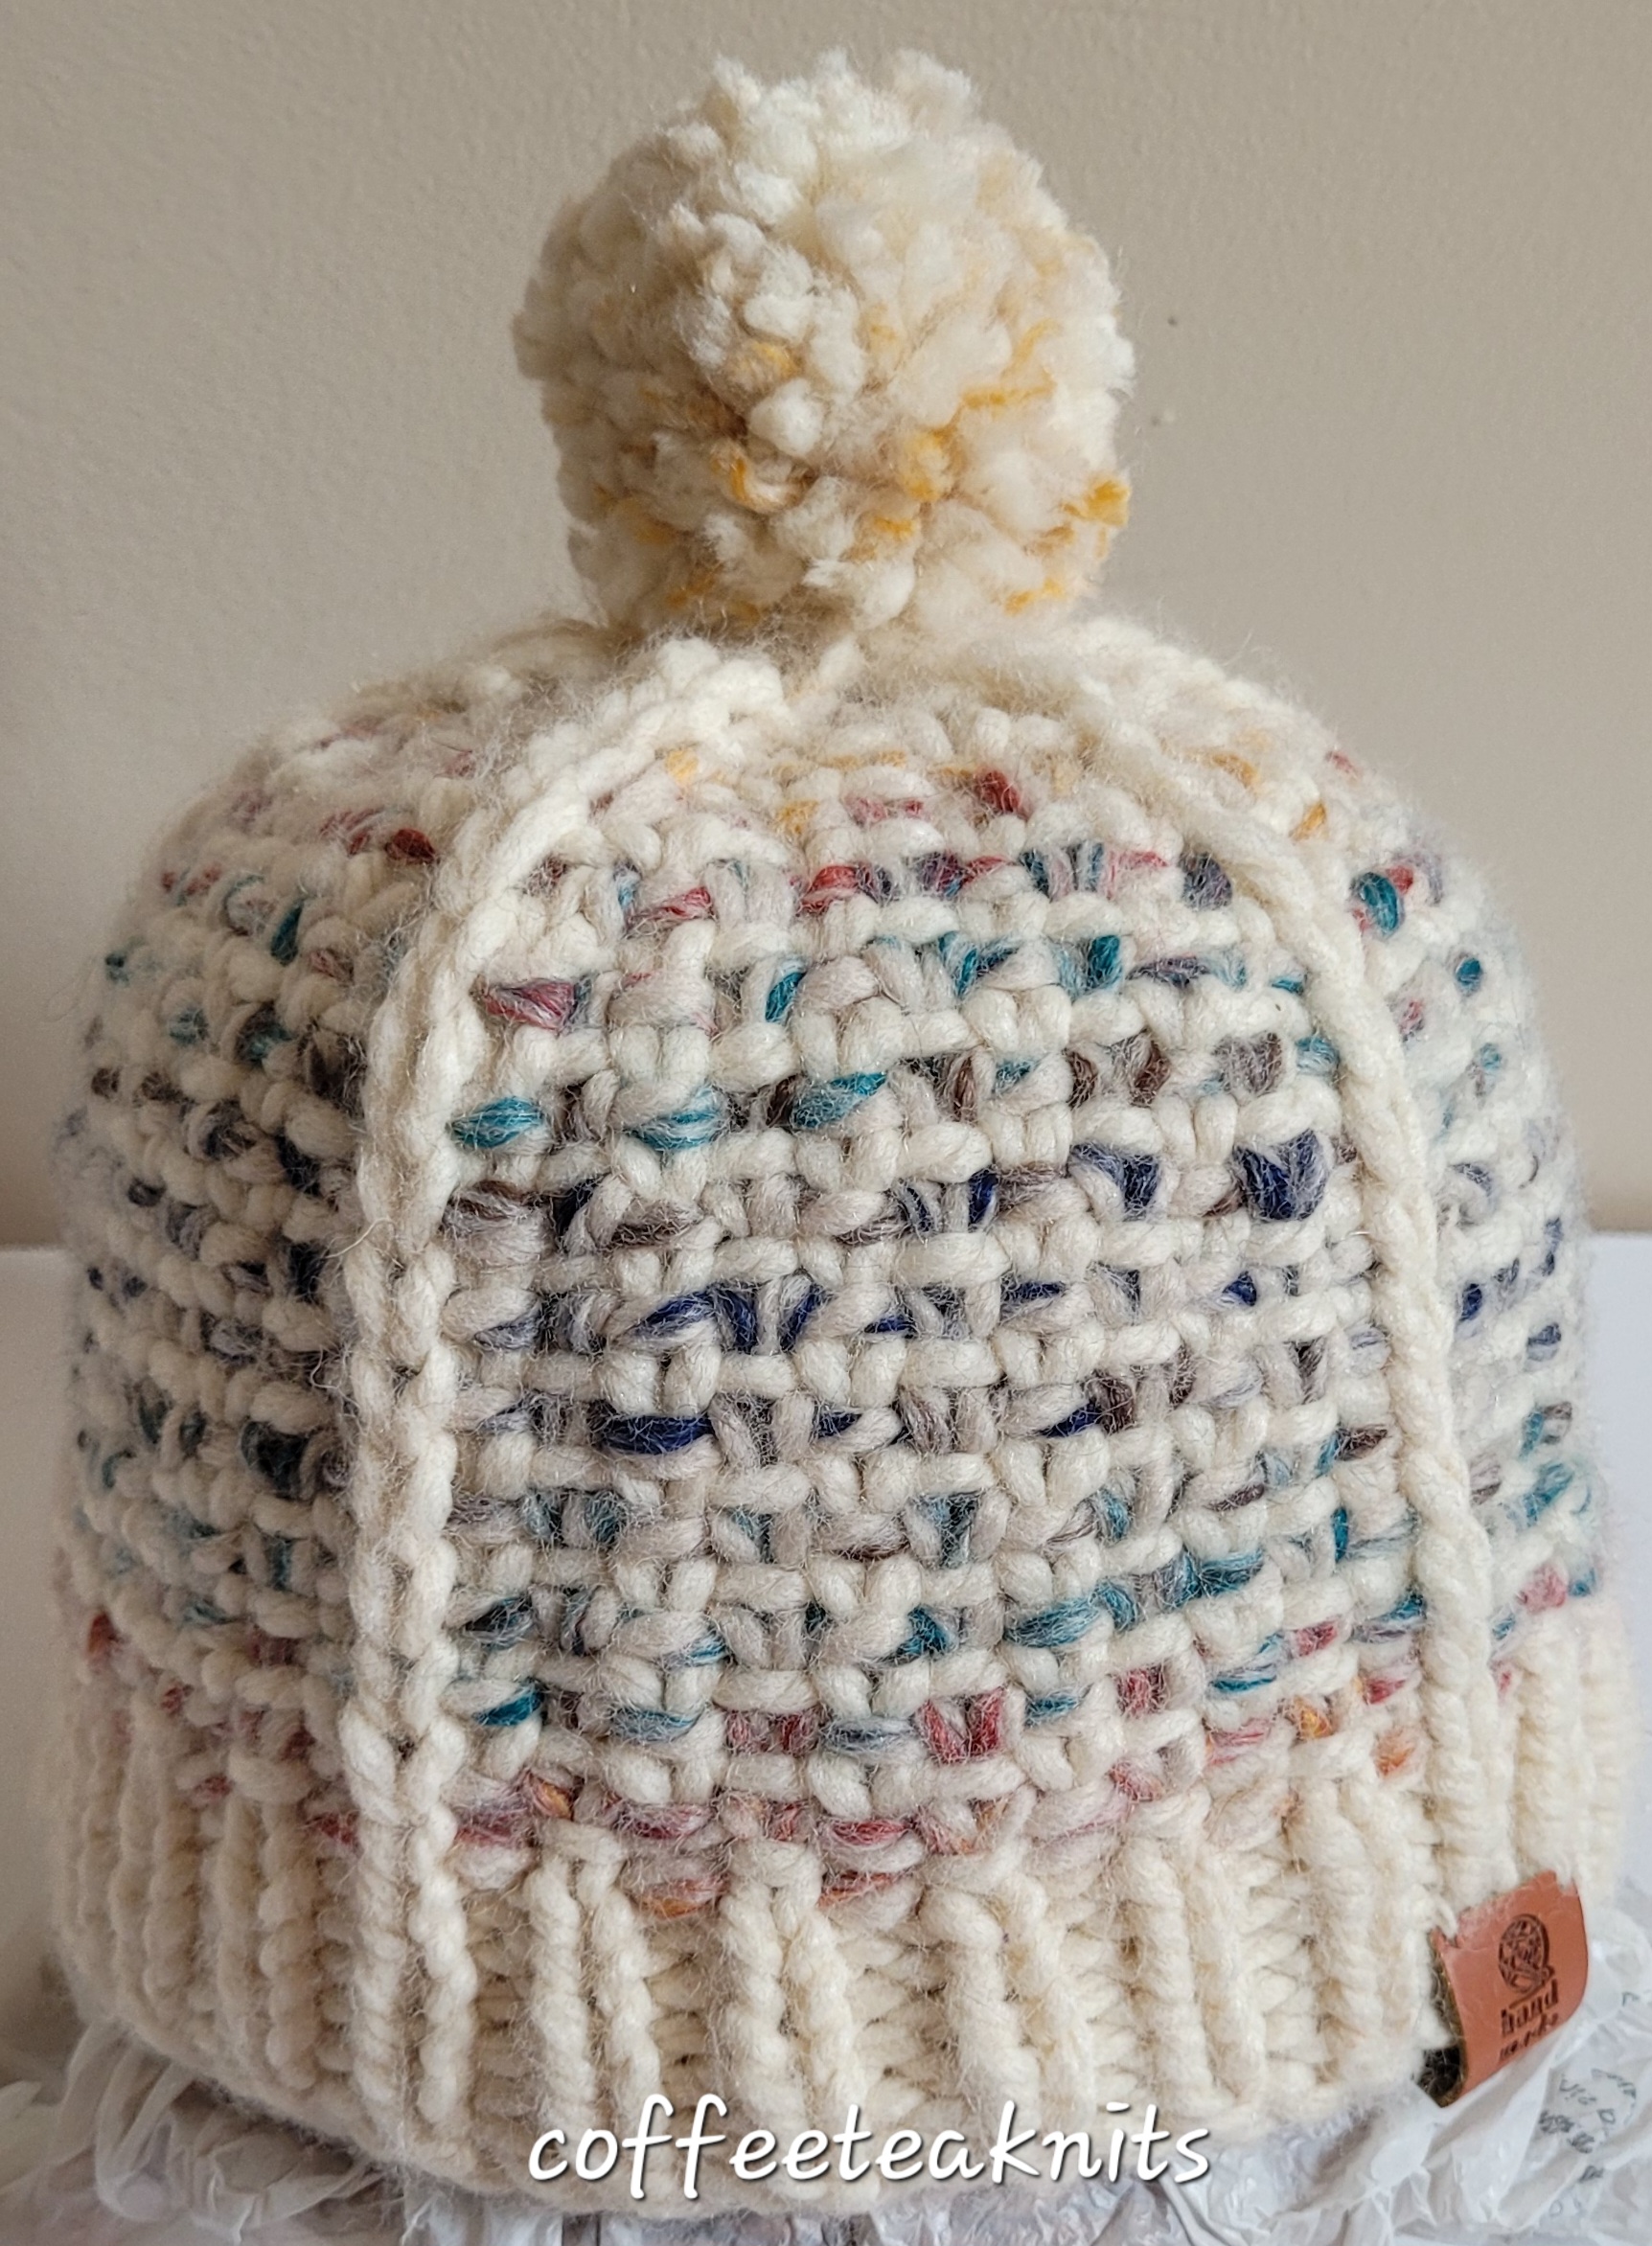
Stay warm this winter with the Wintry Weather Hats. These hats are knit using a super bulky yarn and can be knit in a day or two. The Wintry Weather hat is knit in the round in a K1, P1 rib stitch pattern with purl rounds with little or no crown shaping. The two hats differ in their stitch count and in the last round. These hats will keep you and those who receive these hats quite warm and cozy this winter season.  

Materials Needed for The Wintry Weather Hat:
Yarn: Lion Brand® Wool Ease® Thick and Quick yarn in Harvest Colorway for Wintry Weather Hat 1 and Seaglass Colorway for Wintry Weather Hat 2
Knitting Needles: US #11 16-inch circular needles and US #13 for the cable cast on (Tutorial Series: The Cable Cast-on Method)
Tapestry needle to weave in ends
Knitting skill level: Beginner to advanced beginner (pattern is knit in the round and has cable cast on)
Gauge: 2.5 stitches / 4 rows per inch in 1 x 1 rib stitch pattern with US #11 knitting needles without blocking
Size: Hat 1 may fit an adult L and Hat 2 may fit an adult M (the stitch count and length can be increased or decreased to preferred size) 

Abbreviations:
K: Knit
P: Purl
BOR: beginning of round
K2tog: Knit the two stitches on the left needle together
[…]: stitch pattern repeats

The Wintry Weather Hat Pattern (images and text for personal use only)

With US #13 knitting needles and using the Cable Cast-on method (Tutorial Series: The Cable Cast-on Method), cast on 54 stitches for Wintry Weather Hat 1 (Harvest colorway) and 50 stitches for Wintry Weather Hat 2 (Seaglass colorway)

Transfer all the stitches to US #11 16-inch circular knitting needles, place a BOR marker, join round by knitting the following:

  • Round 1: [K1, P1] repeat […] till BOR marker, slip BOR marker
  • Rounds 2-18: Repeat Round 1
  • Round 19: Purl all stitches till BOR marker, slip BOR marker
  • Round 20: [P1, K1] repeat […] till BOR marker, slip BOR marker
  • Rounds 21 – 24: Repeat Round 20
  • Round 25: Purl all stitches till BOR marker, slip BOR marker
  • Round 26: [K1, P1] repeat […] till BOR marker, slip BOR marker
  • Rounds 27 – 30: Repeat Round 26
  • Round 31: Purl all stitches till BOR marker, slip BOR marker
  • Round 32: [P1, K1] repeat […] till BOR marker, slip BOR marker
  • Rounds 33 – 36: Repeat Round 32
  • Round 37: Purl all stitches till BOR marker, slip BOR marker*
  • Round 38: Knit all stitches till BOR marker, slip BOR marker

Round 39 for Wintry Weather Hat 1: Knit all stitches till BOR marker, slip BOR marker
Round 39 for Wintry Weather Hat 2: K2tog till BOR marker, slip BOR marker

Cut a 10 to 15 inch working yarn tail and insert into a tapestry needle and weave the tapestry needle through all the remaining stitches and pull tight to close the gap at the top of the hat.

Optional: Attach and secure any faux fur pom pom of choice on top of the hat

Weave in the ends, wash and block the Wintry Weather Hat

*To increase length of Wintry Weather Hat (if preferred) add the following rounds after Round 37:
Repeat Rounds 26 – 30 
Repeat Round 37, 38 and 39


~coffeeteaknits.com

Tutorial Series: K2tog and P2tog

One way to decrease a stitch in knitting is by doing a K2tog on the knit row/round or a P2tog on a purl row/round. K2tog stands for knit two stitches together and P2tog stands for purl two stitches together. The videos below show both ways of decreasing one stitch in right handed knitting.

Advertisements

Written Steps for K2tog:

  • Insert the right needle into the front of the second stitch on the left knitting needle and then insert it into the first stitch on the left needle
  • Wrap the working yarn around the inserted right needle
  • Pull the right knitting needle and working yarn loop into and through the 2 stitches on the left needle
  • Keep the working yarn loop (the new stitch) on the right needle and slide the 2 stitches off the left needle
Advertisements
Advertisements

Written Steps for P2tog:

  • Insert right needle front to back into the first two stitches on the left knitting needle
  • Wrap the working yarn around the right needle
  • Pull the working yarn loop on the right needle through the two stitches on the left needle and keep the loop (new stitch) on the right needle
  • Slide the first two stitches off the left needle
Advertisements
Advertisements

~coffeeteaknits.com

To Crochet a Cardigan


Last month I completed my very first crochet cardigan. It is based on the free crochet pattern called In the Clouds Cardigan by Grace of For The Frills. The cardigan is beginner friendly and the pattern comes along with a video tutorial on how to crochet this cardigan. The video tutorial for this cardigan was very helpful.

I picked this cardigan because it had a similar crochet moss stitch pattern (single crochet, chain one) yet where the single crochet was placed gave a different texture to the crocheted item. This textured crochet stitch pattern was also my inspiration to design and crochet the Four Sections Blanket pattern.

Briefly, the body of the free cardigan pattern is worked sideways (lengthwise) beginning from the first front panel, then the back, and ending with the second front panel leaving gaps for the armholes. The shoulders are seamed. The sleeves are crocheted flat and then seamed to the armhole edges. The ribbing for the body, sleeves, pockets, and neckband are crocheted separately using smaller crochet hooks and then seamed to the cardigan.

My cardigan looks quite different from In the Clouds Cardigan. Although I used the sideway technique and the same stitch pattern, I made several modifications to the cardigan. The cardigan I crocheted is not oversized nor does it have any pockets. Worsted weight yarn that I had purchased some years ago was used instead of the bulky weight yarn recommended in the pattern. My gauge was different and so were the crochet hooks that I used.

The biggest modification was in the sleeves of the cardigan and the neckband ribbing. Since I didn’t have enough yarn left to crochet long length sleeves, I decided to pick up stitches along the armhole edges with a knitting needle and purled both sleeves (pictured below) ending with a repetition of [Knit 1 through the back loop, purl 1] for the ribbing of the sleeves. For the neckband ribbing, I crocheted several rows of the moss stitch pattern all along one front, the neck and down the other front.


There are two main lessons I learnt from crocheting this beginner friendly cardigan pattern. One is that you need more yarn for a crochet cardigan than for knitted cardigan, and the other is that crocheting a cardigan takes less time than knitting one.

I am satisfied with how the cardigan turned out. Since the time to crochet a cardigan is much shorter than knitting one, I will definitely be crocheting more sweaters. There are several free crochet patterns available on For The Frills website that are quite lovely and beginner friendly. Some patterns also have video tutorials. I can’t wait to crochet another cardigan or a pullover using these free patterns by Grace.


How has your experience with crocheting cardigans been? Share some of your experiences in the comment below.


~coffeeteaknits.com

Tutorial Series: Purl and Un-Purl

The purl stitch in knitting looks quite different from the knit stitch. The videos below show how to make purl stitches and how to undo (un-purl) those stitches for right handed knitting.

The Purl Stitch:

  • Insert the right needle from front to back of the first stitch on the left knitting needle
  • Wrap the working yarn around the inserted right needle
  • Catch the loop made made by the working yarn (the new stitch) with the right needle
  • Slip the loop (the new stitch) onto the right needle and the first stitch off the left needle


Un-Purl (undo the Purl stitch):

  • Insert left knitting needle into the purl bump below the new stitch on the right needle
  • Catch the left side of the purl bump above the working yarn and place the loop made onto the left needle
  • Slide the new stitch on the right needle off the needle
  • Pull the working yarn (dropped stitch loop) away from the stitch on the left needle

~coffeeteaknits.com

The Four Section Blanket Pattern


I bought the yarn for the Four Section Blanket almost a decade ago when they opened a new Hobby Lobby store near me. I was still a novice knitter dabbling in knitting a top down sweater and wanted to use this yarn for that. I tried to knit a sweater with this yarn but for some reason it didn’t happen. The yarn languished in my storage bin for years till a couple of months ago when I took it out from storage and crocheted this Four Section Blanket.

Four separate pieces of the same size are crocheted for the Four Section Blanket using a crochet moss stitch pattern for the border and a mix of single crochet, chain 1 stitch pattern for the four pieces. Although both stitch patterns have single crochets and chain ones, the placement of the single crochet results in a distinctive looking pattern. Each section has a round of crochet moss stitch pattern as its border edge. The four pieces are then joined using the zig zag crochet slip stitch method. The border of the blanket is finished with several rounds of the crochet moss stitch pattern. The finished blanket measures about 42 x 44 inches.

The Four Section Blanket Pattern (text and images for personal use only)

Yarn: Hobby Lobby I Love This Yarn! in Terra Cotta Colorway (4 skeins needed for this blanket)
Tapestry needle to weave in ends
Gauge: 4.5 stitches/inch
Crochet hook: US size I-9 or 5.5 mm 
Abbreviations:
sc: single crochet
[…]: pattern repeat

With US # I-9 (5.5 mm) crochet hook, make a slip knot and chain 80 stitches

  • Row 1 (RS): Skip the first stitch, [single crochet the next stitch, chain 1, skip the next stitch] repeat […] till the last stitch, sc the last stitch (on the slip knot side), chain 1 and turn
  • Row 2 (WS): Skip the first stitch, [sc the next stitch, chain 1, skip the next stitch] repeat […] till the last stitch, sc the last stitch, chain 1 and turn

Repeat Row 2, 72 more times.


Repeat Row 2 (RS) more time
One Round of Crochet Moss Stitch Border:

  • Turn and pick up 37 stitches and crochet in moss stitch pattern (pick up a stitch and sc, chain 1, skip the next stitch and repeat) all along the left side – As shown in the video above
  • Turn and pick up 40 stitches and crochet in moss stitch pattern along the 80 chain stitch edge
  • Turn and pick up 37 stitches and crochet in moss stitch pattern all along the right side
  • Turn and pick up 40 stitches of the last row (bind off row) and crochet in moss stitch pattern along that last row.

Slip stitch into the first stitch of the round and pull working yarn through. See the finished first section below.


Make three more identical square shape pieces (about 18 x 18 inches each).

Join the four small pieces with zig zag slip stitch crochet method or any other join method of your choice:

Join the last row (bind off row) of first completed piece to the 80 chain stitch edge of the second completed piece with the zig zag slip stitch crochet join method moving from right to left

Join the last row (bind off row) of the third completed piece to the 80 chain stitch edge of the fourth completed piece with the zig zag slip stitch crochet join method moving from left to right.

Join the two large rectangular shaped pieces with zig zag slip stitch crochet method or any other join method of your choice:

Starting from the bottom to top, join the two rectangle pieces with the zig zag crochet slip stitch method


Crochet Moss Stitch Border:

Round 1 (RS): Make a slip knot with US size I – 9 (5.5 mm) crochet hook, and starting from one corner of the joined piece, bring the slip knot through (from back to front) the corner stitch (beginning of round), sc into the corner stitch, chain 2, sc into the same corner stitch, chain 1, [sc into the next chain 1 space, chain 1] all around the joined piece with a repeat of [sc in the corner stitch, chain 2, sc into the same corner stitch, chain 1] at each of the corners. 

Repeat Round 1, 5 more times with [sc into the chain 1 space, chain 1] all around the joined piece with a repeat of [sc into the corner stitch chain 2 space, chain 2, sc into the same corner stitch chain 2 space, chain 1] at each of the corners chain 2 space. 

At the end of last round sc into the beginning of round corner stitch chain 2 space and pull working yarn through.

Weave in the ends, wash and block the Four Section Blanket


~coffeeteaknits.com

Tutorial Series: Knit and Tink

Welcome to the first video tutorial here on Coffee Tea Knits. The knit stitch and how to tink (knit spelled backwards) or unravel that stitch is shown in the two videos below.

The Knit Stitch:

  • Insert the right knitting needle from back to front of the first stitch on the left knitting needle.
  • Take the working yarn around the top of the right needle and wrap it between the two needles on top of the first stitch
  • Catch and pick up the working yarn loop (the new stitch) with the right needle
  • Slip the first stitch off the left needle and onto the right needle for the new knit stitch

Tink (to undo or unpick the knit stitch):

  • Insert the left knitting needle into the v – shaped stitch below the first stitch on the right needle
  • Catch the left strand of the v – shaped stitch with the left needle and slip it onto the left needle
  • Pull the first stitch on the right needle off the needle
  • Pull the working yarn (loop) out of the stitch now on the left needle

~coffeeteaknits.com