The Brick and Mortar Dishcloth is knit using the mosaic colorwork technique with slip stitches and two different colors of yarn. In mosaic knitting only one color of yarn is needed per row. The mosaic pattern in the Bricks and Mortar Dishcloth is formed with garter slip stitches and by switching the two different colors of yarn back and forth every two rows. The Brick and Mortar Dishcloth is knit flat and measures about 7.5 x 7.5 inches after washing. The dishcloth is finished with a round of crochet moss stitch and a round of slip stitch, chain one border edge with a hanging loop.
Advertisements
The Brick and Mortar Dishcloth Pattern (text and images for personal use only)
PLEASE SUBSCRIBE FOR THE FREE PATTERN. THANK YOU
Subscribe to continue reading
Subscribe to get access to the rest of this post and other subscriber-only content.
Cast on for knitting or a foundation chain for crochet all start with a slip knot. The first stitch in knitting is the slip knot. The slip knot in crochet is the loop for the first foundation chain. Therefore, how to make a slip knot is the first step in learning how to knit or crochet. There are many ways to make a slip knot. How to slip knot differs for knitters and crocheters. The video below shows how I make a slip knot to start a crochet foundation chain.
Advertisements
How to Slip Knot (slow motion):
Advertisements
Written Instructions for How to Slip Knot:
Wrap the yarn around index and middle finger of the left hand going from top to bottom (clockwise)
Bring the yarn across and between the two fingers
With the right hand, bring the strand of yarn in and through the ring formed by the wrapped yarn
Pull and tighten the ring holding the strand of yarn to form the slip knot
Insert a crochet hook into the slip knot and tighten it around the hook
Although early Spring flowers have appeared and so have the birds, winter has not yet left us. Below freezing temperatures and cold winter air still lingers. Nevertheless, I will make items with Spring weather in mind. The Patchwork Petal Scarf uses cotton yarn more suitable for pleasant weather. It’s made up of eight center out crochet moss stitch squares which are then joined using the zig zag slip stitch crochet join method. Two rounds of crochet moss stitch are used for the border edge of the joined squares. Fringes are added to the Patchwork Petal Scarf.
Advertisements
The Patchwork Petal Scarf Pattern (text and images for personal use only)
PLEASE SUBSCRIBE FOR THE FREE PATTERN. THANK YOU
Subscribe to continue reading
Subscribe to get access to the rest of this post and other subscriber-only content.
The Swirling Hot Pad/Trivet is knit holding four strands of yarn together. It is a flat circle that is knit in the round moving towards the center from the cast on edge by a series of decreases. It is similar to The Striped Spiral Hotpad/Trivet but differs in where the series of decreases is placed. The cast on edge of the Swirling Hot Pad/Trivet is finished with a slip stitch, chain one crochet border.
Advertisements
Materials Needed for The Swirling Hot Pad/Trivet: Yarn: Patons® Classic Wool Worsted™ in Natural Mix and Heath Heather colorway – 2 strands of each colorway yarn held together Knitting Needles: US #9 (5.5 mm)16-inch circular needles and US#11 (8 mm) needles for cast on Crochet Hook: H – 8 (5.0 mm) Tapestry needle to weave in ends Knitting skill level: Beginner to Advanced Beginner Gauge: 3.5 stitches per inch in the garter stitch pattern with US #9 knitting needles after blocking Size: about 9.5 inches in diameter
Advertisements
Abbreviations: K: Knit P: Purl BOR: beginning of round pm: place marker sm: slip marker rm: remove marker K2tog: Knit the two stitches on the left needle together […]: stitch pattern repeats
Advertisements
The Swirling Hot Pad/Trivet Pattern (text and images for personal use only)
PLEASE SUBSCRIBE FOR THE FREE PATTERN. THANK YOU
Subscribe to continue reading
Subscribe to get access to the rest of this post and other subscriber-only content.
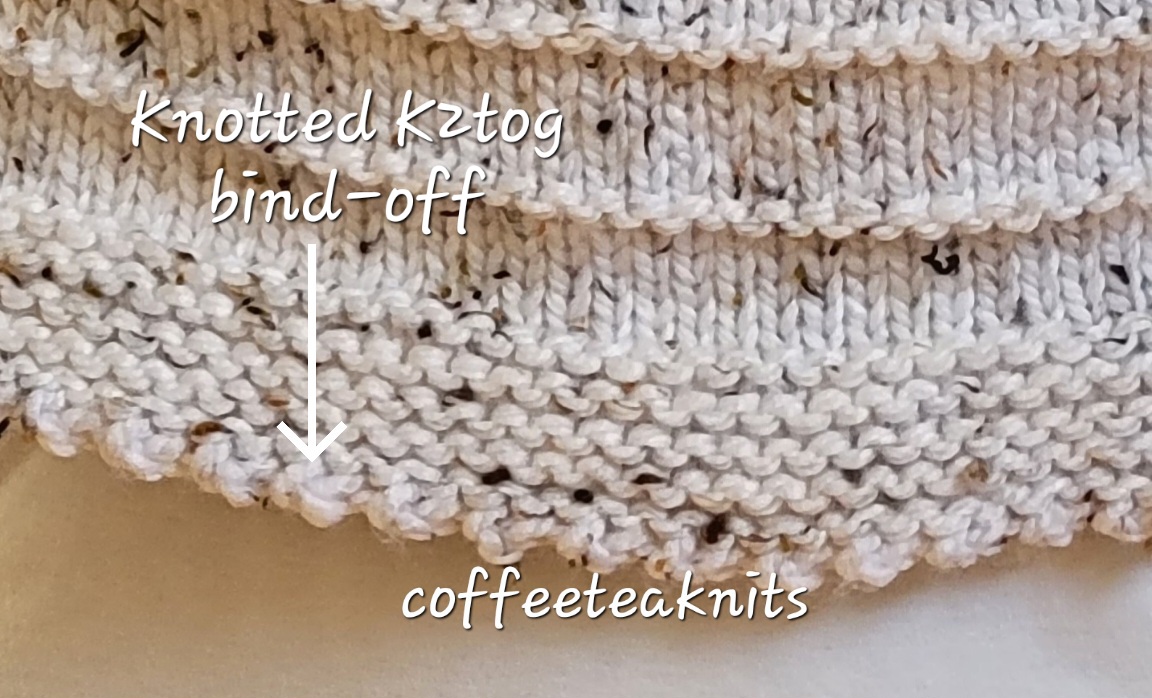
A decorative bind – off method that I used in The Cozy Season Shrug is the Knotted K2tog bind – off. It gives a nicer looking finished edge for shawls, shrugs etc. that can be added to a garter stitch pattern border.
Advertisements
The written instructions and video below on how to do the knotted K2tog bind – off is shown for right handed knitting.
Advertisements
Abbreviations:
K: Knit
K2tog: Knit the two stitches on the left knitting needle together
wyif: with the working yarn in front
The Knotted K2tog Bind Off:
Advertisements
Knotted K2tog Bind Off:(written intructions)
To begin the bind off row/round: K2, wyif slip the 2 knitted stitches on the right knitting needle back onto the left knitting needle
Wrap the working yarn in front of the 2 stitches on the left knitting needle
Insert the right knitting needle into the wrapped stitches on the left knitting needle and knit those 2 stitches together.
Knit the next stitch on the left knitting needle. There are two stitches on the right knitting needle
Pass the second stitch on the right knitting needle over the first stitch on that needle
K1, wyif slip the 2 knitted stitches on the right knitting needle back onto the left knitting needle
Repeat steps 2 to 5
Repeat steps 6 and 7 till one stitch left in the bind off row/round
Cut and pull working yarn through the last remaining stitch and weave in the end
The Drapes Well Scarf is a rectangular infinity scarf that is knit flat and then joined at the cast on and the bind off edges. The scarf is knit with 2 strands of yarn held together in a combination of the garter stitch and the brioche honeycomb stitch patterns. The brioche honeycomb stitch pattern is a combination of slipped stitches and yarnovers in one row and knit 2 togethers in the next row. The yarn (Lion Brand® Yarn TruBoo) is smooth and silky that drapes well making it ideal to knit this infinity scarf. The 2 strands of yarn held together in the Drapes Well Scarf adds extra warmth around the neck making it an accessory suitable for cold weather.
Advertisements
Materials Needed for The Drapes Well Scarf: Yarn: Lion Brand® Yarn TruBoo in Silver – 2 strands of yarn held together Knitting Needles: US #8 and US#10 for cast on Crochet Hook: G-6 (4.0 mm) Tapestry needle to weave in ends Knitting skill level: Beginner to advanced beginner – slipped stitches, yarnovers (see tutorial here) and three needle bind off Gauge: 5 stitches per inch in the brioche honeycomb stitch pattern with US #8 knitting needles after blocking and without stretching Size: Fits most adults. Length can be increased or reduced to preferred size
Advertisements
Abbreviations: K: Knit P: Purl sm: slip marker pm: place marker RS: right side WS: wrong side YO: yarnover K2tog: Knit the two stitches on the left needle together wyif S1: with working yarn in front slip 1 stitch purlwise S1 wyib: slip 1 stitch purlwise with working yarn in the back […]: stitch pattern repeats
The Drapes Well Scarf Pattern (text and images for personal use only):
With 2 strands of yarn held together, cast on 32 stitches with US # 10 knitting needles
With US #8 knitting needles and 2 strands of yarn held together knit the following:
Advertisements
BLOCK 1 (The Drapes Well Scarf is divided into 8 blocks or sections of pattern repeats):
Repeat Rows 4 to 7, nine more times Repeat Row 2, 4 more times ending in RS row
Advertisements
BLOCK 2:
Repeat Rows 4 to 7, ten times
Repeat Row 2, 4 more times ending in RS row
Advertisements
BLOCK 3 to BLOCK 7:
Repeat BLOCK 2, five more times (Block repeats can be reduced or increased if preferred)
Advertisements
BLOCK 8:
Repeat Rows 4 to 7, ten more times
Repeat Row 2, 2 times ending in RS row
Advertisements
Three Needle Bind off Joining the Cast on edge:
Bring the Cast on edge with the WS (wrong side) facing out. With another US #8 needle pick up one leg of the V right below the cast on edge stitches. Pick up 32 stitches.
Insert right needle into the first stitch on the first left knitting needle and then insert it into the first stitch on the second needle.
Knit the two stitches together on the needle
Insert right needle into the second stitch on the first left knitting needle and then insert it into the second stitch on the second needle.
Knit the two stitches together
Pass the first stitch on the right needle over the second stitch to bind off.
Repeat steps 4 to 6 for the three needle bind off.
Advertisements
Crochet Border:
Starting on the RS (right side) of the three needle bind off edge, make a slip knot with G-6 (4.0 mm) crochet hook and pull it under the V of the the edge stitch and chain 2.
Insert hook under the V of the next edge stitch and pull the loop through the edge stitch and slip stitch it to loop on the hook, chain 1
Repeat Step 2 around one side edge of the scarf
Slip stitch the last stitch on the hook into the beginning chain 1 stitch
Repeat Steps 1 and 2 for other side of the scarf
Weave in ends, wash and block the Drapes Well Scarf
Yarn over (YO) is another method to increase stitches in rows or rounds. Yarn overs create holes or eyelets in knitted items and are most commonly used in lace stitch patterns. A stitch increase with a yarn over is most often followed by a stitch decrease in the same or the next row or round for most lace stitch patterns in knitting. The written instructions and videos below show how to increase a stitch with a yarn over (YO) on a knit row for right-handed knitting.
Advertisements
Abbreviations:
K: Knit
YO: yarn over
Advertisements
Yarn Over (YO) in slow motion:
Yarn Over (YO) written instructions:
Wrap the working yarn from back to front on the right knitting needle
Bring the working yarn to the back of the right hand knitting needle
Insert right knitting needle into the first stitch on the left knitting needle
Knit the first stitch on the left knitting needle to complete the yarn over
Advertisements
Yarn Over with Knit Stitches: The video below shows K1, YO, K2, YO, K2, YO, K2, YO, K2
Stay warm this winter with the Wintry Weather Hats. These hats are knit using a super bulky yarn and can be knit in a day or two. The Wintry Weather hat is knit in the round in a K1, P1 rib stitch pattern with purl rounds with little or no crown shaping. The two hats differ in their stitch count and in the last round. These hats will keep you and those who receive these hats quite warm and cozy this winter season.
Advertisements
Materials Needed for The Wintry Weather Hat: Yarn: Lion Brand® Wool Ease® Thick and Quick yarn in Harvest Colorway for Wintry Weather Hat 1 and Seaglass Colorway for Wintry Weather Hat 2 Knitting Needles: US #11 16-inch circular needles and US #13 for the cable cast on (Tutorial Series: The Cable Cast-on Method) Tapestry needle to weave in ends Knitting skill level: Beginner to advanced beginner (pattern is knit in the round and has cable cast on) Gauge: 2.5 stitches / 4 rows per inch in 1 x 1 rib stitch pattern with US #11 knitting needles without blocking Size: Hat 1 may fit an adult L and Hat 2 may fit an adult M (the stitch count and length can be increased or decreased to preferred size)
Advertisements
Abbreviations: K: Knit P: Purl BOR: beginning of round K2tog: Knit the two stitches on the left needle together […]: stitch pattern repeats
Advertisements
The Wintry Weather Hat Pattern (images and text for personal use only)
With US #13 knitting needles and using the Cable Cast-on method (Tutorial Series: The Cable Cast-on Method), cast on 54 stitches for Wintry Weather Hat 1 (Harvest colorway) and 50 stitches for Wintry Weather Hat 2 (Seaglass colorway)
Transfer all the stitches to US #11 16-inch circular knitting needles, place a BOR marker, join round by knitting the following:
Advertisements
Round 1: [K1, P1] repeat […] till BOR marker, slip BOR marker
Rounds 2-18: Repeat Round 1
Round 19: Purl all stitches till BOR marker, slip BOR marker
Round 20: [P1, K1] repeat […] till BOR marker, slip BOR marker
Rounds 21 – 24: Repeat Round 20
Round 25: Purl all stitches till BOR marker, slip BOR marker
Round 26: [K1, P1] repeat […] till BOR marker, slip BOR marker
Rounds 27 – 30: Repeat Round 26
Round 31: Purl all stitches till BOR marker, slip BOR marker
Round 32: [P1, K1] repeat […] till BOR marker, slip BOR marker
Rounds 33 – 36: Repeat Round 32
Round 37: Purl all stitches till BOR marker, slip BOR marker*
Round 38: Knit all stitches till BOR marker, slip BOR marker
Advertisements
Round 39 for Wintry Weather Hat 1: Knit all stitches till BOR marker, slip BOR marker Round 39 for Wintry Weather Hat 2: K2tog till BOR marker, slip BOR marker
Cut a 10 to 15 inch working yarn tail and insert into a tapestry needle and weave the tapestry needle through all the remaining stitches and pull tight to close the gap at the top of the hat.
Advertisements
Optional: Attach and secure any faux fur pom pom of choice on top of the hat
Weave in the ends, wash and block the Wintry Weather Hat
*To increase length of Wintry Weather Hat (if preferred) add the following rounds after Round 37: Repeat Rounds 26 – 30 Repeat Round 37, 38 and 39
One of the decorative cast-on methods I like to use is the Cable Cast-on method. I’ve used this cast-on method on several of my knits including The Cozy Season Shrug and The Cozy Mood Winter Hat. It gives a nice finished edge for any top down or bottom up knitted items. An advantage to this method is that you don’t need a long yarn tail to begin casting on the stitches. The cable cast-on begins with a slip knot and each additional stitch is added using an alternative to the knitted cast-on method. The written instructions and video below on how to do the cable cast-on is shown for right handed knitting.
Advertisements
The Cable Cast-on Method
Advertisements
The Cable Cast-on Steps:
Make a slip knot
Transfer the slip knot onto the left knitting needle
Insert the right knitting needle into the slip knot and bring working yarn around and in between the two needles as if to knit
Catch and pull the working yarn loop onto the right knitting needle
Transfer the new stitch loop from the right knitting needle onto the left knitting needle
Insert the right knitting needle into the space in between the bottom of first 2 stitches on the left knitting needle
Catch and pull the working yarn loop with the right knitting needle
Transfer the new stitch loop from the right knitting needle onto the left knitting needle
Repeat steps 6 – 8 till the desired number of stitch count is reached for a knitting project
It seems winter has come early this year. We’ve already had below freezing temperatures and a bit of snow. The Cozy Mood Winter Hat will be worn earlier than I thought. It is warm and cozy and knit with Lion Brand® Wool Ease® Thick and Quick yarn. The yarn is a super bulky weight so the hat can be completed in a short time.
Advertisements
The Cozy Mood Winter Hat is knit bottom up and in the round. It begins with a 1×1 ribbing in Colorway 1 yarn, followed by several rounds in the linen knit stitch pattern for the body of the hat. It’s a two round pattern with alternating Colorway 1 yarn and Colorway 2 yarn. Decreases in linen stitch pattern are made for the crown and the hat is then finished with a pom pom.
Advertisements
The Cozy Mood Winter Hat Pattern (images and text for personal use only)
Materials Needed for The Cozy Mood Winter Hat: Yarn: Lion Brand® Wool Ease® Thick and Quick yarn in the Fisherman (Colorway 1) and Hudson Bay (Colorway 2) Knitting Needles: US #10.5 for 1×1 ribbing and US #13 16-inch circular needles for the rest of the hat; US #13 knitting needles for the cable cast on Tapestry needle to weave in ends
PLEASE SUBSCRIBE FOR THE FREE PATTERN. THANK YOU
Subscribe to continue reading
Subscribe to get access to the rest of this post and other subscriber-only content.