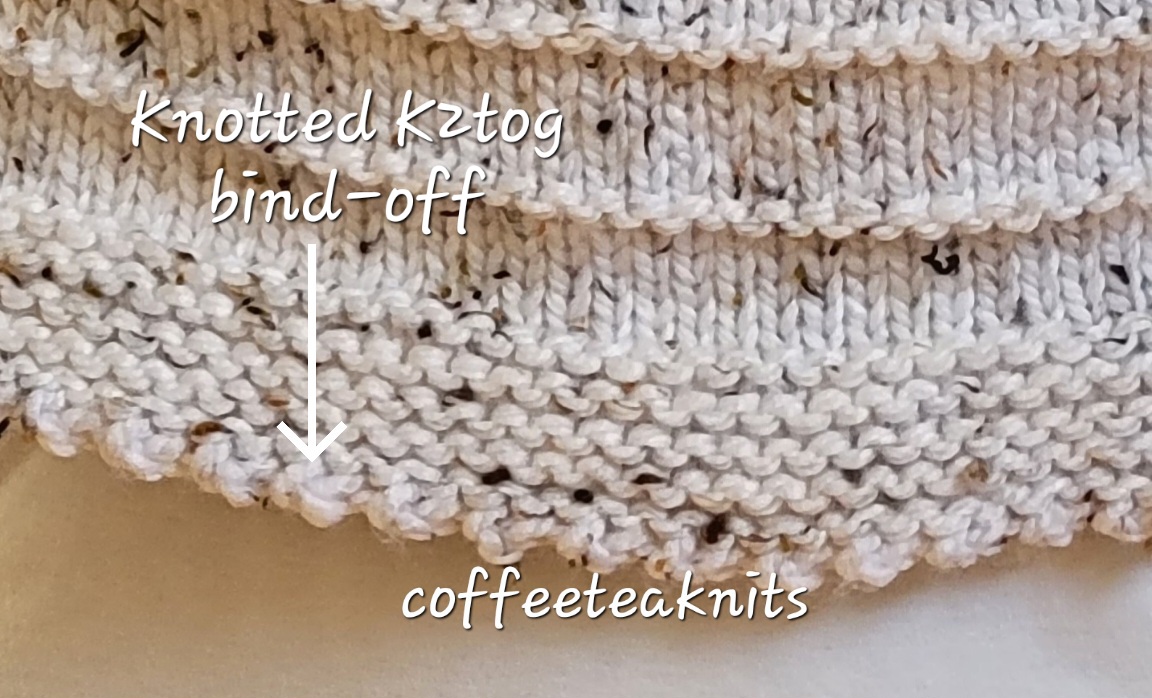
Tutorial Series: The Knotted K2tog Bind Off

A decorative bind – off method that I used in The Cozy Season Shrug is the Knotted K2tog bind – off. It gives a nicer looking finished edge for shawls, shrugs etc. that can be added to a garter stitch pattern border.

Advertisements

The written instructions and video below on how to do the knotted K2tog bind – off is shown for right handed knitting.

Advertisements

Abbreviations:

  • K: Knit
  • K2tog: Knit the two stitches on the left knitting needle together
  • wyif: with the working yarn in front

The Knotted K2tog Bind Off:

Advertisements

Knotted K2tog Bind Off: (written intructions)

  1. To begin the bind off row/round: K2, wyif slip the 2 knitted stitches on the right knitting needle back onto the left knitting needle
  2. Wrap the working yarn in front of the 2 stitches on the left knitting needle
  3. Insert the right knitting needle into the wrapped stitches on the left knitting needle and knit those 2 stitches together.
  4. Knit the next stitch on the left knitting needle. There are two stitches on the right knitting needle
  5. Pass the second stitch on the right knitting needle over the first stitch on that needle
  6. K1, wyif slip the 2 knitted stitches on the right knitting needle back onto the left knitting needle
  7. Repeat steps 2 to 5
  8. Repeat steps 6 and 7 till one stitch left in the bind off row/round
  9. Cut and pull working yarn through the last remaining stitch and weave in the end
Advertisements

~coffeeteaknits.com

Tutorial Series: Yarn Over (YO) with Knit Stitches

Yarn over (YO) is another method to increase stitches in rows or rounds. Yarn overs create holes or eyelets in knitted items and are most commonly used in lace stitch patterns. A stitch increase with a yarn over is most often followed by a stitch decrease in the same or the next row or round for most lace stitch patterns in knitting. The written instructions and videos below show how to increase a stitch with a yarn over (YO) on a knit row for right-handed knitting.

Advertisements

Abbreviations:

  • K: Knit
  • YO: yarn over
Advertisements

Yarn Over (YO) in slow motion:

Yarn Over (YO) written instructions:

  • Wrap the working yarn from back to front on the right knitting needle
  • Bring the working yarn to the back of the right hand knitting needle
  • Insert right knitting needle into the first stitch on the left knitting needle
  • Knit the first stitch on the left knitting needle to complete the yarn over
Advertisements

Yarn Over with Knit Stitches:
   The video below shows K1, YO, K2, YO, K2, YO, K2, YO, K2

Advertisements

~coffeeteaknits.com

Tutorial Series: The Cable Cast-on Method

One of the decorative cast-on methods I like to use is the Cable Cast-on method. I’ve used this cast-on method on several of my knits including The Cozy Season Shrug and The Cozy Mood Winter Hat. It gives a nice finished edge for any top down or bottom up knitted items. An advantage to this method is that you don’t need a long yarn tail to begin casting on the stitches. The cable cast-on begins with a slip knot and each additional stitch is added using an alternative to the knitted cast-on method. The written instructions and video below on how to do the cable cast-on is shown for right handed knitting.

Advertisements

The Cable Cast-on Method

Advertisements

The Cable Cast-on Steps:

  1. Make a slip knot
  2. Transfer the slip knot onto the left knitting needle
  3. Insert the right knitting needle into the slip knot and bring working yarn around and in between the two needles as if to knit
  4. Catch and pull the working yarn loop onto the right knitting needle
  5. Transfer the new stitch loop from the right knitting needle onto the left knitting needle
  6. Insert the right knitting needle into the space in between the bottom of first 2 stitches on the left knitting needle
  7. Catch and pull the working yarn loop with the right knitting needle
  8. Transfer the new stitch loop from the right knitting needle onto the left knitting needle
  9. Repeat steps 6 – 8 till the desired number of stitch count is reached for a knitting project
Advertisements

~coffeeteaknits.com

Tutorial Series: Pfb (Purl front and back)

Purl front and back (Pfb) is the method to increase stitches on the purl side in a row or round. One stitch in a row or round is added when the first stitch on the left knitting needle is purled in the front loop as well as in the back loop before sliding that stitch off the left needle. The written instructions and video below show how to increase stitches by doing a Pfb for right handed knitting.

Advertisements

Abbreviations:

  • P: purl
  • Pfb: purl front and back
Advertisements

Pfb (Purl front and back) in slow motion:

Advertisements

. Pfb (Purl front and back) written instructions:

  • With working yarn in front, insert the right knitting needle from front to back into the front loop of the first stitch on the left knitting needle
  • Bring the working yarn around and between the left and right knitting needles
  • With the right needle, catch and pull the loop made by the working yarn under the front loop of the stitch on the left needle
  • Turn the right needle towards the back loop of the same stitch on the left needle
  • Insert the right needle from back to front into the back loop of the same first stitch on the left needle
  • Bring the working yarn around and between the two needles
  • Catch and pull the new loop made by the working yarn with the right needle
  • Slide the first stitch off the left needle and secure the two new stitches on the right needle
Advertisements

P1, Pfb, P1, Pfb:

Advertisements

~coffeeteaknits.com

Tutorial Series: (Kfb) Knit front and back

One way to increase stitches in knitting is the Kfb (knit front and back) method. Increasing stitches in knitting is used to give shape to knitted items, for texture and for lace work. An extra stitch is added in a row or round when a stitch on the left knitting needle is knit both in the front loop as well as in the back loop. This tutorial includes written instructions and two videos (one in slow motion) on how to increase stitches by doing a Kfb for right handed knitting.

Advertisements

Kfb in Slow Motion:

Advertisements

Written Instructions for Kfb (Knit front and back):

  • Insert the right knitting needle into the front loop of the first stitch on the left knitting needle
  • Bring the working yarn around and between the left and right knitting needles
  • Catch and pull the loop made by the working yarn with the right needle
  • Turn the right needle towards the back loop of the same stitch on the left needle
  • Insert the right needle into the back loop of that stitch
  • Bring the working yarn around and between the two needles
  • Catch and pull the new loop made by the working yarn with the right needle
  • Slide the first stitch off the left needle and secure the two new stitches on the right needle
Advertisements

The video below shows Knit 1, KFB, Knit 1, Kfb:

Advertisements

~coffeeteaknits.com

Tutorial Series: K2tog and P2tog

One way to decrease a stitch in knitting is by doing a K2tog on the knit row/round or a P2tog on a purl row/round. K2tog stands for knit two stitches together and P2tog stands for purl two stitches together. The videos below show both ways of decreasing one stitch in right handed knitting.

Advertisements

Written Steps for K2tog:

  • Insert the right needle into the front of the second stitch on the left knitting needle and then insert it into the first stitch on the left needle
  • Wrap the working yarn around the inserted right needle
  • Pull the right knitting needle and working yarn loop into and through the 2 stitches on the left needle
  • Keep the working yarn loop (the new stitch) on the right needle and slide the 2 stitches off the left needle
Advertisements
Advertisements

Written Steps for P2tog:

  • Insert right needle front to back into the first two stitches on the left knitting needle
  • Wrap the working yarn around the right needle
  • Pull the working yarn loop on the right needle through the two stitches on the left needle and keep the loop (new stitch) on the right needle
  • Slide the first two stitches off the left needle
Advertisements
Advertisements

~coffeeteaknits.com

Tutorial Series: Purl and Un-Purl

The purl stitch in knitting looks quite different from the knit stitch. The videos below show how to make purl stitches and how to undo (un-purl) those stitches for right handed knitting.

The Purl Stitch:

  • Insert the right needle from front to back of the first stitch on the left knitting needle
  • Wrap the working yarn around the inserted right needle
  • Catch the loop made made by the working yarn (the new stitch) with the right needle
  • Slip the loop (the new stitch) onto the right needle and the first stitch off the left needle
Advertisements
Advertisements


Un-Purl (undo the Purl stitch):

  • Insert left knitting needle into the purl bump below the new stitch on the right needle
  • Catch the left side of the purl bump above the working yarn and place the loop made onto the left needle
  • Slide the new stitch on the right needle off the needle
  • Pull the working yarn (dropped stitch loop) away from the stitch on the left needle
Advertisements
Advertisements

~coffeeteaknits.com

Tutorial Series: Knit and Tink

Welcome to the first video tutorial here on Coffee Tea Knits. The knit stitch and how to tink (knit spelled backwards) or unravel that stitch is shown in the two videos below.

The Knit Stitch:

  • Insert the right knitting needle from back to front of the first stitch on the left knitting needle.
  • Take the working yarn around the top of the right needle and wrap it between the two needles on top of the first stitch
  • Catch and pick up the working yarn loop (the new stitch) with the right needle
  • Slip the first stitch off the left needle and onto the right needle for the new knit stitch
Advertisements
Advertisements

Tink (to undo or unpick the knit stitch):

  • Insert the left knitting needle into the v – shaped stitch below the first stitch on the right needle
  • Catch the left strand of the v – shaped stitch with the left needle and slip it onto the left needle
  • Pull the first stitch on the right needle off the needle
  • Pull the working yarn (loop) out of the stitch now on the left needle
Advertisements
Advertisements

~coffeeteaknits.com